Help Center - Everything You Need to Know About Surfboards
About Greenlight
Yes. Place your order online and we'll notify you when it's ready to pick up in the front hallway of our factory. Usually within 2 days of ordering (except EPS blanks - see below)
NOTE:
WE MANUFACTURE ALL ENGINEERED EPS SURFBOARD BLANKS PER ORDER ALLOWING FOR OPTIMAL CUSTOMIZATION TO MAKE SHAPING EASIER, FASTER, AND WITH LESS DUST.
DUE TO HIGH DEMAND PLEASE ALLOW UP TO 2 WEEKS BEFORE PICK UP NOTIFICATION OR SHIPPING.
The Greenlight Pick Up Area is Open 24/7 for your convenience and monitored by cameras for security.
Online orders only. You'll be notified when your order is ready to pick up.
NOTE:
WE MANUFACTURE ALL ENGINEERED EPS SURFBOARD BLANKS PER ORDER ALLOWING FOR OPTIMAL CUSTOMIZATION TO MAKE SHAPING EASIER, FASTER, AND WITH LESS DUST.
DUE TO HIGH DEMAND PLEASE ALLOW 3 WEEKS BEFORE PICK UP NOTIFICATION OR SHIPPING.
Online orders only, we do not have a retail store. We'll notify you via email when your order is ready to pick up.
NOTE:
WE MANUFACTURE ALL ENGINEERED EPS SURFBOARD BLANKS PER ORDER ALLOWING FOR OPTIMAL CUSTOMIZATION TO MAKE SHAPING EASIER, FASTER, AND WITH LESS DUST.
DUE TO HIGH DEMAND PLEASE ALLOW 2 WEEKS BEFORE PICK UP NOTIFICATION OR SHIPPING.
| Our pricing structure is set up to offer discount pricing to both manufacturers and individuals. You don't need a business license or tax ID # to save money when buying from Greenlight. Reduced pricing is based on quantity discounts on the following items.
|
Most pickups are available within 2 days of ordering, EPS blanks are 3 weeks... We'll notify you when it's ready
NOTE:
WE MANUFACTURE ALL ENGINEERED EPS SURFBOARD BLANKS PER ORDER ALLOWING FOR OPTIMAL CUSTOMIZATION TO MAKE SHAPING EASIER, FASTER, AND WITH LESS DUST.
DUE TO HIGH DEMAND PLEASE ALLOW 3 WEEKS BEFORE PICK UP NOTIFICATION OR SHIPPING.
Let us know what you need ASAP and we'll hold your order to include it. We will send a secure payment link for you to purchase and we'll ship it all out.
There is a $2.50 administrative order change charge.
We do our absolute best to ship your within 2 days depending on time of order. If ordering blanks it takes a few weeks to manufacture them and we work each shipment in the order we receive them.
You will receive a tracking number email when your order ships. Check your spam folder if you did not see it.
You can also log into your online account and view the status of your order.
Email us at info@greenlightsurfsupply.com and we'll reset your account and send a link to login
We didn't receive any orders so you were not charged, out payment gateway declined the card for address or zip code discrepancy. Your bank marked your attempts as "pending" and hold it for 2-3 days.
More info on why you see it as a charge here:
The merchant is telling you the transaction was declined, and your bank is telling you it has been approved. Yes, your bank approved the transaction but the merchant's payment gateway declined the transaction so the entire transaction was declined even though your bank approved it. Merchant's payment gateway may have security settings which may have triggered a decline such as address and zip code verification. It is the way how the banks operate, so it's not your fault nor merchant's fault. The merchant cannot remove the charge since it was never approved, so please do NOT ask merchant to remove this charge. The charge will be on "pending" state, and the money will never be taken out of your credit card account but the reserve will be put aside so it will reduce your credit limit until the transaction clears on it's own within 2-5 business days. The bank will say "ask the merchant to call in to cancel this transaction", but a merchant CANNOT call in on your behalf as the credit card companies will not share account information with non-account holders such as a merchant.
To understand why this is happening, you'll have to understand how credit card transactions are processed. For full explanation, please read the Credit Card Processing Diagram with explanation below.
1. When a buyer commits an order, the credit card transaction goes to the payment gateway provider such as Authorize.Net and forwards the transaction to Merchant Bank's Processor.
2. The information is then sent to your bank ("issuing bank"), and your bank will either approve or decline the transaction based on customer's available funds. If transaction is declined by your bank, the transaction stops and there is NO problem. The customer's bank account will show transaction declined and so does the merchant's processor so there is no reason to argue with the merchant or bank.
3. If the transaction is approved by your bank, now the transaction is once again go through a security check by the payment gateway company with billing information sent by the issuing bank. If customer entered address, zip code and card code do not match with the credit card billing information provided by the issuing bank, the payment gateway may decline the transaction based upon merchant's fraud security settings. This is the reason why your bank says it's approved, and your merchant says declined -- and, they are both right!! Your bank approved the transaction, but the payment processor declined the transaction.
To conclude, the net result of transaction status is a failure as the payment processor declined the transaction even though your bank approved it. This transaction will NOT show up on your credit card statement as it is declined by the payment processor. To your bank, they'll see this transaction as approved and will temporarily hold ("reserve") this money until the payment processor claims the money (which will never happen as it is a declined transaction), or a specific time elapses with no action from the payment processor which then releases the reserve. The time it will take to release the fund varies from banks to banks, and it could take anywhere from 2-7 business days.
The reason for multiple "approved" transactions on your bank account may be due to multiple attempts on your part to submit the order when the payment processor declined the previous transaction.
Why would payment gateway company scan a security check and decline the transaction when the issuing bank already approved the transaction? Credit card fraud is one of the fastest growing crimes as more and more people are buying products and services online. When fraud occurs, the banks get their money back from the merchant and the customers get their money back from the banks (with a bit of hassle). It is the merchant who will lose money on fraudulent transactions. To protect merchants and buyers, payment gateway providers implemented additional security check to prevent "possible" fraud.
Note: You may reproduce and distribute contents of this article provided that you give a full credit to the author ("Scott Seong"), and provide a backlink to this page from your webpage. The content shown below is borrowed from Authorize.Net, and we do not have an authority to grant permission to redistribute it's content.
Credit Card Transaction Workflow Diagram
Source: Authorize.Net

1. The merchant submits a credit card transaction to the Authorize.Net Payment Gateway on behalf of a customer via secure Web site connection, retail store, MOTO center or wireless device.
2. Authorize.Net receives the secure transaction information and passes it via a secure connection to the Merchant Bank's Processor.
3. The Merchant Bank's Processor submits the transaction to the Credit Card Network (a system of financial entities that communicate to manage the processing, clearing, and settlement of credit card transactions).
4. The Credit Card Network routes the transaction to the Customer's Credit Card Issuing Bank.
5. The Customer's Credit Card Issuing Bank approves or declines the transaction based on the customer's available funds and passes the transaction results back to the Credit Card Network.
6. The Credit Card Network relays the transaction results to the Merchant Bank's Processor.
7. The Merchant Bank's Processor relays the transaction results to Authorize.Net.
8. Authorize.Net stores the transaction results and sends them to the customer and/or the merchant. This step completes the authorization process – all in about three seconds or less!
9. The Customer's Credit Card Issuing Bank sends the appropriate funds for the transaction to the Credit Card Network, which passes the funds to the Merchant's Bank. The bank then deposits the funds into the merchant's bank account. This step is known as the settlement process and typically the transaction funds are deposited into your primary bank account within two to four business days.
Why is my credit card zip or postal code not matching?
When your payment fails due to an incorrect zip or postal code, this means your bank told us your security code matched, but not your zip or postal code. To protect both you and us, we decline non-matching transactions to fight fraud.
How we process payments
- We send a charge request to your bank for approval
Your bank may both approve the transaction and tell us something didn't match -- in this case, they specified that only the security code matched, but not the zip/postal code
- To protect you against fraud, if either the zip/postal code or security code don't match, we reject the transaction
- For some banks, this can leave a temporary pending (but unsettled) charge on your account. It will fall off your card shortly, usually within 24-48 hours.
To get to the bottom of this, you need to find out why your bank is telling us that the information we are submitting with your payment does not match what they have on file for you. When you call your bank, they may initially tell you "we approved that charge". You have to be more specific with call center staff and ask "Why did the AVS not match? What zip code did you receive and what do you have on file for my account?"
| Yes! We ship to
all corners of the world with USPS. Our webstore automatically calculates
international shipping costs based on the weight of your
package. At this time we cannot resins, resin additives,
or surfboard blanks and kits to international
addresses. |
Please read our blank shipping information page. You can order blanks online and the shipping options will appear in the checkout for domestic US addresses. |
| Yes, we can ship blanks and resin within North America no problem. The costs of shipping blanks and resins internationally (overseas) is extremely high. If you want to purchase larger volumes of product it becomes affordable on a container but small shipments are usually at least 5 times the cost of the product. Please contact us if you have large volume requests. We have customers in the Caribbean, Puerto Rico, Peru, Chile, Costa Rica, and the UK who we ship larger quantities of blanks and resin to. |
| Click HERE for our blank shipping info and costs. We can fit up to 4 blanks per box if you would like to lower your shipping cost per blank, and can ship 3 full boxes of blanks (12 blanks) for the same cost as shipping a single blank. |
| That's
correct Greenlight's unglued EPS blanks 6'6" and under ship UPS Ground to your door. Shipping costs are calculated in the webstore's cart and based on your location. Please visit our SHIPPING INFO page for detailed costs on blank shipping |
All orders are shipped as quickly as possible. Some are same day, most are next day unless it is a blank order which we manufacture per order. Blanks ship out in about 3-4 days depending on the quantity you've ordered. We use USPS and UPS depending on best rate for your shipment. East coast addresses usually receive their shipments in 3-5 business days. Middle states 4-6 business days. West Coast 5-7 business days. Canadian customers expect 5-10 days as the shipment must go through customs office. All other international customers expect 21 days to receive your order. You will be emailed a tracking number for your order. Please check your spam folder if you do not receive it. Please do not email us asking where you order is. The tracking number has the answer. If you do not receive your package in the estimated times stated above, please email us the tracking number and we will take care of it. |
Please visit our SHIPPING INFO page for detailed costs on blank shipping
You can order blanks online and the shipping options will appear in the checkout for domestic US addresses. |
Absolutely. Please select "pickup at shop" in the checkout For stock PU Blanks (US BLANKS and ARCTIC) they are ready to pick up immediately. Engineered EPS Blanks are made to order and we'll email you when the blanks are ready. It's usually 4-5 days to get to your blank order. |
Yes. We can ship all products including Blanks and Resins to Canada. Shipping rates are calculated in the store's checkout. MORE INFO ON OUR SHIPPING PAGE We also have options ship to a freight warehouses on the US border for you to pick up. It is much less expensive to ship there as opposed to over the border. If shipping blanks please email us for a shipping quote as we work with several cross-border freight companies to find the best price for you.You are responsible for Duty and brokerage fees for the shipment. We recommend contacting one of the freight brokers below to clear your shipment through customs: http://www.shipnorthamerica.com/htmfiles/brokerage.htm |
1. We can ship to one of the following freight centers on the US border for you to pick up and drive back over the border. There is a small warehouse fee for these freight centers. You clear through customs at the border. This saves a lot of shipping cost for you as the freight companies almost double the fees to get your products across the border and deliver to you.
NEW SEPT 2017! Have your blanks shipped to a warehouse with the KinekPoint Service! Dozens of warehouses on the US border we can ship to.
Freeport Forwarding - Champlain, NY (Approx 1 hour from downtown Montreal)
Bee Line Logistics - Champlain, NY
Pinnacle Parcels - Richford, VT
Shiretown Package and Receiving - Houlton, ME
CBI - Niagra, NY
Absolutely, you can pick a kit up at our shop in Manasquan. Please select "pickup at shop" and allow us to email you when the blanks are ready as we manufacture them onsite per order. Might take up to 2 weeks depending on how busy we are.
| We cannot hold blanks without payment. Please order the blank online and select 'pickup at shop' for the shipping option to make sure you get it. |
We are an independent distributor for US Blanks but offer a
different and faster service than Florida actually. |
All orders are online.
If you are purchasing an EPS blank we fabricate them per order and please allow up to 2 weeks to pick up. We'll email you when it's ready.
US Blanks are stock items you can order online and select "pick up at shop". We will notify you when they are out in the pick up area.
Shipping costs, both domestic and international are automatically calculated by the webstore based on total weight of the order and your location. Shipping costs for blanks is a little more involved. Click here for more info on blank shipping costs. Keep in mind we can ship your fiberglass, resins, fins, tools, etc with the blanks in the same box for no additional cost
Please visit our SHIPPING INFO page for detailed costs on blank shipping
Returns & ExchangesOur policy lasts 10 days. If 10 days have gone by since you received your purchase, unfortunately we can’t offer you a refund or exchange.To be eligible for a return, your item must be unused and in the same condition that you received it. It must also be in the original packaging. There is a 15% restocking charge for returned items.Non-returnable items:Gift cardsDownloaded / Digital productsTo complete your return, we require a receipt or proof of purchase and an RMA # (Return Merchandise Number) to be written on the outside of the return shipping box. Please contact us before sending the item back for your RMA#.Please do not send your purchase back to the manufacturer.There are certain situations where only partial refunds are granted (if applicable):1. Any item not in its original condition, is damaged or missing parts for reasons not due to our error2. Any item that is returned more than 10 days after deliveryRefunds (if applicable)Once your return is received and inspected, we will send you an email to notify you that we have received your returned item. We will also notify you of the approval or rejection of your refund.If you are approved, then your refund will be processed, and a credit will automatically be applied to your credit card or original method of payment, within a certain amount of days.Late or missing refunds (if applicable)If you haven’t received a refund yet, first check your bank account again.Then contact your credit card company, it may take some time before your refund is officially posted.Next contact your bank. There is often some processing time before a refund is posted.If you’ve done all of this and you still have not received your refund yet, please contact us at info@greenlightsurfsupply.com.sale items (if applicable)Only regular priced items may be refunded, unfortunately sale items cannot be refunded.Exchanges (if applicable)We only replace items if they are defective or damaged*. If you need to exchange it for the same item, send us an email at info@greenlightsurfsupply.com and send your item to:Greenlight Surf Supply187 Parker AveManasquan New Jersey US 08736
*Damage to items from improper use, storage, abuse or user error is not eligible for exchange.GiftsIf the item was marked as a gift when purchased and shipped directly to you, you’ll receive a gift credit for the value of your return. Once the returned item is received, a gift certificate will be mailed to you.If the item wasn’t marked as a gift when purchased, or the gift giver had the order shipped to themselves to give to you later, we will send a refund to the gift giver and he will find out about your return.ShippingTo return your product, you should mail your product to:Greenlight Surf Supply187 Parker AveManasquan New Jersey US 08736You will be responsible for paying for your own shipping costs for returning your item. Shipping costs are non-refundable.If you are shipping an item over $75, you should consider using a trackable shipping service or purchasing shipping insurance. We don’t guarantee that we will receive your returned item.
We can ship EPS foam blanks in half for less than the blank glued up. We also ship Polyurethane foam blanks glued up but it costs more.
If you want to order an EPS foam blank the Canada shipping cost will be available in the webstore's checkout.
Stringer is included with the blank, the glue is separate and can be purchased HERE.
Unfortunately the shipping companies do not just weigh the order. They've devised what's called Dimensional Weight = (Length X Width X Height)/194. The large dimensions of the blanks (even shortboards) make the weight look like 100+lbs and therefore expensive to ship. They have to be moved on a tractor trailer and are called "freight".
We work with multiple freight companies to negotiate the lowest possible shipping costs possible for you on every surfboard blank order.
But Greenlight has developed a way to ship Engineered EPS Surfboard Blanks under 6'6" to your door with UPS Ground for about 60% less cost than a freight truck. We ship the blank to you unglued to make the package smaller. Our EPS blanks have flat edges so glue up is really easy with clamps or even just stack the pieces vertically on the floor and apply pressure while the glue dries.
You will be emailed a tracking number for your order. Please check your spam folder if you do not receive it. Please do not email us asking where you order is. The tracking number has the answer. All orders are shipped as quickly as possible. Some are same day, most are next day unless it is a blank order which we manufacture per order. Blanks ship out in about 3-4 days depending on the quantity you've ordered. We use USPS and UPS depending on best rate for your shipment. East coast addresses usually receive their shipments in 3-5 business days. Middle states 4-6 business days. West Coast 5-7 business days. Canadian customers expect 5-10 days as the shipment must go through customs office. All other international customers expect 21 days to receive your order. If you do not receive your package in the estimated times stated above, please email us the tracking number and we will take care of it. |
Sure, I recommend getting our shaping tool kit and our beginner glassing kit with epoxy (we can usually get epoxy through customs).
Yes, but we do not ship blanks or resin to Europe at this time, too cost prohibitive. We do ship small items like tools and materials to Europe daily though.
Yes, we ship to most international countries. We
can ship anything but blanks and resin to international
addresses. International
shipping rates are calculated in the store's checkout. Just make a shopping
cart and enter your address. Local customs charges may
apply. All packages are sent via United States Postal
Service (USPS). Orders may be subject to import duties and taxes, which are levied
once your package reaches
your country. Greenlightsurfsupply.com does not collect import duties and
taxes and cannot predict
these particular charges. These duties and taxes are not included with the
freight calculation and are
the responsibility of the customer. For information regarding your
country's customs policies, please contact
your local customs office. |
| We can ship anything but blanks and resin to Mexico. International shipping rates are calculated in the store's checkout. |
Yes, we ship to Britain. Pounds are
automatically converted to USD when your credit card is processed in the
webstore. No problem. Shipping costs are calculated in the store's
checkout based on weight of products. Please note we cannot ship resins or blanks
internationally. |
Yes we ship to FPO/APO addresses. Our webstore will not recognize an FPO address so please let us know what you'd like to purchase and we'll send you a secure payment link. No problem.
Very expensive to ship blanks overseas. You have to buy a lot of blank to make it worth the shipping costs
Yes, we certainly do ship to AU all the time. International shipping costs are calculated in the webstore's checkout based on total weight of the order.
Shipping the blanks across the country to BC is about $400. The total weight of the order will determine the exact cost. When shipping blanks its always better to get more because they don't weigh much and the shipping costs do not increase much with multiple blanks.
Here is a link to the Canada Duty Calculator
Some shipments such as blanks will require a customs broker to clear your produts across the border.
Here are a few brokers to contact for info:
http://www.shipnorthamerica.com/htmfiles/brokerage.htm
http://www.aacb.com/
http://www.pcb.ca/
Small shipments with USPS do not require a broker.
SURFBOARD BUILDING QUESTIONS
Our beginner surfboard shaping kits include everything you need to get started shaping boards at home by hand. All the materials, tools, instructions, safety equipment, and support. All you need extra is wood and screws to build your shaping racks. We even give you padding for the shaping racks you build and a free outline template of your choice from our Template Library.
The only thing not included is the fin boxes and fin install supplies since that is a personal preference and usually depends on what type of fins you currently own.
The beginner kits come with an Engineered EPS blank and epoxy resin so you can build a stronger board that will last (most people keep their first shape as a memory of the fun) and it's much less toxic and smelly than glassing with polyester resin so you can do it in your garage or basement without stinking the whole house up!
We ship the beginner kits to your door with UPS to reduce the shipping costs.. you will glue the blank halves and stringer together in a simple process. Here's a video of how to glue your blank to save about $100 in shipping costs!
Yes. We have a longboard shaping kit.
Contact us for shipping quote.
For a first timer, the least expensive fin system to install is FCS X-2 Plugs, [2 plugs per fin... for a tri fin you'll order 4 RAIL plugs and 2 CENTER Plugs, if you're making a quad fin order 8 RAIL plugs as the RAIL Plugs have a fin cant angle molded in] FCS X-2 Plugs only require a normal power drill, X-2 Holesaw bit. and quick set jigs.
Here's how to install the X-2 plugs and a diagram of standard fin placements:
The things that we would suggest to make this an easy install are the FCS dummy install jigs and a g square or versasquare for laying out fin placements. The quick set jigs are an easy one time use product and the g square or versasquare is a tool you will use forever in your board building...
NOTE: For EPS boards use Resin Research Quick Kick Epoxy to reduce exotherm and prevent melting the foam. See Step 4.
1. FCS X-2 and FACTORY plugs are installed after the hotcoat. After installation and the resin has cured, you sand them down flush with the board while sanding the bottom.
2. Once you have the quickset jigs laid out on the board (lined up with your shapers dots) you will use a FCS Hole Saw bit to make your holes for the plugs. Drill the hole 5'8" deep and pull the foam out with needle nose plyers or dig out with a flathead screw driver.
3. We suggest using either FCS dummy jigs or a set of fins to set the plugs with the correct spacing as well as adjust the fin cant angle. Lightly screw the plugs onto the dummy jig tabs. If using fin keep the plugs loose on the fin tabs so you can push them down to where the "nubs" on the plugs touch the hotcoat.
4. Polyester boards: Mix 1 oz of resin per plug. (6 oz total for a tri-fin, 8 oz total for a quad).
EPS boards: Use Resin Research Quick Kick resin. In temperatures hotter than 80 degrees F, mix 1/2 oz per plug. You will fill the plug hole twice to reduce exotherm and prevent melting the foam.
5. Polyester Board: Pour about 1/3 oz of mixed resin into the holes.
EPS Board: Pour about 1/2 oz mixed resin into the holes.
6. Place the plugs in the holes with the dummy jig or fins to ensure proper alignment. Set the fin cant to the desired angle and hold in place with tape. Here is an illustration of taping the fins in place (these are glass ons but same taping methods apply to FCS fin plugs)
7. Polyester Boards: Using a small cup (dixie cups work great) carefully pour resin around the perimeter of the plug so it runs into the drilled hole. Be careful not to over fill! Fill just under the lip of the plug and jig.
EPS Boards: In temps above 80 degrees F, let the first pour cure for about 2 hours then mix another 1/2 oz Quik Kick resin per plug an top off.
Once the resin cures remove the jigs and sand the plugs down until they are flush with the board.
______________________________
Three other fin box options that are installed before fiberglassing your board are:
We also have FCS Fusion fin plugs which require a Fusion Install kit and trim router.
Another option is the new FCS II fin system which require a FCS II Install kit and trim router.
or
Futures Fin system which requires a Futures intstall kit with router
Our Surfboard Shaping Starter Kit includes all the materials, tools, and instruction needed to build a surfboard. Only thing needed to purchase is a leash and fins from a surf shop when complete.
Also your daughter will need to build shaping racks from wood and fiberglassing racks from wood, buckets and a bag of cement or sand. The total cost for those materials from Home Depot is about $30
The logo rice paper can be printed on with an inkjet printer, or drawn on with posca pens, acrylic paint, or india inks. Do not use sharpie markers as they will bleed when wet out with resin.
It is best to put the logo paper directly on the foam on the bottom of the board, and in between the two layers of fiberglass on the deck to protect it from sanding. You can also put it on top of a cured lamination and put a small piece of fiberglass over it. We use 1.5 oz fiberglass for this. It is common for board builders to laminate the board with a dark color pigment then put the logos on top of it with the 1.5 oz fiberglass cloth protecting the logos.
Consistent High Quality
Greenlight has teamed up with a major plastics manufacturer to design the optimal bead and compression process for EPS surfboards to improve surfboard strength, flex, practical weight, and shapability. We've even engineered the rocker and foils in our blank selection to yield any board you can imagine with the least amount of effort by hand or machine.
Our engineered EPS Blanks can also be customized to any thickness for a super close tolerance blank that requires very little shaping without the expense of paying for a machine shape.
Greenlight's Engineered EPS Blanks Advantages:
- Reduced Bead Tear out
- when Shaping by Hand
- or Machine
- Low Resin Absorption
- Calculated Rocker and Foil Designs
- Completely Customizable
- Quick Turn Around Time
Surfboard are made from (and we sell) two types of foam blanks.
1. EPS Blanks - EPS stands for Expanded Polystyrene. EPS foam is lighter and stronger than Polyurethane foam blanks. It consists of small beads of polystyrene expanded with steam and fused together under high pressures. Greenlight's EPS blanks are engineered with a special bead formula for the optimal strength, flex, and shape-ability of the blank. There is a growing demand for EPS surfboards in the world due to its superior strength to weight ratio.
The EPS blanks are rectangular in shape supplied with a rocker and foil. You can create any outline shape you want with EPS blanks.
Greenlight is a huge proponent of EPS surfboards and has been developing, manufacturing and selling EPS blanks for over 10 years.
NOTE: EPS foam must be glassed with EPOXY resin! Polyester resin will melt the foam!
2. PU Blanks - PU stands for Polyurethane. It has been the standard surfboard core for over 50 years. PU blanks can be glassed with either polyester resin or epoxy resin (epoxy becoming more popular due to its superior strength). PU blanks are molded in the general shape a surfboard to reduce the amount of excess foam. Your surfboard shape outline still must be drawn on the blank and cut out.
EPS stands for Expanded Polystyrene. EPS foam is
lighter and stronger than Polyurethane foam blanks.
It is also recyclable.
There is a growing demand for EPS surfboards in the world due to
its superior strength to weight
ratio. Greenlight is a huge proponent of EPS surfboards and has
been developing, making and selling
EPS blanks for over 10
years. We have engineered our own EPS foam that is the only EPS foam specifically designed for surfboards on the market. NOTE: EPS foam must be glassed with EPOXY
resin! Polyester resin
will melt the foam! |
We manufacture all EPS blanks here at the shop and can cut up to 12' long. Please email info@greenlightsurfsupply.com with your blank dimensions and stringer option and we'll give you a quote.
We can also take a AKU Shaper, Shape3D file or .dxf file you design and cut directly from that.
PU stands for Polyurethane. It has been the
standard surfboard core for over 50 years. PU blanks can
be glassed with either
polyester resin or epoxy resin (epoxy becoming more popular due to its
superior strength). |
We order customs blanks for our customers all the time. Price depends on the blank size and stringer configuration you want. Please email info@greenlightsurfsupply.com for a quote.
US Blanks have a general surfboard rocker and outline. You will need to cut an outline with all blanks that we sell. When selecting a US Blank you should try to find a blank that fits the dimensions of the board you are trying to shape. US blanks are a close tolerance blank which mean that the outer part of the blank is the strongest foam and as you get closer to the center the foam will get softer, which makes blank selection critical to the strength of your surfboard.EPS blanks are uniform density throughout so you can get one a bit thicker than your finished board dimensions and shape away. EPS blanks are hotwire cut from a block of foam and have a rectangular outline which allows you the freedom of any outline you choose to cut. |
Sure, we'll split your EPS blank no problem. Just put a note in the order to split the blank.
You can glue it up with a stringer or as a stringerless with Gorilla glueOur Engineered Expanded Polystyrene (EPS) is available in our Engineered 2# cubic foot density. Other densities (1#, 1.5#) available upon request.
US Blanks - we stock BLUE density (medium). Lighter and Heavier desities (red, green, brown) available as a custom blank upon request.
| We use those letters to differentiate shapes of the same length. If you would like to let us know what you are interested in shaping we can help steer you in the right direction. |
| Yes, you will need to draw a template on the board and cut it out to get your desired shape. We offer a selection of printable templates on our site if you are looking to get a pre made template. |
| Our EPS blanks all have square noses and tails so you can make any shape you want. |
Your son should get an "Up to 6'6"
Fish, Egg, or Shortboard' or "Up to 6'4" Shortboard" beginner
shaping kit. It depends on the type of board your son wants to
shape... our 6'6" long kit is designed with extra foam in the surfboard
blank to get the feel of shaping without ruining your
efforts. We can ship the kit to
your door or
you can pick up at our shop if you'd like. |
You could use another longboard blank and 'flip" it so the nose rocker would be used for the tail (as long as your outline template fits in the nose area [which would be the tail of the blank when you flip it]) Some guys flip the US Blanks 98Y for nose rider designs.
Or we can custom order you a blank to whatever rocker you want. No problem.
For the 9'2" go with the US Blanks 93Y or
94B depending on the rocker you want to get. I'm not familiar with the Gold
Standard rocker but my guess
would be the 93Y. US Blanks 84SP for the funshape and either a US
Blanks 510RP or 6'2A for the mini simmons depending on your preference of
nose rocker (510 more, 62A less..) 2 layers 6 oz deck / 1 layer 6 oz bottom for the
longboard... or if you wanted to keep it lighter for your girl to carry
you can do a 6/4
deck. |
| US Blanks have a general surfboard rocker and outline. You will need to cut an outline with all blanks that we sell. When selecting a US Blank you should try to find a blank that fits the dimensions of the board you are trying to shape. US blanks are a close tolerance blank which mean that the outer part of the blank is the strongest foam and as you get closer to the center the foam will get softer, which makes blank selection critical to the strength of your surfboard. |
All our blanks available are listed on our website. Here's a link to the blank page. We manufacture EPS blanks per order so please give us a few days before picking up.We carry US Blanks, Common Surf Foam, and cut EPS in 2.0#, 1.5#, and 1# densities. Quantity discount pricing is shown on each blank page. You can order online and we'll have them ready for you to pickup. Feel free to contact us anytime if you have a question |
US Blanks and Common Surf Foam are PU blanks (polyurethane foam)
It has been the standard surfboard core for over 50 years. PU blanks can be glassed with either polyester resin or epoxy resin (epoxy becoming more popular due to its superior strength).
EPS stands for Expanded Polystyrene. EPS foam is lighter and stronger than Polyurethane foam blanks. It consists of small beads of polystyrene expanded with steam and fused together under high pressures. Greenlight's EPS blanks are engineered with a special SWELLBEAD formula for the optimal strength, flex, and shape-ability of the blank. There is a growing demand for EPS surfboards in the world due to its superior strength to weight ratio.
Greenlight is a huge proponent of EPS surfboards and has been developing, manufacturing and selling EPS blanks for over 20 years.
NOTE: EPS foam must be glassed with EPOXY resin! Polyester resin will melt the foam!
Please see our Shipping Info Page for different blank shipping costs.
Here's a link to the blank glue up instructional video: https://youtu.be/
The video can also be found on each EPS blank product page
Yes we have foam cutting files for various skimboard sizes. We can provide you an EPS foam blank any length in 2# density. Please contact us for a quote.
Yes, we have wakesurf board blanks and complete wakesurf board building kits available.
Please click here for our WakeSurf Board Building Section
Don’t believe all the hype, EPS is great to shape. A good deal of our customers prefer to shape their boards with it. We all use just a regular planer and do not switch out the blades. We would recommend our Pro Tool series as they were designed to take down foam fast and efficiently, especially EPS beads.
We use AKU Shaper .brd files, Shape3D .3dx files, or Autocad .dxf files. But you can send a pdf and we can trace it. Or just rocker numbers and we'll create the file for you. No problem.
Cost depends on length, foam density, and stringer material. Send a file over and we can quote it.
Venting an EPS board is like an "insurance policy" to prevent delamination. EPS boards contain very small air pockets between the foam beads which expand and contract with changing temperatures. If a board is dinged while surfing and water gets in, additional heat (leaving your board on the beach or in a hot car) will cause the water to change phase in to steam and exert pressure on the fiberglass skin - pushing the glass away from the foam (delamination).
It's up you to if you want to install a vented leash plug in your EPS board but we developed the VXVs because so many personal boards were having issues when not vented. Since installing VXVs in boards there has not been a single delam due to water expansion in a board in years.
*It is highly recommended to install vented leash plugs in stand up paddle boards due to the large volume of foam that will expand and contract more in varying temperatures. All the major SUP manufacturers vent their boards with either a vented leash plug or a deck vent.
It is popular to "Flip" a stock blank to increase the tail rocker and lessen the nose rocker. This is also called Reverse Rocker.
A lot of guys just template the board with the at the tail of the blank if the outline fits.
We can easily build you a reverse rocker blank in any size if your outline templates don't fit on a stock blank that is flipped.
EPS blanks do not need to be sealed but sealing helps to use less resin and also provides a bright white uniform surface if you are doing color or artwork on the board.
You can simply squeegee lightweight spackle on the board (mixed with bottled water to a mayonaise consistency) in a thin later to fill the small holes between the beads, or mix up a paste of epoxy and Q-cell and squeegee that on (makes a stronger board).
There is also the option of finish sanding the board to 320 grit sanding screen to close up the cavities between the foam beads.
The glue up simply holds the blank together so you can shape it. An uneven glue up will just be a little more shaping to level everything out. Glassing the board provides all the strength and the glue is not really a factor in the board.
If you have space between the foam and stringer you can squeeze more glue in. It will expand to fill the gap and is shapeable.
Our Engineered EPS foam does not require sealing. We recommend screening your final shape with 150 grit sanding screen to tighen up the bead structure for less resin absorption into the foam.
Sealing with lightweight spackle is highly recommended when glassing resin tint laminations or if you are painting the blank to give the blank a flatter surface for uniform color (no darker pools of resin)
The answer to your question is covered in detail on the first page of our Surfboard Building Guide. Please read through the guide to understand the entire process and you'll be confident in starting to shape your own boards.
Our new foam is a consistent density throughout the blank and designed with a special mix of EPS beads that have high energy bond strength that reduces tear out and resin absorption. We could call it super duper fused but it's just marketing words. I've shaped "superfused" blanks that chunks of the rail blew off with one pass of the surform...
The blank rocker and foils are also special since we took a lot of time studying current modern rockers and designed the series of blanks to easily fit just about any board possible.
You can use epoxy resin but we recommend using Expanding Stringer Glue as it cures fast and is easy to sand.
Tear out is nothing to "worry" about. It is part of the process of shaping EPS. Our foam is the tightest bead bond in the industry but you will still get some beads that pull out. The idea of shaping EPS to to rip into it with the most aggressive tools to remove the foam them go over it with finer grits of sandpaper or sanding screen to close the small bead voids up.
If you are painting or doing a resin tint it is advised to apply a thin coat of lightweight spackle on the board to make it a clean, bright white surface to have even color.
A clear glass job or opaque pigmented resin lamination does not require spackling.
No big deal. If you have more Stringer Glue left just squeeze it in the void and it will expand. It's foam too and easily shapeable. If it looks weird you can put a logo over the area, paint the board, or do a pigmented lamination to cover it.
You can design a file from free design programs like AKU Shaper or Shape3D software and upload it when you order a custom cut close tolerance EPS surfboard blank.
You can just email the specs of your blanks, length, thickness, nose and tail rockers and we'll draw it for you.
Or you can send a file from free design programs like AKU Shaper or Shape3D software and we can work with that.
When the glue is fully cured you'll be able to peel it off your skin. Maybe rub some sandpaper or file on it to break it up. We're peeling glue off body parts all the time here
Your stringer choice really depends on performance and style. 1/8" basswood stringers have been standard for decades and work really well. Our new HD foam stringers give the board more "pop" out of turns and are just as strong as the 1/8" basswood. The HD foam stringers also give you a choice of color and can be shaped with the same tools as used on the foam. No wood tools needed.
In the end, the snap resistance of a board really depends on the amount of fiberglass you put on the board. An all 4 oz glass board is much more susceptibe to breaking than a board with a mix of 6 oz and 4 oz glass or an all 6 oz glassed board (longboards or old school fish).
The gap is no issue for strength of the board, the fiberglass shell is 90% of the strength after glassed. To make it look good you can squirt more glue into the gap and let it expand. If you have clamps then use them to pull the foam to the stringer and it will be 100% glued correctly.
If you're doing a clear, white board or pigmented lamination no need to seal. You can leave the finish at around 80 grit and glass, or tighten up the beads with higer grits up to 220, although there is no real benefit going past 80 grit.
If painting or tinting the resin you can seal the blank with EPS Sealing Paste to close the voids in the foam and provide a clean, bright white canvas do you your artwork on.
Please take a look at the 'MAKING TEMPLATES' Section of our Surfboard Building Guide for a complete explanation of the different methods of making templates.
The template letters next to the length are just to identify different templates of the same length.
The best noserider template we offer in my opinion is the 9'6W as it is designed with a wider nose and square tail for nose riding. The other templates are more high performance or cruiser designs.
Sorry we don't make custom templates. Please refer to our Surfboard Shaping Guide for different methods of making your own templates.
The stock templates we have are all HERE on the site. They are starting points for your shape. You can make a single fin from any of them or modify the template to what you feel looks right.
| Read our Surfboard Building Guide A-Z. Making templates if covered in the writeup. |
If your board is over 8'
long and you need to make a two-sided 'spin' or 'flip' template, you
simply draw the nose half of the board on one side of the template, and the
tail half of the board on the other side. Just make sure that you mark stringer points on both ends and top/bottom of the template to mark the
point where you will place the template down on the stringer when you trace
your outline on the surfboard blank. |
There are no standard dimensions for a surfboard
rocker (the stringer) since it all depends on the waves you surf and how you
want the board to
perform. Stock
surfboard blanks have proven rockers that are a great starting point and
maybe a little adjustment is needed while shaping to get the desired rocker
you want to
surf. Typically, if
you are making your own stringer, you simply trace the blank foam outline on
a piece of wood and cut out to match. Then glue it all
together. If
you want some dimensions to start you can copy the rocker on
our 6'3
Fish blank |
The 12'6" SUP outline template has parallel rails through the middle of the board so you can take out sections of the middle to reduce the length without changing the overall shape. No need to specify the length you want when ordering.
To make the board wider you simply move the template away from the stringer and draw curves on the blank to extend the outline to the stringer. You can do it free hand, make your own paper template for the extensions, or bend a flexible piece of wood, plastic, or metal to get your extension curve.
Sorry we do not supply rocker templates. There are no standard dimensions for a surfboard rocker (along the stringer) since it all depends on the waves you surf and how you want the board to perform.
Stock surfboard blanks have proven rockers that are a great starting point and maybe a little adjustment is needed while shaping to get the desired rocker you want to surf.
Extensive info on ROCKER can be found in our Surfboard Design Guide
There is no physical railband template but we provide the rail band dimensions to lay out on your board. The dimensions depend on thickness of the board and out chart is made for a 2 1/2" thick board. A little math is needed to calculate railband dims for other thicknesses.
The railband numbers can be found in our Surfboard Building Guide, here they are as well.
Railband Reference drawing for a fish

When using templates it's always a good idea to measure out the width you want the board to be and pencil in a dot at the widest point on each side of the stringer. Then line up the template to that dot and parallel to the stringer. Then trace the line and connect the nose and tail lines if needed.
Templates are all about the curves that work well in the water and not so much about numbers.
We designed the templates to be any width you want by moving it closer to the stringer for a narrower board or further for a wider board. We believe you should have control over the design and dimension of your board and not be locked into a board that is designed for someone else.
Our templates are mostly all about the curve and the flow of water around the plan shape. Width dimensions only determine the rail-to-rail stability of the board.| Please review the
Surfboard Shaping section of our Surfboard
Building Guide for general info in shaping a surfboard, Stand Up
Paddleboard, Kiteboard, Wakeskate,
etc. If you have specific questions on surfboard shaping, please enter search terms in this extensive FAQ & knowledge database to find your answer. If the answer to your question is not in our HELP CENTER, please email info@greenlightsurfsupply.com for assistance. |
| Your nose and tail rail marks can vary by the nose and tail
depending on the type of board you are shaping. In a high performance shape
you will have a rail mark at the nose that is 1/2" and the center and
tail marks at 1" to account for the foil of the board as shown
here Each board can be a little different so don't be afraid to adjust the numbers slightly to account for the rail thickness you desire. Reference: Simple Rail Bands Chart - (midpage) Boxy Rail Bands Knifey Rail Bands |
The "fred tool" part of the rail runner is for the bottom tuck only. The bottom tuck is normally anywhere from a 3/8" - 3/4" radius (depending on your preference) and the rail bands are cut in the the rail runner.
The deck rail bands are much bigger and not a "radius" but an arc or curve. The rail bands are created with a power planer or G-rasp tool and the sharp corners of the rail bands are cut down by rail screen (you should be using a more aggressive screen like the sand shark screen to shape the rails down... they'll come out round and less angular or boxy)
Think of the rail bands as facets of a diamond. Flat surfaces intersecting at points. There is a curve hiding in there that is exposed when the corners are screened off.
More info and dimensions for rail band shaping in our Surfboard Building Guide
| Any
planer will work to shape a board. We offer an entry level electric power planer that works great for shaping all types of foam and is simple to use. The Hitachi modified planer is a surfboard specific planer with on the fly depth adjustment, a bit more power, and better dust control. The modified Hitachi makes shaping railbands much easier and allows you to shape your surfboard's foil and rocker fluidly as you can adjust the depth of the cut while walking the board. It is a great tool for the experienced shaper or anyone that plans on shaping a bunch of boards. You can also use a stock planer like a Bosch, Dewalt, Makita, etc. The planing techniques are different since there is no adjustability but the goal is to remove foam quickly with a planer, which stock planers off the shelf will do. There is just more hand shaping with a G-rasp and Rasputin involved when using a stock power planer. Another note, if you choose a stock planer make sure it has 2 blades for a smoother cut on foam. A single blade power planer will tear the foam like crazy and make more work for you! |
| We can supply you with all of the materials that you need. We would suggest EPS foam and epoxy resin with some 4 oz fiberglass. If you would like to use a strap system we would suggest a 4 leash plug setup. If this fits your needs we can get a handplane kit setup for you. Just shoot us and email with your handplane blank request info@greenlightsurfsupply.com |
| To fill in any marks we spackle the entire board with light weight white spackle. Then you can take screen and smooth out all the spackle once it has dried. This is purely an aesthetic step to give the board a perfect look to the finish. |
| We suggest laminating a strip of
the Uni
directional carbon fiber along the centerline of the bottom of the board or you can
wrap the rails with the Uni directional carbon fiber for more torsional
strength. You can also laminate the bottom of the board with VectorNET
carbon fiber reinforcement for additional
strength. It is recommended to do at minimum lamination of 1 layer 6 oz
and 1 layer 4 oz on the deck to reduce pressure denting from your
feet. |
Absolutely, the 6'6" blank is designed for
first time shapers and you can make any size board from it up to 6'6".
Our paper templates work well
on all blanks. |
| Our Railband dimensions are in the Shaping section of our Surfboard Shaping Guide. |
Due to the nose rocker curve in the deck of a
surfboard planer blades cannot easily get to the foam in that area. A trick
is to turn the planer on an angle so the barrel is more parallel to the
stringer in the nose curve area. It's not easy and most beginners
just use a G-rasp
or tigershark
paper on a hard block to shape that
area. |
| A spokeshave is the tool you want to take down the stringer. |
Most blanks do not need a lot of added rocker
since the blanks are designed with proven curves. Blank selection is
very important. If
adding more than 3/4" of tail rocker choose a longer blank and cut the
excess length from the tail so there is extra foam thickness to shape into. Good shapers plan their
shapes first and choose the best blank for the least amount
of work. In this case we'd cut the tail shorter to where you have
about 1/2" of tail pod thickness and reshape it a little. Chalk it up to
a learning experience, the board will still surf fine and you'll be stoked on
it. |
Sounds like the board won't surf as you had
intended it to. No shame in salvaging the blank and shaping
something different. You can certainly glass on a fin, that's cool too. And you
get a lot of extra glassing experience when glassing on fins. It's a good
thing to do at least once in your board building
life. You could use another longboard blank and 'flip" it so
the nose rocker would be used for the tail (as long
as your outline template fits in the nose
area [which would be the tail of the blank when you flip it]) Some guys flip
the US Blanks 98Y for nose rider
designs. Or we can custom order you a blank to whatever rocker you
want. No problem. |
The EPS sealing paste is used after shaping to
fill in 'tear outs' and provide a nice looking, bright
white surface to glass.
Use stringer
glue or epoxy to glue up the blank. |
We can help you out. No problem. Please schedule a time to bring
your flowboard by the shop to talk about
it. |
Yes, after shaping the foam blank chop off the
end and glue a wood tailblock on. Use masking tape to hold the block
in place. Then
carefully shape the block into the desired tail
shape. |
Glue and clamp pieces of wood together. You can
use wood glue, gorilla glue, or resin. When the tailblock is cured and
you can glue it to the
board. |
Yes just do the calculations based on your board's
thickness in the midpoint, nose, and tail... the goal is to keep the
railbands smooth and flowing so don't get caught up in the numbers too
much. |
| The railband dimensioned layout drawings are found in our free Surfboard Building Guide A-Z |
| Yes, the railbands will taper in the nose and tail areas up to a 1/2" difference from the midpoint dims. It's all relative to the foil of the board. If you are unsure what the railbands will look like simply mark the railband dimensions at the midpoint, 12" from the nose and 12" from the tail and connect the dots with a pencil. Follow the flow of the foil with the line. If the line looks good and matches the flow of the foil then go cut it. If it doesn't look good make a new line until you find what looks right to you. |
Aim for 2 1/2" thick with 4" nose rocker (1/2"
thick at tip) and a 1 1/2" tail rocker (~5/8" thick tail). Foil the
flow of foam to be 2 1/2" thick at the midpoint a bit forward of the
midpoint of the outine. Have fun and feel free to contact us anytime if you have a
question or need anything. |
We certainly do have a lot of customers who make Wakeboards
with our materials. We do custom cuts for wakeboards since there are so many
styles. The blank can be shipped to your door cut in half and you glue
it up for between $35-$50 depending on where you live. Let us know if you have any
questions or would like us to cut you a
blank |
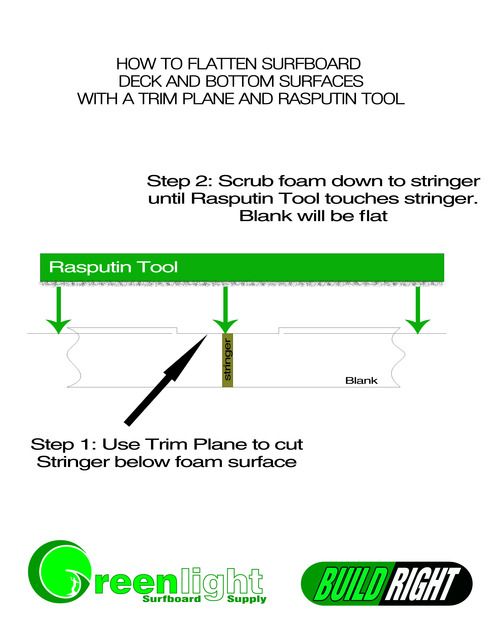
Normally guys use a power
planer to mow down the foam to the thickness you
want. By hand, the trick is to shape the stringer down first with
a trim
plane, then level the foam to the stringer with a G-rasp or shaping
rasp. |
Yes I definitely recommend a spokeshave for fine tuning the stringer and not tearing the foam. But, tear-outs are a common occurance with EPS foam and there is no way around it. There are 2 ways to remedy tear-outs
1. after shaping spread a thin layer of lightweight spackle over the blank to fill in the holes - or you can use an epoxy / Q-cell slurry which gives the board more strength but increases weight a bit.
or
2. Use various sanding screens and foam shaping pad to close up the tear outs. Each progressive sanding screen grit will shave the EPS bead down and not tear. We use up to 320 grit to close them all up...
Please note the quality of the foam has a lot to do with it... make sure the blank in at least 2# density. Also, sharp tools and shaping a little slower help reduce tearouts.
I have used Micro-planes before and in my option they do not take enough foam away. Takes forever to get the shape you want.
We developed PRO-TOOLS to aggressively and efficiently shape EPS foam. They do cause a little tearing which is normal but finishing the shape with spackle or sanding screen makes the board look like a polyurethane blank..
You can find all the Design Guides here: http://
Our surfboard shaping power planer is a great value for a power tool but you can use any planer to skin and shape a blank. Whatever you can find for the lowest cost as long as it has 2 blades. 1 blade will tear the heck out the the foam.
I use a 6" Sawzall blade in my jigsaw to cut the outlines then a railrunner to square it up, or a hard block with sandpaper. (We have plastic Rail Runners for less cost as well)
T12 lights are fine for a shaping room, they put out a bit more light than T8 bulbs. Doesn't really matter, we're looking at shadows on a blank and not necessarily the light.... Position them about 2" above the top of a blank on your shaping racks.
The only feedback we've gotten has been very positive except one guy wore out the grit by trying to shape a stringer which is advised not to do on the site.
The power planer is great for both EPS blanks and PU foam (I've shaped many with this planer) but does not have the on-the-fly depth adjustment of the modified Hitachi.
The adjustment is nice but not necessary to shape a board. With a non-adjusting planer, I usually keep it cutting full depth for the major foam removal and finish the delicate parts in the nose and tail by hand.
Sorry, we don't sell rail band templates. It's almost impossible to have standard rail band templates due to various thicknesses in everyone's foils and length of board. You can make rail band templates to copy boards but not a one-off shape.
Railbands must be shaped according to the board's foil, thickness, and flow as well as the surfer's preference in rail shape.
Laying out railbands is pretty simple. Here are examples of Boxy and Knifey rail bands. Use the chart below to lay out the rail bands you want.
It is best to reshape a SAWZALL blade to fit your jigsaw. Takes a little elbow grease and a file or grinder if you have one. It helps to bend an kink in the tab to help the blade stay in the jigsaw.
Get a 6" one that is wide like this to help keep the cut straight. Any brand will do...

The foil (thickess) of a board is all dependent on the midpoint thickness and volume of foam you need to float.
Most blanks have the foil already shaped in and not much additional tweaking is needed, unless you choose a blank that is not right for the shape.
If you're making a 3" thick board at the middle, the thickness at 12" from the nose and tail will be somewhere in the 1 1/2" to 2" thick range.
There is not right or wrong numbers. It all works.
Here is a reference drawing for the how the rail band dimensions change along the foil of the board that may help you see the proportions of thickness.
You can measure the thickness of your current surfboards as a guide too.
It's simple to shape channels though. Just use a hard block with sandpaper wrapped around it and shape the channels by putting pressure on the corner of the block.
The outline cut is the most crucial aspect to the way your board looks and any dips or wobbles in the outline will show up in the rail and you can't get it out at that point.
For a flawless outline we make a tool called the Rail Runner that does the work for you. It also shapes the bottom tuck of the rail which is one of the most critical aspects of a board since it determines how much "grip" into the wave the board will have so it's best to undershape it to start and screen it to the radius you want. As soon as you cut that tuck railband a little too much the foam is gone and you're intended rail shape is altered.
First, the trim plane is not the best tool for finish passes on the stringer to make it flush with the foam. You want to use a spokeshave for that.
When using the trim plane drag it along the stringer on a 45 degree angle to help keep it flat and not rock sideways which can gauge the foam. Also go along the grain of the wood. You'll know when you're going against the grain because the trim plane will dig in deep an get stuck.
You can also file a radius on the edges of the trim plane blade to keep them from hitting the foam.
This is covered in our Surfboard Building Guide. The calculations based on your board's thickness in the midpoint, nose, and tail... the goal is to keep the railbands smooth and flowing so don't get caught up in the numbers too much.
Here is an illustration on railbands but here it is for reference
Here are suggested rail band dimensions.
The railbands will taper in the nose and tail areas up to a 1/2" difference from the midpoint dims. It's all relative to the foil of the board. If you are unsure what the railbands will look like simply mark the railband dimensions at the midpoint, 12" from the nose and 12" from the tail and connect the dots with a pencil. Follow the flow of the foil with the line. If the line looks good and matches the flow of the foil then go cut it. If it doesn't look good make a new line until you find what looks right to you.
The only difference between the PVC and steel tools is that the steel are heavier and require less "elbow grease" to shape foam as well as come with a lifetime warranty. They both give the same results on the foam.
Normally guys use a power planer to mow down the foam to the thickness you want.
By hand, the trick is to shape the stringer down first with a trim plane, then level the foam to the stringer with a G-rasp or shaping rasp.
If you have all the tools you'll just need a blank, resin, fiberglass, finboxes, and a leash plug to build a board.
We offer surfboard building kits in traditional materials or newer epoxy materials.
You might also want to consider getting just a blank, a beginner glassing kit, and fin boxes of your choice.
We screen EPS with 100 / 150 / 220 / then 320 grit for a super smooth, spackle-free surface. Each screen grit cuts the beads until all the small voids between beads are gone. We use a foam sanding pad with the screen to even out contours. It's more work than spackling but leaves a very nice and clean foam surface.
There are power planers out there specifically designed for surfboard shaping with on-the-fly adjustments for tapering foam(a huge help for shaping rocker, foil, and rails), special dust chutes and handles but any planer will do the job. Just make sure it's got 2 blades so it doesn't tear the foam.
We sell an affordable entry level power planer that does a great job on both PU and EPS foam as well as stringers.While there are no concrete numbers to sufboards it's a good idea when you start to keep more foam in the board that you can fine tune in the end before glassing.
Aim for a 1/2" thick nose tip and a 5/8" tail tip thickness. Then foil your board for a nice flowing line from the nose to tail. Don't get caught up in the numbers too much. Water doesn't know numbers...
Here's more info on Foil from our Design Guide:
SURFBOARD FOIL
The change in thickness you notice when you view aboard from the side is referred to as foil. This thickness flow in most modern boards is smooth and even, without noticeable lumps or transitions. Foil determines to a great degree the overall volume of the board, how it flexes, the degree to which it can be flexed before it snaps, and whether the board is designed for long drivey turns or quick snaps. In general, thinner boards (2 3/8 inches thick or less at the thickest point) will be more flexy, harder to paddle, and less drivey… but more responsive. These boards are most suited for better surf, smaller or more advanced surfers, and strong paddlers. Thicker boards (2 1/2+ inches thick or more at the thickest point) will be less likely to snap but stiffer in terms of flex, will be easier to paddle due to increased buoyancy, and be more drivey. They will be more difficult to control in bigger surf, but work better in weak, small or slow waves because the added volume will allow them to catch waves easier and give the rider something to “push off of” when putting the board on a rail. A thinner board would have a tendency to sink under these conditions. Obviously, heavier and more powerful surfers require boards with more volume for flotation and to resist being pushed too deeply into the water and stalling on a hard turn.
While a trained eye can get a good feel for what the overall thickness flow is doing, and what it is intended for, by viewing from the side, the best way to quantify foil is by taking measurements along the length of the board using calipers. Measurements are most often taken at 12 inches from the nose and tail, 24 inches from the nose and tail, and at the wide point. Typically, boards are 1/8 to 1/4 inch thicker 12 inches from the tail than from the nose, and 1/16 to 1/8 inch thicker 24 inches from the tail than from the nose. The thickest point is typically found at the wide point. Boards designed for drive over responsiveness have their wide points and thick points ahead of center. Retro boards, single fins, classic longboards, and guns are good examples. These boards paddle better because the concentration of foam volume is under the chest when lying prone, and the center of the buoyant force is closer to the front foot when riding. Modern performance shortboards, however, have their wide and thick points behind center, which makes them inherently more difficult to paddle, but have a tighter turning radius. Rather than having the bulk of volume under the chest and front foot, the thick point back puts the concentration of foam between the surfers feet, better facilitating back-footed, rail-to-rail surfing.
It's a good idea to get the stringer flush with the foam so the fiberglass lays flat across the stringer. If it is not flat there will be a gap and there's a good chance the glass will crack there letting water into the board.
Also, a smooth, clean shape is easier to sand. Wavey rails, high and low spots on the deck and bottom will cause a lot more work sanding.
Take your time to get the shape as nice a possible (without overshaping) and you'll find the glassing and sanding process will go pretty smoothly.
The board is foiled from nose to tail so the thickness of the rail is different at 12" from the nose than the midpoint of the board. The rail band chart shows dims for the center of a 2 1/2" thick board. You can measure the thickness of your nose and tail at 12" marks and do a little math to determine the rail marks based on your midpoint rail bands.
After a few boards you can just eye it up though. The most important thing is to keep the rail shape flowing along with the rocker and foil.
Flattening the bottom and deck can be done by hand with two tools: a stringer trim plane and Greenlight Rasputin Tool
Squeeze some Gorilla glue into the gap. It will expand and fill it then you can sand down any excess and glass the board.
Let me preface this reply with the fact that water doesn't know numbers, it's the flow of shape that matters. Numbers are only a guideline to shaping what looks good to our eyes and feels good to our hands.
That being said the railband dimensions change at 12" from the nose and 12" from the tail due to the tapering foil of the blank's profile and the narrower nose and tail widths than the midpoint.
Most importantly you want to copy the bottom rocker onto the side rail and make that taper slightly in the nose and tail areas. The deck rail bands will affect overall volume of the board and shape of the top rail.
You can do math to calculate the rail mark dimensions at the nose and tail based the change in thickness compared to the midpoint. For example, a 2 1/2" thick midpoint rail mark of 1 5/8" [1.63 / 2.5 = ~60% for a 60/40 rail] will reduce down to 1" if the foil thickness is 1 5/8" @ 12" from the nose (~60%)
You can put your rail marks on the board and trace them out (making a tool for that is fine but I use my hand and drag my pinkie along the edge or bottom to trace the outline or rocker and adjust the curve while walking to hit the rail mark dots - or come close.
Then take a look and if you don't like it, make adjustments. It'll all shape off when tools hit the foam.
The apex is between the rail mark and top of tuck and will appear when screening the rail bands to round them off.
Always use the midpoint of the length of your board for the railband measurement, not the widepoint. Although the widepoint being only 4" away will not really affect the railband dimension as the board's thickness should be pretty much the same in that area.
We recommend the most aggressive grit you can get your hands on to shape the foam quicky. We have Tigershark sandpaper which is 36 grit and also our Greenlight shaping rasps are 16 grit and are the most efficient way to shape next to using a power planer.
You can find the rail band designs in the shaping section of our Surfboard Building Guide.
No, you absolutely do not need an electric power planer. We recommend shaping your first few boards by hand with the tools included in the kit to understand what you're doing and have control over how much foam is removed. As soon as you put a power tool between you and the foam there's no telling what mistakes will happen as you're trying to get the hang of both the proper sculpting of foam as well as how to use the planer correctly on foam. Once you shape a board or two by hand and understand the process and how the shape comes along then you can use a planer to take some of the elbow grease out of it...
We do offer customization of your blank to take away most of the useless power planing to thickness. If you'd like we can provide your blank 1/4" thicker than your final shape thickness so you only have to scrub a total of 1/4" of foam (1/8" from deck and bottom) which is pretty quick with out rasps provided in the kit. If you want a custom blank thickness just put a note in the "custom blank specifications" section of the cart and we'll cut it the that thickness. No problem.
| The easiest fin box system to install for the side bite would be the Factory fin plugs, or FCS X-2 plugs. You can also buy inexpensive quick set jigs and FCS T-3 Holesaw to install the plugs. |
| CLICK HERE for the FCS X-2 Fin Plug Install Manual More detailed install info below: NOTE: For EPS boards use Slow Hardener Epoxy or set the plugs with 2 resin pours to reduce exotherm and prevent melting the foam. See Step 4. 1. FCS X-2 and FACTORY plugs are installed after the seal coat. After installation and the resin has cured, you sand them down flush with the board while sanding the bottom. 2. Once you have the quickset jigs laid out on the board (lined up with your shapers dots) you will use a FCS Hole Saw bit or FACTORY Holesaw to make your holes for the plugs. Drill the hole 5/8" deep and pull the foam out with needle nose pliers or dig out with a flathead screwdriver. 3. We suggest using either FCS dummy jigs or a set of fins to set the plugs with the correct spacing as well as adjust the fin cant angle. Lightly screw the plugs onto the dummy jig tabs. If using fin keep the plugs loose on the fin tabs so you can push them down to where the "nubs" on the plugs touch the seal coat. 4. Polyester boards: Mix 1 oz of resin per plug. (6 oz total for a tri-fin, 8 oz total for a quad). EPS boards: Use Slow Cure epoxy resin, or if using Fast cure, mix 1/2 oz resin per plug. Pour resin in the holes about 1/3rd deep to set the plugs in. You will come back and fill the rest of the perimeter in another step. Doing 2 separate pours will prevent the EPS foam from potentially melting from epoxy exotherm. 5. Polyester Board: Pour about 1/2 oz of mixed resin into the holes. EPS Board: Pour about 1/2 oz mixed resin into the holes. 6. Place the plugs in the holes with the dummy jig or fins to ensure proper alignment. Set the fin cant to the desired angle and hold in place with tape. Here is an illustration of taping the fins in place (these are glass ons but same taping methods apply to FCS fin plugs)
7. Polyester Boards: Using a small cup (dixie cups work great) carefully pour resin around the perimeter of the plug so it runs into the drilled hole. Be careful not to over fill! Fill just under the lip of the plug and jig. EPS Boards: Let the first pour cure for about 2 hours then mix another 1/2 oz epoxy resin per plug and top off. Once the resin cures remove the jigs and sand the plugs down until they are flush with the board. |

| Yes, the front dummy fin cant is 6.5 degrees, the rears and sitebite fins are 4 and 3 degree, respectively. |
½ oz per X-2 plug, mix ½ cc MEKP per ½ oz
polyester resin: so for a tri fin (6 X-2 plugs) mix 3 oz
poly resin and 1.5 cc
catalyst You can download our resin chart HERE
which includes info on how much resin to use for
finboxes |
Glass the fins on after laminating the board and
before hotcoating. You'll hotcoat the board and fins
all at the same time.
Watch this video to
learn how to glass on fins. |
| Check out Greenlight's Fin Position Layout Guide HERE |
FCS
Fusion fin boxes were invented because of the growing popularity of
EPS/Epoxy construction. Not to say you can't use
the traditional X-2
plugs but it's a longer process. You need to pour a little epoxy in the hole
to set the plugs, then a few hours later you finish off with more resin. A 2 part pour reduces
exotherm which melts the EPS causing a weak install. It's a
must to use Resin
Research Quik Kick resin for plugs for less exotherm. You can also
put cold icepacks under the fin area while installing
to reduce exotherm. In our opinion FCS
Fusions are better overall for ease of install and
strength. |
| Yes you can use the same resin for glass on the
fins. Nothing special is
required. Glass
on fin roving can be purchased HERE |
White pigment is available HERE,
you can use this with any resin but whenever you use UV
cure resin you need to add MEKP
to colorwork and finboxes to ensure it all cures. |
Take a small drill (around 1/16" diameter) and
carefully drill out the cured resin until a fin key can fit. Then back
the screw out, it will
pull the rest of the resin out with it. Take your time and make sure not to
hit the finbox threads with the drillbit. |
Drill the plug out with a holesaw
and a template
to drill out the remaining parts of the plug and resin. Might need
to pull it out with
plyers. Fill hole 1/2 way with resin and cab-o-sil.
Slide your fin tab into the new plug (do not screw) and drop it into the hole while sliding other
tab into existing 2nd plug for alignment. Push
the plug down until the tabs touch the
glass. The jig will act as a resin dam, fill in the rest of the hole
with resin being careful
not to overfill and get the screw submerged in resin. When cured remove fin
and template, screw down the screw, and
sand the plug and resin flush with the board. For
additional strength you can
laminate a patch of 4 oz. fiberglass over the plug, hotcoat and sand. Good as
new. |
Yes, you
need a special install jig for the longboard fin boxes. Here's a link to the
jig. Same router for all fin systems and longboard
fin boxes. |
All fin boxes are ordered as a single box... so you'll order (2) 9 degree, (2) 5 degree, (2) 3 degree, and (1) 0 degree [center box]
It is always best to measure the fin placement from the rail since the fin works with the rail and not the center of the board.
Please take a look at our fin position layout diagram from tri fins, quads, single fins and 2+1 setups.
FIN POSITION LAYOUT DIAGRAMYep. routing's scary until you get used to it. Just go slow and stay strong on the router next time...
You can install the box and fill the hole with extra resin, put some of that foam dust on the floor in the hole (after installing the box). It'll take up some space and require less resin..
If you want to cover the mistake you can paint the foam a dark color in the fin area before laminating.
Futures finboxes are the hardest to install and do require the router jig to get it right. We recommend FCS X-2 Plugs to start. All that is required is a holesaw bit and a drill to install them. We also have jigs to make sure the plug spacing is correct.
You can still sand the plugs down and glass over them. It's more difficult but certainly can be done.
I recommend glassing a small later of glass over the holes first and re-drilling or cutting the fiberglass with a razor blade. This will protect the foam when sanding the plugs flat.
Put a piece a masking tape over the slot and screw holes before laminating.
After the hotcoat has cured you'll have to cut through the resin and remove the tape.
You are correct the center tab gets removed to get the fin in place. Usually we pop them out during the sanding process with a pair of needle nose pliers.
The tab is there as a part of the plastic molding process.For EPS Blanks, we recommend setting X-2 plugs with 2 separate resin pours so the resin doesn't exotherm and melt the EPS foam.
Fill the drilled X-2 hole about 1/4 to 1/3rd of the depth with resin (just a little) and set the plugs in. Then when that's cured fill the rest of the hole with another batch of resin.
26 layers of 6 ounce in a hand layup works well for FCS and futures boxes, which are 0.25 inches wide on the flange.
36 layers of 6 ounce for the normal single fin center boxes, which have a 0.375 inch width.
It's best to orient your fin template so the fiberglass yarns run from the base to the tip on an angle for the best flex. Having them run straight parallel and perpendicular to the base makes for a floppy fin. So make your fin panel big enough.
I think you'll need somewhere around 60 oz of resin to make a 36 layer panel...
If any water gets in the board, EPS foam has air pockets inside that heat up into steam and push on the glass, delaminating it. The vents prevent that.
PU has no air and no steam but delaminates from the foam crushing and breaking away from the glass.
EPS / epoxy construction is 5X stronger than PU with the same glass schedule.
No maintenance needed. It's good practice to occasionally dump some fresh water in the plug because hypothetically tiny salt pieces can accumulate and clog the vent. But highly unlikely.
You can put masking tape over the FCS plugs when glassing and cut the slots out with a razor blade when the resin is cured. You can also fill the plug slots and screw hole with plummer's putty to make sure no resin gets in there when glassing.
Straight resin on the plug and routed hole. We pour a the routed hole about 1/4 the depth and brush resin up the sides of the walls.
Then take the rest of the resin from the bottom of the routed hole and paint the bottom and sides of the fusion plug before setting it it.
Squeegee around any excess resin to prevent bumps in your lamination.
No, futures designed the new install kit to only work with theMakita RT0701C router
FCS X-2 plugs were the first system, then came FCS Fusion, then FCS II click in system.
Normal 2-tab fins work with the X-2 plugs and Fusion
In summertime heat (80 degrees ) the epoxy resin will tend to exotherm in deep holes as in FCS X-2 plug holes and ding repairs. FCS fusion, FCS II, and Futures are a tight fit and use very little resin so no worries there.
We recommend pouring only about a 1/2 ounce of epoxy into a hole at a time then waiting about an hour to fill up the rest of the hole. This will stop the epoxy from exotherming and melting EPS.
I am about to begin glassing my board but I’m confused about the fin boxes and i was hoping you guys could help me out. I have the future fin boxes installed in the foam and i understand i have to put resin in the hole i routed out and set the fin boxes. i know before i put on the fiber glass I’m supposed to tape off the opening of the fin box and then begin laminating, but how am i going access the fin box after the hot coat, do i sand the hot coat down until the tapes gets sanded off with it?
Yes, the tape gets sanded off and opens the fin slot. You can see the futures boxes have a raised tab that creates a bump in the lamination. When sanded flush with the board it opens right up.
We prefer to install 10.5" centerfin boxes because it gives you an extra 2" to move the fin around, Start with the fin in the middle of the box for your first few surfs then move it back for more drive or forward for more turning depending on how you want to surf the board. Or maybe just keep it in the middle if you're having fun!
The centerfin box is installed after the hotcoat, before sanding the board. The lip of the box will be sanded down flush with the bottom of the board during the sanding process. We recommend "grinding" the fin box plastic with 60 or 80 grit and a hard or medium flexpad.
Grinding is a bit different than sanding whereas you tilt the sanding pad up a little bit to use just the edge of pad to focus the force right where you need it (on the box plastic). Sanding is done by keeping the pad flat on the board and removing a broader area of hotcoat.
Grind the finbox plastic down for a few seconds and let it cool for a few seconds as too much friction will actually melt the plastic and the heat can possibly transfer into the foam and weaken the area around the box. So it's best to cycle the grinding a few seconds on, a few seconds off.
Grind the box down as close as you're comfortable with without hitting the hotcoat. Then proceeed to sand the entire board with the flexpad flat and as you pass over the finbox it will sand evenly with the hotcoat.
Football patches are fiberglass patches shaped like footballs which are used for strengthening pre-glass fin systems, such as FCS Fusion, FCS II, and futures.
They are laminated over the fin boxes at the same time you laminate the bottom of the board. The football patches go on first, then roll your bottom fiberglass over them.
Use 4 oz. scrap fiberglass (you can use 6 oz as well) Cut it out about 1" bigger on all sides than your fin box shape into an oval (or football shape) and lay over the fin box. MAKE SURE YOUR FIN BOXES AND SCREWS ARE TAPED OVER FIRST!!!
Then roll your bottom fiberglass over and saturate with resin. Pull out any excess resin from the fin box area and pop any air bubbles around the fin box holes.NOTE: if you are doing an opaque pigment bottom lamination, it is best to route and install the fin boxes after the lamination so you can see them. Then the clear fiberglass football patches go over the fin boxes and bond to the lamination - giving the fin boxes more strength.


You do not need to use Cab-O-sil but the resin might drain into the foam and require an additional top-off pour...
There is no need for Cab-o-sil in FCS fusion, FCS II or futures fin box installs. Only suggested for FCS X-2 and Factory fin plugs as well as leash plugs.
For a plywood fin, either finbox compatible or glass-on use 2 layers of 6 oz fiberglass on each side of the plywood fin. Laminate them on an angle so the fiberglass strands run from the base (toward the leading edge) to the tip of the fin. You'll get a better flex pattern than having the fiberglass strands run parallel and perpendicular to the base. Use Resin Research Quik Kick.
To make futures fins I have simple propped up a piece of wood to the desired cant angle (a bit of trigonometry is required) and layed wax paper over it. Wet up 2 layers of glass on the mold, Lay in your wood fin, fill the base with fin roving the width of the wood as well as a piece of roving along the leading edge of the fin, then laminate 2 layers of cloth over that. Over-build everything to trim to shape when cured. Use a carbide jigsaw bit to cut out the fin and base, sand to size and file in the notches for the futures fin.
Hotcoat and finish sand to fit into the fin box. You'll want the final base width to be 1/4".
Fin placement really depends on our average back foot placement when you pop up. You want the fins slightly behind your rear foot for a twin set.
Somewhere around 7" - 7.5" up from the tail is a good place to put the trailing edge of the twin fins. For keels you want them back another inch since they have longer bases so 6" - 6'5" up from the tail.
Twin fins are supposed to be loose so you'll want 5 degree cant and 3/16" toe-in. Keels are more of a down the line fin and need less toe-in and cant. 1/8" Toe-in and 2-3 degree cant is good for them.
Be advised using standard side fins from a thruster set for a twin will not work as well as real twin fins. There is more surface area on twin fins that hold you in the wave, a standard thruster side fin will be difficult to make waves on.
Here is one way to install the centerfin box
And here's a third method to make the fin pocket applicable to wood or foam boards.
We have templates to make your own centerfin router jig at the bottom of THIS PAGE
![]()
The only difference between the new futures ILT (Interwoven Laminate Technology) and the futures 1st generation boxes are the holes in the flange that allow resin to flow through and provide more bond between glass and foam.
1. Fin placement should be relative to where your back foot is on the board... the side fins position should be right under your foot as a baseline. Do 10 pop ups on a tape measure or yard stick and measure the average distance your back foot lands from zero. This is your "neutral point'. If you want the board to be more drivey down the line position the fins back towards the tail a bit. If you want looser and more turning move them up a bit (this is a pivot point). But you can't go wrong with the typical 11"-12" up from the tail (seems to be where most feet land anyway).
2. Toe-in: More toe-in provides more turning but more drag. For front tri fin or quads a 1/4" toe in (measured by a Versa-Square or G-square) is optimal. Rear quad fins get 1/8" or 3/16" toe-in depending on if you want drive or more turning. Twins get 3/16" toe
3. Cant: Fin cant provides "lift". More cant is looser, less is drivey. This is a big decision when buying or setting the fin boxes. It all depends on how you want to surf and the wave shape you surf. 5 degree front fin cant is fast down the line while 8-9 degree front fin cant is looser and turns easier (pivot point).
Here is the fin position chart in the surfboard building guide, they are good numbers to use but don't be afraid to experiment!
The difference is the depth of the boxes and fin tabs. Side fins are 3/4" deep, center and rear quad fins are 1/2" deep.
Set the FCS II boxes in flat, the cant is built in but may have to be adjusted slightly to 5 degrees if there is a concave or Vee in the tail. It doesn't really matter though. 5 degree cant is just a standard number and your board will surf fine if it's not exactly 5 degrees.
No need to use Cab-O-Sil when installing FCS II, FCS Fusion, or Futures fin boxes. They are a tight fit in the routed pocket and straight resin is all you need.
Rail plugs have 4 degree cant built in but you should set them to the cant you desire when installing. You can use our fin cant templates to help you set the degree.
Install the FCS X-2 or FACTORY plugs after the hotcoat then sand them down as you sand the hotcoat to 150 grit. Then put a piece of masking tape over the plug slots and screw holes so resin doesn't get in when glossing. You can pull the tape a few minutes after glossing using a razor blade or tweezers.
A two part pour is definitely the way to go. Just put a little resin in the bottom of the holes to set the plug and wait about an hour to fill the rest of the perimeter with resin. Use a dixie cup or something like that to drizzle the resin around the hole.
Bummer. Yep, you have to install them with the screws pointing forwards. The fins won't fit in that way.
I suggest razor blading the fiberglass around the boxes and sticking a fin in them. Then rock the fin back and forth to break the box free. You will pull foam out with it so you can either fill the routed holes with Q-cell and resin mix and re-route or stick some fiberglass scraps in the pocket when installing the boxes the correct way to take up the space.
You'll have to sand the foam off the boxes or get new boxes.
Then cap with a layer of 4 oz cloth before hotcoating.
Air bubbles sometime happen. They are an absence of resin. The next time you laminate over fin boxes wait a few minutes and if you see any air bubbles use the extra resin left in your mixing bucket (or off the floor if you have none left) and dap more resin into the air bubble. It will force the air out and have a clean lamination over the fin box.
To fix these voids simply mix a small batch of resin and drip it into the holes. Fill them up then sand them down flush with the board again.
There is no exotherm with Quick Kick and the small amount of resin used in a futures box install. It is the resin draining into the foam and acting as an anchor in the EPS making it stringer. I advise not using AddF when installing the fin boxes as that makes the resin thinner and allows it to drain more.
We also paint the routed pocked and flange with resin as well as the outside surface of the box when installing. Then pour more resin over the flange to fill the ILT box slots and squeegee the excess resin off the flange and onto the foam.
We do not recommend installing fin boxes the same time as laminating the bottom. You can not set the cant of the fin with the dummy cant jigs in that case. It could make your fins misaligned. Better to let the fin boxes cure then tape them off and laminate the bottom.
The reason the left and right side fins are slightly offset from center is the fins are flat on the inside (not symmetrical) and the jig automatically offsets the fin placement to line the flat inside surface with your shaper's dots.
Although that's just standard industry practice to offset the fins like that, no one will ever know if the board surfs better with the fins 1/8" over here or 1/8" over there... it really doesn't matter...
The jig is marked with a "right" and "left" side.
Looking at the bottom of the board, place the "right" side jig line on the dots on the right side of the board. Vicea-versa for the left side.
Center fin is pf course on the center line.
More info can be found in the FCS II install guide.
For a first timer, the easiest fin system to install is FCS X-2 Plugs or FACTORY Fin Plugs
These plugs only require a normal power drill, X-2 Holesaw bit and quick set jigs.
The things that we would suggest to make this an easy install are the FCS dummy install jigs and a g square for laying out fin placements. The quick set jigs are an easy one time use product and the g square is a tool you will use forever in your board building...
Here's how to install the X-2 plugs and a diagram of standard fin placements:
NOTE: For EPS boards use Slow Cure Epoxy Hardener to install with 2 pours to reduce exotherm and prevent melting the foam. See Step 4.
1. FCS X-2 and FACTORY plugs are installed after the seal coat. After installation and the resin has cured, you sand them down flush with the board while sanding the bottom.
2. Once you have the quickset jigs laid out on the board (lined up with your shapers dots) you will use a FCS Hole Saw bit to make your holes for the plugs. Drill the hole 5/8" deep and pull the foam out with needle nose plyers or dig out with a flathead screw driver.
3. We suggest using either FCS dummy jigs or a set of fins to set the plugs with the correct spacing as well as adjust the fin cant angle. Lightly screw the plugs onto the dummy jig tabs. If using fin keep the plugs loose on the fin tabs so you can push them down to where the "nubs" on the plugs touch the seal coat.
4. Polyester boards: Mix 1 oz of resin per plug. (6 oz total for a tri-fin, 8 oz total for a quad).
EPS boards: Use Slow hardener resin for a one-time pour. Or with fast hardener, in temperatures hotter than 80 degrees F, mix 1/2 oz per plug. You will fill the plug hole twice to reduce exotherm and prevent melting the foam.
5. Polyester Board: Pour about 1/3 oz of mixed resin into the holes.
EPS Board: Pour about 1/2 oz mixed resin into the holes.
6. Place the plugs in the holes with the dummy jig or fins to ensure proper alignment. Set the fin cant to the desired angle and hold in place with tape. Here is an illustration of taping the fins in place (these are glass ons but same taping methods apply to FCS fin plugs)
7. Polyester Boards: Using a small cup (dixie cups work great) carefully pour resin around the perimeter of the plug so it runs into the drilled hole. Be careful not to over fill! Fill just under the lip of the plug and jig.
EPS Boards: In temps above 80 degrees F, let the first pour cure for about 2 hours then mix another 1/2 oz resin per plug an top off.
Once the resin cures remove the jigs and sand the plugs down until they are flush with the board.
______________________________
Three other fin box options that are installed before fiberglassing your board are:
We also have FCS Fusion fin plugs which require a Fusion Install kit and trim router.
Another option is the new FCS II fin system which require a FCS II Install kit and trim router.
FCS II finbox flange is to be flush with the foam and the tabs stick up about 1mm above the foam. You'll glass over them and the bumps sticking up will be sanded off, opening the box holes and making everything flush with the hotcoat.
The trick to routing a centerfin box into a deep double concave tail is to simply shim the router template to level. Depending on the curve of your concaves you may have to shape the sides of the finbox to the shape of the concave after the resin has cured.
CLICK HERE for the FCS X-2 Fin Plug Install Manual
For a first timer, the easiest fin system to install is FCS X-2 Plugs or FACTORY Fin Plugs
These plugs only require a normal power drill, X-2 Holesaw bit and quick set jigs.
Here's how to install the X-2 plugs and a diagram of standard fin placements:
NOTE: For EPS boards use Slow Cure Epoxy Hardener to install with 2 pours to reduce exotherm and prevent melting the foam. See Step 4.
1. FCS X-2 and FACTORY plugs are installed after the seal coat. After installation and the resin has cured, you sand them down flush with the board while sanding the bottom.
2. Once you have the quickset jigs laid out on the board (lined up with your shapers dots) you will use a FCS Hole Saw bit to make your holes for the plugs. Drill the hole 5/8" deep and pull the foam out with needle nose plyers or dig out with a flathead screw driver.
3. We suggest using either FCS dummy jigs or a set of fins to set the plugs with the correct spacing as well as adjust the fin cant angle. Lightly screw the plugs onto the dummy jig tabs. If using fin keep the plugs loose on the fin tabs so you can push them down to where the "nubs" on the plugs touch the seal coat.
4. Polyester boards: Mix 1 oz of resin per plug. (6 oz total for a tri-fin, 8 oz total for a quad).
EPS boards: Use Slow hardener resin for a one-time pour. Or with fast hardener, in temperatures hotter than 80 degrees F, mix 1/2 oz per plug. You will fill the plug hole twice to reduce exotherm and prevent melting the foam.
5. Polyester Board: Pour about 1/3 oz of mixed resin into the holes.
EPS Board: Pour about 1/2 oz mixed resin into the holes.
6. Place the plugs in the holes with the dummy jig or fins to ensure proper alignment. Set the fin cant to the desired angle and hold in place with tape. Here is an illustration of taping the fins in place (these are glass ons but same taping methods apply to FCS fin plugs)
7. Polyester Boards: Using a small cup (dixie cups work great) carefully pour resin around the perimeter of the plug so it runs into the drilled hole. Be careful not to over fill! Fill just under the lip of the plug and jig.
EPS Boards: In temps above 80 degrees F, let the first pour cure for about 2 hours then mix another 1/2 oz resin per plug an top off.
Once the resin cures remove the jigs and sand the plugs down until they are flush with the board.
______________________________

Three other fin box options that are installed before fiberglassing your board are:
We also have FCS Fusion fin plugs which require a Fusion Install kit and trim router.
Another option is the new FCS II fin system which require a FCS II Install kit and trim router.
Install the futures fin boxes flush with the foam and push one side in deeper into the foam to get the correct fin cant
At Greenlight one of our motto’s is ‘Keep it Simple’ so we’ve put together beginner surfboard glassing kits that include all the materials, tools, and instruction to get you started and keep you glassing. We offer two types of fiberglassing kits: Epoxy resin (for EPS foam or PU foam blanks) Polyester resin (for PU foam blanks ONLY!) Fiberglassing is a multi step process but anyone can do it. Please read our comprehensive writeup on glassing in Greenlight’s Surfboard Building Guide A-Z
Epoxy resin has become a very popular choice for
surfboard construction in the last 10 years.
Polyester resin has been the
standard in surfboards for 50 years. Epoxy is 5X stronger, has better flex
properties, better UV
resistance and very low VOCs (and no smell when glassing) than Polyester
resin. Polyester resin is is brittle
and yellows much faster than epoxy. The only advantages of polyester are
its curing times are faster
than epoxy and it sands to a shinier surface. |
What's up guys.. First attempt at glassing didn't go so well. I should have read all your information in the surfboard building guide first. The resin kicked quicker than expected and I panicked. I think I realize a lot of the mistakes I made and how to be more successful next time, but I'm wondering if there's anything I can do to salvage this. There are dry spots in the lap as well as spots with excess resin all along the rails.
Not a big deal. The board will surf fine but look a little funky. All a part of the learning process.
All you can so now is move forward and keep glassing. Sand that lap down close to flush with the foam before laminating the deck. Don't worry about the dry spots, they will fill in with resin a little but still be visible.
Things you can do better:
1. Cut the laps real nice and straight following the outline of the board. Jagged glass edges make it harder to laminate and sand flush. Take your time cutting! A nice lap cut makes the job easy.
2. Shorten the laps a little, actually a lot... you only need an inch or inch and a half lap. Shorter laps will also be much easier to saturate (see #3)
3. Saturate the glass 100% before wrapping the laps onto the deck. Look for white, dry weave and make sure there's resin on all of it.
4. Don't let the epoxy resin sit in the bucket after mixing! It reduces work time. Mix it thoroughly for about 2 minutes and immediately pour 1/2 the resin down the centerline of the board. Squeegee it around nose to tail from center outwards to the rail on each side. When there's no more resin to spread pour another line of resin out of the bucket near the rail and continue saturating. Just spread it an move along. Let the resins soak in and don't screw with it too much.
You should have less then 1/4 of the bucket worth of resin as you're ready to saturate the rails. This give you more working time with the resin (less exotherm)
Work the resin on the board from the centerline stringer out to the rails to saturate the fiberglass hanging down (the laps). Lift the lap fiberglass up with one hand and squeegee the resin from the deck onto the white glass. There should be no white glass spots showing when fully saturated. Use the resin left in the bucket to saturate any dry spots on the rails.
Relax and flow with it. All you're doing it getting all the fiberglass wet with resin and sticking it to foam! There's a process to it but don't stress it!
In general, shortboards under 7' require 7 yards
of fiberglass
and either a one gallon of polyester
resin or a 96 oz kit of epoxy
resin. Longboards, 9-10 yards fiberglass and 2 gals
polyester or 1.5 gals epoxy
resin. We also have beginner
glassing kits with epoxy if you want to go that
route. You can download our Epoxy and Polyester Resin
Usage Chart HERE |
A lap is when the fiberglass wraps around the
rail to the other side of the board, providing more strength. When
glassing the bottom of the
board, the fiberglass '˜laps' onto the deck. When fiberglassing the deck,
the fiberglass laps around the rail onto the bottom. The distance of the lap (measured from
rail to stringer) has a effect of the board's overall
breaking strength and flex.
A longer lap will make a more snap-resistant, stiffer board because. A
shorter lap will be a weaker and flexier board. A standard lap distance is about 1" in
towards the stringer from the apex of the rail. |
A freelap is common on clear boards where you
simple saturate the fiberglass and squeegee it onto the opposite side
of the shaped blank.
When the resin cures the edge of the fiberglass is sanded flush, or close to
flush with the foam. Be careful when
sanding not to hit the foam. A nice sanded flush lap will prevent air bubbles
along the 'lap line' when laminating the
deck. A cutlap is commonly used when adding resin tint
or pigment to the laminating resin. If glassing the bottom of the board, the lap on the deck is first taped off on with masking tape
along the outline of the board, about 1“ to 1 ½" in from the apex of the rail. The tape defines the 'lap line' and
prevents resin and fiberglass from sticking to the board where the tape is.
Saturated fiberglass is squeegeed around the rail
and onto the tape. When the resin gels or 'kicks', a sharp razor blade
is used to cut the fiberglass along the
tape line. The excess fiberglass that is stuck to the tape is then peeled off
the blank (along with the
tape) leaving a nice straight cut lap line around the board. This lap line
can be gently pushed into the board with a popsicle stick instead of sanding it flush.
Cutlaps are mostly covered with a pinline on the hotcoat to hide
a wobbly cut. |
Laminating is the process of "gluing" the fiberglass to the foam with resin. It gives the board strength.
Hotcoating (or seal / sanding coat) it the process of applying resin with a brush on top of the fiberglass lamination to seal it from water and also providing a resin surface that can be sanded smooth.
The term "hotcoat" is an old term referring to glassers adding a lot of catalyst to polyester resin to make it cure fast. The resin heats up when curing and the board would feel warm - therefore a "hotcoat"...
Today with the popularity of epoxy resins, the term seal or sanding coat is more accurate and pertains to all types of resins.| You can download Greenlight's Polyester Resin Additive Amount Chart here |
| You will need a 3 gallon kit of epoxy and a 30 yard roll of
fiberglass. You can also download our epoxy and polyester resin usage
chart HERE |
Please download and review our RESIN USAGE CHART for epoxy and polyester resins.
| You will need 96 oz of epoxy, 2 oz Additive F, and 7 yards of 4 oz fiberglass. We also offer an beginner epoxy glassing kit if that would be easier for you to select the products and save a little money. |
| Please download our epoxy and polyester resin surfboard usage
chart HERE |
| We feel that Resin Research Epoxy is the best on the market.
This is why we only sell Resin Research, it is a superior product in our
opinion. For hotcoats we recommend using Resin
Research ULTRA Quick Kick Epoxy. The QUICK KICK version is a bit
thicker and cures faster therefore provides a thicker hotcoat that stays on
the rails better and doesn't drain off due to gravity. A thicker hotcoat will
help prevent sanding
burnthroughs. |
| We are huge fans of Epoxy and we tend to use it on all of our personal boards whether shaped from Polyurethane foam or EPS foam. If you are interested in building a board with this method you would be best off adding the items you are interested in to your cart separately as we do not yet offer a kit with PU foam and epoxy resin. |
Bottom logos are laminated directly to the foam. Spread some
resin on the foam, place the logo, then apply more resin on top of the
ricepaper and squeegee out any air bubbles. Then the fiberglass is rolled out
over it and laminated. Deck logos go in between the first and second layer of
fiberglass. Same method of applying the logo as the bottom with extra resin
and squeegeeing out any air bubbles, then roll the top later of fiberglass
over and laminate. |
You can download out Surfboard Resin Usage Chart HERE |
| The
first layer you can cut to the apex of the rail and then the second layer can
fully wrap over the board to the bottom. Just follow the outline of the board
with your fiberglass shears touching the board all along the
rail. You can trim the
fiberglass back a little at the nose and tail so there is not multiple layers
of fiberglass overlapping. This way the board is stronger to resist buckling and more
ding resistant on the rail |
| We no longer carry the bamboo fiberglass cloth. Our manufacturer no longer produces it for us and we have not secured a new manufacturer. We will keep everyone posted if and when we are able to bring it back to market |
| You can simply add the UV powder to your gallon of resin, re
cap it and shake well. We suggest giving the gallon a quick shake
before each use as the UV activator will tend to settle at the bottom after a
while. You can also add small quantites of UV powder to the resin in the cup but it will be hard to measure the exact amount of UV powder to add. Too much will make the resin look yellow-ish, not enough will not cure correctly. For reference use 7cc UV powder per gallon of resin |
There are two schools of though on this: 1. 6 oz cloth over the 4 oz. on the deck. will make the board stronger than a 4 oz. lap to the bottom but use more resin in the hotcoat. 2. 4 oz over the 6 oz will be a bit easier to lap and use less resin on the hotcoat to fill the weave. Either way is OK. It's up to you |
| The Vented Leash
Plugs come with the website address to view the Vented Leash Plug
Installation Video |
| Epoxy putty is only used as a resin dam for our vented leash plugs. Putty is not recommended for regular plugs. Use resin. |
The chewing gum like mass
is Epoxy Putty, it's used as a resin dam during installation so the resin
won't clog the G-Vent membrane. You can watch the Vented Leash
Plug install video here showing how the putty
works. |
Polyester resins are not eco-friendly, epoxy
resins are considered 'more eco-friendly'
because they have extremely
low VOCs |
Resin Research UTLRA Epoxy (CE or Quick Kick both have UV Stabilizers in them to greatly reduce yellowing). Epoxy has better flex properties and the board will remain more lively as Poly will break down, stress crack and delaminate. |
| You can sand as soon as the resin cures to a hard
state... There are many variables in the timing of resin
cure with both polyester and epoxy resins (temperature, humidity, type of
resin, etc) so it's better not to rush and just make sure the lamination is
hard. Note:
Polyester resin will still be a bit tacky after curing... you can still sand
it but make sure the resin is cured and
stiff. Epoxy resin will be nice and
hard and sand easily |
| You can hotcoat right after is has hardened (after sanding the
laps down). Note: With epoxy resin - If you hotcoat with a
48 hour window of the lamination, you will get a strong resin chemical bond
between the hotcoat and lamination. |
| With Epoxy, If you wait more than 48 hours to hotcoat the
board it's a good idea to rough up the board for a mechanical bond between
the hotcoat and lamination... Just hit the lamination with 80 grit on a
medium sanding pad and blow / wipe the dust off.. you can also wipe down with
Denatured Alcohol and drag the sticky side of masking tape all over
the board to pick up dust and eliminate pinholes and fisheyes in the
hotcoat. Polyester resin does not require any roughing to establish a
good bond as the laminating resin remains a bit tacky to "grab"
onto the hotcoat resin. |
For a continuous color deck and bottom make a
"master batch" of resin with the color in
it. Pour half into a
clean container and put a lid on it. Mix the hardener in the first bucket of resin and
laminate the bottom - 1 layer of glass. Cut lap that on the
deck. Then mix hardener in the second
color resin bucket and laminate the deck - 1 later. Cut that at the bottom
cut lap. Then laminate the
bottom clear free lap - sand the lap flush with deck Then laminate the deck clear free lap - sand the
lap flush with bottom |
This is not a big deal but will show up in the final
board. First, you should cut the glass as evenly as possible so the
lap line is consistent. This will make sanding it flush much easier. See how
the glass it all wavy? That's more work to sand. Second, you can simply use a
hard block with 60 or 80 grit paper to sand down the edge of the fiberglass
until it comes as close to the foam as possible without gouging the foam. We
do it with a power sander and hard disc now but a hard block by hand is much
easier to learn when you're starting out. Also, another little trick
instead of sanding the laps flush is to simply push the fiberglass edges down
into the foam with a popsicle stick. Just enough to get them flush with the
deck foam. Again, it helps to have a clean and even fiberglass cut to reduce
the work and inconsistency. |
I think you're talking about resin exotherm melting the foam.
"Burn through" is a term we use when oversanding the hotcoat into
the glass. In summertime heat (80 degrees ) the epoxy resin will tend to
exotherm in deep holes as in FCS X-2 plug holes and ding repairs. FCS fusion,
FCS II, and Futures are a tight fit and use very little resin so no worries
there. We recommend pouring only
about a 1/2 ounce of epoxy into a hole at a time then waiting about an hour
to fill up the rest of the hole. This will stop the epoxy from exotherming
and melting EPS. |
I just got air bubbles in my last lamination too..
it happens. Simply sand the bubble open and throw a little patch of cloth on
them. Then sand the patch overlap flush with the rest of the
fiberglass. It
sounds like your lamination in fine. It should have the texture of the
fiberglass and the hotcoat will fill all that in and make it disappear.
You're doing fine! |
| Absolutey! You can use Epoxy on a Polyurethane Blank. Many boards are built like that these days. |
Fabric
inlays are pretty simple actually. It is best to use silk or cotton
fabric. Tape off the inlay area as if you were doing a
cut lap (because you are doing a cut lap actually) Lightly spray 3M Super 77 spray adhesive on the
blank and ROLL out the fabric, making sure to get rid of any wrinkles along
the way. You can iron the fabric first if you want... Laminate and let the resin soak through the
fabric. When the resin is tacky but not fully cured run
a razor blade along the tape line and pull the excess off. Depending on the
cloth it might be hard to see the tape so you can make a template first and
scribe the line on the fabric before cut lapping. You can push the edges of the fabric slightly
into the foam with a popsicle stick to get it flush so no air bubbles will
happen at the seam as you laminate the fiberglass over it. Not difficult at all. |
Ideally you want to glass indoors in 70 degree
temps but that doesn't mean it can't be done successfully
outdoors. Epoxy moves better in hotter temps so I recommend
heating the resin first so it flows nicely on the board while
hotcoating. But, it's
best to have the surfboard and resin at the same temperature so the resin
doesn't get "shocked" when hitting a colder board and getting a
little funky. So if you can keep the board and resin in a warm room and bring
them out at the same time you'll have better results. Also beware of wind pushing debris onto the board while
outside, it's almost guaranteed to happen :) I've glassed boards outside plenty of times in the summer
months and they turned out fine.. Overall don't
expect perfection when you're working in a non-perfect environment. The end
product will be a ton of fun to surf no matter how it turns out. |
Yes you can hotcoat with epoxy. Although it's not advisable it is best to scratch up the poly lamination with 60 grit sandpaper for a better bond.
Over time the hotcoat may chip off from the board flexing since the materials have to chemical bond
Please download our Polyester Resin Additive Chart
No, it's just the wax in the solution has hardened. Simply heat the bottle up to re-melt the wax and you're good to go.
Vectornet can be used on the rails to provide a more torsional flex pattern (which you won't really feel on a SUP). Or if used along the bottom will stiffen the entire board and you can reduce the amount of fiberglass on the bottom to 1 layer...
Styrene is not compatible with epoxy. Additive F is the epoxy reducer. You want to double the amount of additive F for a gloss coat to thin it out... about 10 cc (ml) per quart of resin. The rule of thumb for a hotocat is 2cc per oz. of hardener, so it'll be 4cc per oz of hardener for a gloss coat.
Standard glassing schedule is 2 layers on the deck and 1 layer on the bottom. Although you can laminate any number of layers you want to increase board strength.
You'll have 2 1/2 "laps" of fiberglass around the rail of the board. One from the bottom to the deck, one from the deck to the bottom, and 1/2 a lap on the deck to the midpoint of the rail.
Overlapping the fiberglass on the rails provides great strength and snap resistance as well as stiffens the board.
You can vary the length of the lap (how much fiberglass runs from the rail towards the stringer) to increase stiffness or reduce weight of the board..
The lap from the bottom to the deck is usually about 1 1/2" - 2" long... the deck to bottom lap is normally a bit shorter (around 1") on shortboards.
All you need in one carbon strip on the bottom. Carbon stiffens the board and only works in tension, so on the deck is pretty useless.
Laminate it right down the middle of the bottom and you're good to go. You can immediately lay out the bottom fiberglass, cut, and laminate right after the carbon strip. It's best to laminate the carbon first separately to eliminate air bubbles.
Yes you can install the Vented Leash Plug right into the foam before glassing. Please note the install video shows the previous version of the VXV with a cap. The new vent requires you to stick a piece of masking tape over the top to prevent resin from getting into the plug when laminating if you're doing a pre-glass install.
You can cut the masking tape out with a razor blade while the lamination is curing and re-tape for the hotcoat (advised). Or cut through both the hotcoat and lamination when all is cured (more difficult)
Absolutey! You can use Epoxy on a Polyurethane Blank. Many boards are built like that these days.
No need to spackle PU foam, just recommended for EPS foam to fill the voids between foam beads.
We recommend getting a surfboard shaping tool kit and a beginner glassing kit for your reshape. That's all you need.
If you're looking to reduce weight you can pull more resin out of the lamination so the fiberglass weave has no shininess, reduce the length of your laps (less material on board), and cut back on the hotcoat amount but make sure you're really good at sanding so you don't burn through.
We don't use cheater coats but they definitely help the hotcoat be smoother and and easier sand out. A single proper hotcoat and good sand job is all that's needed.
You can squeegee a cheater coat of resin on just to fill in the fiberglass weave. Then about 2 hours or so later (with Quik Kick resin) you can brush on the hotcoat. Just let it flow flat and walk away. Screwing around with the hotcoat will cause pinholes, ripples, and fish eyes.
Next day do the same to the other side.
One thing to know is resin itself is not all that strong. So extra resin on the board only makes it heavier. The lamination of fiberglass and resin (a composite) is the strength of the glass job. The hotcoat is just a sandable sealer to keep water from wicking into the board through the fiberglass strands.
Yes, you can use poly over an epoxy hotcoat but it is not recommended. Since there is no chemical bond between the two types of resin it is best to sand the epoxy hotcoat with 80 grit to get a better bond with polyester. Over time it will eventually chip off with use.
You can laminate the deck the day after you glass the bottom. You do not have to sand the rails, but you can sand down the lap line ( the glass that has wrapped around to the deck) and then layout your deck fiberglass.
No it is not 100% necessary to use Cab-o-sil in the vented leash plug installation.
The cab-o-sil thickens the resin so it does not drain into the foam as much, using less resin and eliminates the possibility of having to fill the plug hole twice with resin.
Our Vented Leash Plugs have been in surfboards and SUPs for since 2010 worldwide with no reports of degrading over time. We recently developed a new improved membrane we call "G-vent" to replace Goretex which is the standard venting material.
If you are concerned with longevity of the membrane then you can rinse with fresh water as the only thing that can do wrong with the membrane itself is getting clogged with salt particles from ocean water. But that is very unlikely since the microscopic membrane is smaller than water molecules.
You can be confident in the lifetime if our vented leash plugs.
A cut lap marking tool is something you don't need to spend money on. Just make it yourself with scrap foam from your outline cut.
Here is what it should look like. Just push a pencil through the foam the desired distance from the rail and scribe your line around the board.
You can proceed to the next glassing step as soon as the resin hardens and you're able to sand it (for example sanding down the laps to the foam).
Resin curing times depend on type of resin, temperature and humidity so use your good judgement before moving forward.
Trying to rush to finish a board rarely ever works out and creates more problems that prolong the build. Believe us. we've rushed plenty of experimental shapes for swells on the way and they more often than not sat on the glassing racks while surfing the swell with an older board... that's how it goes.
We do however recommend waiting a day to sand the board after the bottom hotcoat. It cures up a lot harder and sands nicer...
Could I do this (I hope I can explain this idea alright): lets say I am making a noserider with 6+4 bottom and 6+6+4 top. Could I theoretically laminate the 6 cloth on the bottom with the tinted resin, press the cut lap into the foam, laminate the entire deck with tinted resin, then after the cut lap on the bottom is cut, laminate the 4 cloth with clear resin on the bottom and then cut that where the hard edge of the cut lap is so it ends up leveling out? How would that turn out if it did work? Is there a better way to do it?
For a continuous color deck and bottom make a "master batch" of resin with the color in it.
Pour half into a clean container and put a lid on it.
Mix the hardener in the first bucket of resin and laminate the bottom - 1 layer of glass. Cut lap that on the deck.
Then mix hardener in the second color resin bucket and laminate the deck - 1 later. Cut that at the bottom cut lap.
Then laminate the bottom clear free lap - sand the lap flush with deck
Then laminate the deck clear free lap - sand the lap flush with bottom
Yes, you need to add MEKP catalyst to UV cure resin for finbox and leash plug installs because the sun's UV rays will not penetrate that deep into the board.
It is also a good idea to add a drop of catalyst to UV resin for laminating and hotcoating so any resin that hits the floor will cure over time if not exposed to the sun.
Also, if using resin pigments you need to add MEKP catalyst for full cure...
Yes, even though UV resin gives off less VOC fumes because it cures faster it is still a good idea to protect yourself from all levels of fumes.
Yes Surfacing Wax will go bad after time since the styrene evaporates. Also prolonged exposure to heat and light may affect it. If there are chucks of wax floating in there you add more styrene and heat up the bottle to re-liquify the wax into the solution. It's also a good idea to strain it to get rid of any pieces of wax that did not dissolve.
Yes, you can use polyester resin with VectorNET carbon fiber reinforcement.
This is a relatively common issue for first time glassers. Not a big deal, just sand those un-adhered parts of the fiberglass. You won't see the mistake when you do the Next lamination make sure to fully saturate all the cloth and squeegee it all down to the foam.
It is always a good idea to test the color on a scrap piece of foam or white paper before adding hardener. The depth of the resin in the bucket will make it look much darker than on the board.
You can do a tinted or pigmented hotcoat over the lamination to cover up the current color. Just be careful not to sand through the hotcoat or you will see the lighter color underneath.
VectorNET is a stiffener and not so much an impact resistant material. It will make your board lighter, stiffer, and break-resistant but not ding proof. It will help resist pressure dings from feet and knees if used on the deck.
S-glass is more impact resistant than E-glass and a bit stiffer.
With Vectornet on the foam and a layer of S-glass on a poly blank you pretty much have a very strong board in many aspects with a savings in weight.
If you get the resin opaque you will not see the VectorNET underneath the lamination. We suggest doing a small test panel on scrap foam or white paper with the VectorNET under the glass to see how it looks before adding the hardener to the resin.
Note: Using more than 10% pigment in the resin may affect the curing and strengthMake sure to add the proper amount of MEKP catalyst to the resin before hotcoating. It will not cure without it (unless it's UV cure resin)
Poly resin has a 6 month shelf life then it starts to thicken and have curing issues. This may be what you're experiencing.
Also, always shake the 250B Hotcoat resin with wax included before use to disperse the wax evenly. It is possible the wax migrated to the bottom of the jug which would make the resin remain sticky.
You can remove the sticky resin with Acetone and a rag. Scrape what you can off first then wipe the rest off...
Install the leash plug about 2" from the tail of the board on the stringer for the most strength. Make sure your tail is thick enough at least 5/8" thick at that point and it does not interfere with the center fin box (if there is one).
For swallow tails it's best to put the leash plug in the foam of the swallow tail so you don't step on it.
Put the powder in the gallon jug and shake well before ever use. No need for MEKP Catalyst except for when adding pigment to the resin, finbox, and leash plug install since the sun won't penetrate and activate the hardening. We do suggest however to put a drop or 2 of MEKP catalyst in UV Cure Resin so any drips that hit the floor or your glassing racks will cure in the shade.
RESIN USAGE CHART HERE:
The Cloth Yardage Multiplier is (1) how much resin I needed to properly saturate the cloth being used, and (2) how much resin beyond that is needed to create a good lamination with good technique. The cloth yardage multiplier is just the # of yards of cloth used, and that gets multiplied by the cloth sq yd weight. That basically should give an approximate(!) amount of resin that the cloth itself will be holding once it's properly saturated without any dry spots and without any excess. Then there's a 2 different buffer amounts added to that to allow a realistic amount to work with so that the laminator isn't working the cloth or resin too much, wrecking the cloth weave and/or introducing too much air into the resin (particularly for epoxy), which gives the minimum and suggested amounts.
No need to sand the board, just sand down the fiberglass lap close to flush with the foam.
Yes, you sand the hotcoat to at least 150 grit before applying the gloss coat. The flatter the sand job the nicer the gloss will come out.
Correct, a gloss is the same as a hotcoat but with styrene added to thin the resin so it flows flat. I know some guys prefer to do gloss coats with MEKP catalyst and let cure inside nstead of UV cure resin because it allows more time for wax to rise to the surface during cure. This helps sand and polish the glosscoat with no swirl marks. You can certainly do a gloss with UV resin as well. Make sure to "flash" the resin in the sun for about 10 seconds to activate hardening then put back in the shade for 10 minutes for the wax to rise. Then back in the sun for a few minutes to fully cure. Same pocess for UV hotcoats.
Yes the surfacing agent loses it potency over time if exposed to heat or light, or the cap is not screwed on firmly. Best results are achieved with fresh additives are used.
The polyester resin catalyst chart amounts are for room temperature (70 degrees F). There is a note at the bottom to use 1/2 the recommended amount for temperatures above 90F.
Therefore figure at 80 degrees use 3/4 the amount of catalyst on the chart. For laminating in 85F you would use around 60% of the amount catalyst.
It is always better to use less catalyst so the resin cures stronger and not brittle. Plus you have more time to laminate and get all the air bubbles out.
You'll need 1 gallon and 1 quart Silmar 249B resin to glass a 9'0 longboard. You'll also need 2 oz MEKP catalyst and 2 oz Surfacing Wax (for hotcoating). If you plan to gloss and polish the board as well you will need an additional quart of Silmar 249B resin and 2 oz Styrene to add into the resin for glossing.
Here is a chart for how much resin to use for each step in the glassing process:
Yes you can add styrene to Silmar 250B. You are essentially making Gloss resin by thinning the 250B hotcoat / sanding resin to it flows in a thin flat layer. Here is a resin additive amount chart for reference.
Definitely shake the 250B resin every time before using since the wax tends to sink to the bottom. You might also want to make sure the board is free of dust and debris before hotcoating. That will cause pinholes and bubbles.
Yes, you can add styrene, wax and MEKP to 250B for glossing. Surfacing wax has styrene in it so you can cut back on the additional styrene a bit so it's not too thin.
How we vac bag veneers is to do the first layer of glass and the veneer at the same time. Spray 3M super77 adhesive to the back of the veneer and roll out 4 oz cloth on it. We then template the fiberglassed veneer and cut it out with shears.
A nice trick is to lightly sand the edges of the veneer before putting on the board so the veneer is close to flush with the foam.
Then wet up the fiberglass with epoxy resin and tape it to the board with masking tape so it doesn't shift when in the bag.
Leave it in the bag for at least an hour so the resin is cured. Then take it out and laminate a layer of 4 oz over it.
Polyester laminating resin is always sticky after curing. It is designed that way so the hotcoat will bond better. All you should be sanding is the lap line to get it close to flush with the foam on the deck and the fiberglass on the bottom. Your sandpaper will always gum up when sanding laminating resin, it's just part of the process.
Adding surfacing wax to the laminating resin is for hotcoating only.
To wrap the carbon (actually any time using carbon strips) the trick is to spray the back side of the carbon with 3M Super 77 spray adhesive and stick it where you want it. It won't move when laminating and you can peel it up if the placement isn't what you want. Super 77 is available at most hardware stores and is also used for adhering sandpaper to Flexpads for sanding.
Deck patches are usually 2/3rds the length of the board from tail to nose and provide more strength for the deck where your feet and knees pound on the deck. They are not necessary but sometimes added for heavier footed surfers. It of course adds more weight to the board but a lot more strength.
Normally a deck patch is the first layer of glass to go on the foam and cut in a triangular or rounded shape towards the nose (2/3rds from the tail). Leaving the deck patch edge running strait across from rail to rail will cause a break point in the board. One or 2 more layers of glass are then rolled out over it and laminated at the same time.
Yes you can add football patches over the first lamination. Normally they are placed on the foam and laminated with the bottom layer at the same time but no worries, it's just a but more work.
Just sand down the edges of the football patches after they cure so there is not a hard edge. When you hotcoat you want the surface to be smooth and the resin to flow over everything uninterrupted.
Painting before gelcoat can be done but it usually causes resin bonding issues and delamination over time. It is always best to paint directly on the foam and clear fiberglass over it or laminate with pigmented resin for color.
No problem glassing in 60 degree temps. Actually the resin will cure in any temperature with catalyst in the Polyester resin. The UV resin will cure in any temperature as well, as long as it's sunny enough to activate the curing. If you can see your shadow the UV resin will cure.
Epoxy resin likes to be above 70 degrees but will cure in any temperature, just takes longer when it's colder. You can heat up the resin and the blank to make glassing easier in temperatures below 70 degrees.
The latest version of the VXV does not have a cap and you can cover with tape if you're worried about getting resin in the plug itself. Just run epoxy around the perimeter of the plug with a small dixie cup creased to make a pour spout.
Yes, you laminate the VectorNET and fiberglass all at the same time.
The VectorNET goes on the foam first, then roll the fiberglass out over top, trim, and laminate with resin.You can glass 2 layers of fiberglass at a time. If using carbon reinforcements like VectorNET they are placed directly on the foam and laminated at the same time as the fiberglass layers.
With the Silmar UV Solar Cure resin make sure to shake the can every time before using to thoroughly mix the photo-catalyst into the resin.
In a shaded area (no UV rays hitting the board) take as much time as you need to laminate the board. The put in the sun or under UV bulbs for about 3 minutes to cure. You can then sand your laps and continue laminating.
For hotcoats add surfacing wax to the UV Solar Cure resin (here's a chart for how much per oz). Hotcoat the board in a shaded area as normal and put in the sun for about 10 seconds. I keep the board in my hands and walk it outside then walk back in. This will "turn on" the resin cure but allow the surfacing wax to rise to the top so you can sand the hotcoat. Give it about 15 minutes in the shade and then bring it outside for another 3 minutes and good to go.
UV Solar Cure resin does not work on finbox and leash plug installs because the UV rays don't get in there so add MEKP catalyst to the resin for a full cure.
It is optional to put a few drops of MEKP in the UV Solar Cure resin for every step of the glassing process so any resin that hits the floor or into drip trays will cureover time being out of the sun.
UV cure resin is inherently weaker than MEKP-cured resin because there is not as much time for the molecules to cross link but you can ride it as soon as the hotcoat is cured.
Here's a chart of resin addititves: https://cdn.shopify.com/s/files/1/0689/1441/files/Greenlight-Polyester-Resin-Additive-Chart.pdf?487
Aerialite E-glass and Hexcel E-glass are the same materials from different manufacturers. We personally like Aerialite because it drapes over rails a little better and easier to laminate. But some guys swear by Hexcel for one reason or another. It's all personal preference as is everything in surfboard building.
WARP glass has more glass strands running along the stringer direction which improves bucking and break strength. Some guys say it holds pigmented resin better too for a deeper color.
S-glass is 20% stronger than E-glass as the glass is processed at a higher temperature. Great for improving overall ding resistance while keeping your board light.
No, you do not add styrene to the resin when hotcoating, you want it to be thick. Styrene is a resin thinning agent and for use with the gloss coat to lay down a thin, flat layer.
The plastic is for production of the tapes. Remove it first then apply the carbon to the board.
Yes it is best to spread the resin in along the carbon fiber direction for the first few passes but after it is fully saturated and adhered to the foam you can cross stroke lightly.
There are three main fiberglass layups and it's a trade off between strength and weight of the board.
1. 4 oz bottom, 4/4 deck - lightest and adequately strong
2. 4 oz bottom, 6/4 deck - stronger deck and rails resists dings and dents better but a little heavier
3. 6 oz bottom, 6/4 deck - strongest all over but heavier
If you want the board all the same color using a transparent tint then you should do a cut lap. Laminate the tinted bottom and do 1 layer of tinted color lam on the deck as a cut lap using the bottom lap as the edge of your deck lap.
Then do a clear lam on the deck lapping to the bottom. You may want to pin line the deck to hide the cut lap...
If you use an opaque pigment all the same color you can do a free lap. Trick is to make a "master batch" of resin with the color to cover both the deck and bottom laminations, then split it and add hardener and lam the bottom. Put the other colored resin aside and add hardener when you're ready to glass the deck.
You have to let the resin tack up to semi-solid before cutting the lap with a razor blade. A good test is to touch the resin on the board with your finger and if it's sticky but does not stick to your finger an pull a string of resin then it's ready to cut. You can also let the resin fully cure and cut through, it's just requires more force to cut through the solid cured resin. Much easier to cut when it's in a softer state.
The carbon goes directly on the foam and is laminated the same time as the fiberglass. A nice trick is to lightly spray the area with 3M Super77 and adhere the carbon to the foam first so it doesn't slide when wetting out the glass and carbon.
Styrene thins the resin and is only to be added for your gloss coat (to be polished to a nice shine). Styrene thins the resin but too much will break the resin bonds apart and therefore not harden.
Take a look at our catalyst / wax / styrene chart and you won't have any problems with your cure.
The standard glassing schedule for a shortboard is one layer 4 oz E glass on the bottom with one later 4 oz + one layer 6 oz E glass on the deck to reduce pressure dents and dings from your heels and knees while popping up.
For a 6'1 you will want 5 yards 4 oz E glass and 2 yards 6 oz E glass
The 6 oz will be 1" short but that's OK, you put that on the deck first and cover with the layer of 4 oz. that wraps around the rails.
A 1/8" concave is not all that much and does not need any extra hotcoat work. The resin will pretty much follow the shape of the board and create a shell. A shallow concave like you have will not fill that much with resin sliding down the sides of the concave. Your last walk out or "tip out" with the brush will keep the hotcoat shell pretty uniform in the concaves.
Then it's a matter of sanding. I recommend a Flexpad Soft Density sanding pad to conform to the concave and sand it all uniformly.
Deep concaves (1/4" +) take more sanding finesse as the resin will pool a lot more than a shallow concave.
Laminate the bottom first, let it cure, then do the deck. Hotcoat top, let cure. Hotcoat bottom, let cure. Install fin boxes (If FCS X-2, FACTORY plugs, or longboard center fin box. let cure. Sand the board.
Read through the glassing section of the surfboard building guide before you start glassing to help you out.
Hexcel and Aerialite are like Coke and Pepsi. Same thing but a slightly different flavor. Aerialite cloth is actually preferred by many more glassers. I like it because it is not as stiff as Hexcel and drapes over the rails easier, less expensive too.
You must use epoxy resin for glassing EPS foam blanks.
Polyester resin will melt the foam! Don't make this mistake!
You can use either polyester resin, UV Sun Cure polyester resin, or epoxy resin on Polyurethane foam blanks.
The trick to carbon fiber rails is to adhere the carbon tape to the rails with 3M Super77 spray adhesive (just a real light spray on the rails to tack them up) and apply the carbon. Then lay out your fiberglass and laminate everything at once. Make sure to squeeze out any bubbles in the rails that may occur between the carbon and fiberglass.
If you can't feel the fiberglass weave then the board is sealed and water will not get in. You can go ahead and surf it.
If it bothers you to see it you can simply spray some Krylon Clear Coat gloss on it and lightly sand it to make the weave disappear. This will also seal any water from getting in if the weave is exposed.
No, UV cured resin is more brittle than catalyzed resin. Catalyzing for a slow cure makes the strongest molecular bonds.
Sealing and EPS surfboard blank is definitely recommended if you are painting the foam prior to laminating or laminating with a resin tint for better aesthetics. White boards or opaque resin pigmented laminations do not require sealing.
Regardless, sealing the blank with EPS Blank Sealing Paste will reduce the amount of resin absorbed into the foam resulting in a slightly lighter board.
We tack the carbon to the foam with a light spray of 3M Super 77 then roll the glass over it and laminate everything at the same time.
Fish eyes are caused by contamination, most likely from the oils in your fingers when handling the board. Also, dirt and dust in the air can settle into the hotcoat and cause pinholes and fisheyes...
It is best to blow off the board with compressed air and wipe down with denatured alcohol before hotcoating.
You can also drag piece of masking tape, sticky side down, over the board to pick up dust particles.
After hotcoating walk out of the room and don't touch the board. Moving around the board may kick up dust which might settle in the board causing issues.This sounds like a case of a mixing issue. I've seen this a few times, and actually have has the same issue years ago.
There was probably a small area in bottom of your bucket of unmixed resin.
Be sure to scrape the bottom and the sides of the mixing container to make sure all the epoxy molecules mix. The resin is heavier and stickier than the hardener and will stay on the bottom unless pushed around with the mixing stick.
Epoxy is an additive reaction (chemistry 101) and requires the resin and hardener to be measured accurately and mixed thoroughly so every 2 molecules of resin links with 1 molecule of hardener.
The best thing to do is scrape off what you can and re-hotcoat the area. No problem.
| This reaction that you are experiencing is due to
"exotherm" the resin. Exothem occurs when epoxy is left
in the cup or bucket after fully
mixed. The
molecules involved in the reaction are reacting quickly because they are
bouncing off each other in the cup and in a confined area it will speed the
process. The best way to slow the reaction is to get the resin out of
the bucket and onto the board once it is fully mixed. Then the
resin will spread out and not react as quickly. |
I know what you mean about moving away from the polyester stink! I personally prefer epoxy for that and it's increased strength benefits.
It is best to glass in temperatures in the 70's but I have glassed plenty of boards in the 40's simply by heating the resin component in the microwave to reduce the viscosity so it saturates the cloth easily. Epoxy is temperature sensitive and will take longer to cure in temps below 70 and cure faster in temps above 80...
We recommend using Resin Research 2000 Ultra for your first time as it provides a good 25 minutes of working time - (Resin Research Quick Kick formula cures faster)
Yes the Resin Research epoxy kits come with hardener. It's a 2:1 mix ratio.
The additive F is separate and you'll need a 2 oz bottle for any epoxy kit 1.5 gallons and below.
Additive F has an agent in it that reduces blush.
Also if washing the board with Denatured alcohol make sure it's 100% dry before hotcoating.
Another thing to watch out for is moisture in the epoxy or brush. It will cause it to look milky white.
Fish eyes are caused by contamination, most
likely from the oils in your fingers when handling the board. Also, dirt and
dust in the air can settle into the hotcoat and cause pinholes and
fisheyes... Try lightly sanding the lamination first than hotcoating. Additive
F will help with fish eyes and bubbles. X-55
is great for accelerating cure times but causes the resin to get
milky-white. |
For first time glassers and SUPs Resin Research 2000CE Ultra is recommended since it has a longer working time compared to Quik Kick.
Once you're comfortable with the glassing process Quik Kick is the way to go with increased curing speeds and in our opinion easier-to-sand hotcoats because it's higher viscosity builds a thicker hotcoat.
Below is more info on 2000CE and Kwik Kick:
2000 CE Ultra Epoxy
This base resin system was originally developed for lightweight hand lay up composite systems. It’s unique four way flex controlled resin ensemble gives the engineer more latitude in developing production systems than any other resin system available today.
The balance of excellent color, UV stability, varying hardener speeds, easy mix ratios, extremely low vapor pressure, excellent chemical adhesion and high gloss finish make this resin system easy to use and an effective production contributor to everyone from the small craftsman to large scale producers. Newly available in all of our formulations is our CE package. The CE package contains an optical brightner and a UV stablizer. The optical brightner gives the resin a slight blue color and makes products appear whiter. The UV absorber is a shield which blocks damaging UV rays from your substrate. Many wood products, foam products and even paints are UV sensitive and our CE package will significantly postpone damage to these coated surfaces. Very safe to use, the resin system also comes with additives and modifiers to produce a myriad of high quality products.
Kwik Kick Ultra Epoxy
The fastest setting hand lay up epoxy yet. As fast or faster than polyester resins in many production scenerios. Mimicks polyester resin in curing by thickening in a similar way but without the hard gel time. This system has only one speed, FAST. Also compatible with our other systems so this can be dropped into production when speed is nessesary.
Some examples:
Ambient Temperature 70F (21C) 80F (27C) 90F (32C)
Pot Life
Kwik Kick 18 min. 14 min. 11 min.
RR 2000CE/2100Fast 22 min. 17 min. 13 min.
RR 2000CE/2100Slow 40 min. 30 min. 22 min.
Set Time - Tack Free
Kwik Kick 1.5 hrs. 45 min. 30 min.
RR 2000CE/2100Fast 3 hrs. 2 hrs. 60 min.
RR 2000CE/2100Slow 6 hrs. 4.5 hrs. 3 hrs.
Some typical working aspects and tips:
1. The low viscosity wets out fast and a fast lock time virtually eliminates resin drain but doesn't preculde the continued ability to move the resin and continue work for the entire pot life and beyond. This system stays where it's put better than any other, even on vertical and curved surfaces.
2. UV stability is excellent with little or no discoloration in over 1000 hours.
3. This system contains UV absorber which allows it to be used in conjunction with sensitive substrates. I.E. Urethane foam, PVC foam, light colored woods, etc.
4. KK is significantly stronger than all other epoxies tested (numbers forthcoming)
5. Low viscosity also facilitates easier and more thorough mix. 2 to 1 ratio is easy.
6. Compatible with RR Additive F for easy sanding and finishing.
7. For surfboards KK is compatible with all modern fin box systems with no foam meltdown. Very low exotherm considering it's speed.
8. Excellent flex charateristics while still maintaining excellent dent resistance.
9. During initial tack free state KK can be hand molded using a hard roller. This saves significant sanding. Bubbles in laminates can be pushed or pinched out during this stage as well.
Epoxy cannot be sprayed through a normal gun. You need what is called a "dump gun" but the finish is undesirable, Not worth spraying.
You do not have to sand between coats if applied within 24 hours. There is still a good chemical bond in that timeframe.
Dust contamination does not affect cure but may cause "fisheyes" and pinholes in the hotcoat. Additive F helps prevent fisheyes but in addition to wiping the lamination down with Deatured Alcohol and keeping your hands off it, you can lay the hotcoat down and walk away to give it time to self-level. If you check on it 20 minutes or so later and see any separations or pinholes in the hotcoat you can lightly rub the area with your finger to connect the resin back together.
While not totally necessary to use additive F in the lamination stage of epoxy glassing, it does help thin the resin so it flows better and soaks into the foam and fiberglass faster.
It it highly recommended to use additive F in epoxy hotcoats (sealcoats) as it eliminates blush, fish eyes, other surface blemishes, and increases Barcol hardness.
This increase in Barcol makes the board sand easy and improves the bond and strength between layers.
It also doesn't interfere with recoating as wax solution in polyester does. That means no sanding between layers.
How to use Additive F:
1cc per ounce Hardener for Laminating
2cc per ounce Hardener for Hotcoating
| We put 1 cc (ml) xylene per ounce of mixed resin in addition to the additive F for the gloss coat. Thins the resin out to lay flatter on a hotcoat sanded to at least 150 grit. |
Fish eyes are caused by contamination, most likely from
the oils in your fingers when handling the board. Also, dirt and dust in the
air can settle into the hotcoat and cause pinholes and
fisheyes... If
they are repairs make sure the area a sanded and wiped down with denatured
alcohol before hotcoating. Yes,
you can use poly over an epoxy hotcoat. Since there is no chemical bond
between the two types of resin it is best to sand the epoxy hotcoat with 80
grit to get a better bond with polyester. Over time it may chip off though
with use. |
Epoxy likes to be used in 70-80 degree temps for a nice flowing viscosity and average curing time. Cold temps will thicken the epoxy making it difficult to laminate and take longer to cure. It can be used in temps in the 40's with no issues - the resin just needs to be warmed up to reduce the viscosity and allow it to flow.
You want to heat the RESIN component only (never the hardener) in the microwave for 2 seconds per ounce or set the bottle near a heater until it flows like water again.
If you can heat up the blank as well it helps keep the resin warm while working with it.... not 100% necessary but helps.
| Yes, X-55 will work with other resin systems |
Yes, we have SLOW hardener available as well.
Please include the term 'SLOW HARDENER' in the customer notes when you order and we'll
include it. No problem. |
This sounds like a case of a mixing issue. I've seen this a few times, and actually have done it before years ago.
There was probably a small area in bottom of your bucket of unmixed resin.
Be sure to scrape the bottom and the sides of the mixing container to make sure all the epoxy molecules mix. The resin is heavier and stickier than the hardener and will stay on the bottom unless pushed around with the mixing stick.
Epoxy is an additive reaction (chemistry 101) and requires the resin and hardener to be measured accurately and mixed thoroughly so every 2 molecules of resin links with 1 molecule of hardener.
The blue tint in the resin is an optical brighter and varies slightly with each gallon we pump from the drum into containers. It does not create any issues in glassing or with the curing, and the blue tint cannot be seen on a board in such a thin lamination layer or hotcoat anyway.
| 2 ounces add F for that mix. Rule of thumb is approx. 2 cc Additive F per
ounce of hardener. 30cc = 1 oz. |
We do not recommend the West System Six10 epoxy, it is too thick and no where near enough to complete your board. Resin needs to have a low viscosity to soak through the fiberglass and bond into the foam when laminating. Also the seal coat (hotcoat) needs to flow like water to self-level and reduce sanding.
West System 105 can be used but it is brown resin and becomes more brown in the sun. It is designed for boats, not surfboards and thus does not have the flex properties a surfboard requires.
We recommend Resin Research Epoxy which is specially formulated for surfboards.
Absolutely. You can laminate with Resin Research 2000CE epoxy and hotcoat with Resin Research Quik Kick. We actually prefer to use Quik Kick on the hotcoats because it is a bit thicker and cures faster so it builds deeper hotcoat (especially on the rails) so there is less chance for burn throughs when sanding.
We recommend using 2000CE for laminations on longer boards, especially SUPS to give more working time. Shortboards can be laminated and hotcoated all with Quick Kick...
As long as the hotcoat is applied within 24 hours of the lamination there will be a chemical bond - even between 2000CE and Quik Kick. After 24 hours it's recommended to lightly scuff the fiberglass for a better mechanical bond. Make sure to blow off or wipe all the dust off the board before hotcoating to avoid fish eyes and pin holes.
Epoxy resin cures to full strength in 7 days but it is about 90% full strength 24 hours after curing.
So you can get in the water as soon as the hotcoat is sanded. It will be plenty strong.
There are two common reasons why hotcoats get air bubbles:
1. Too much brushing - when hotcoating, you're "plowing" the resin around with the brush and the rolling resin captures a little air. The more rolling, the more aeration and it will get trapped in the resin.
2. Too vigorous mixing. Same thing here. If you're whipping the resin while mixing in the hardener you're introducing air. In addition if you keep taking the mixing stick out of the mixing bucket and putting back in, each plunge will bring a little air with it...
It is recommended you sand the current hot coat flat and re-coat to prevent water from wicking through the fiberglass. Essentially you'll be going a gloss coat, or second hot coat. No need to sand all the first hotcoat off, just level it out and scuff it up with 80 grit real quick.
Our Resin Research and Super Sap epoxies are non-toxic and odor free. You can glass inside with no smell or worries at all. It is always a good idea to wear a respirator though when using any chemicals.
Yes you can roll the laps flush with a wallpaper seam roller or push the edge of the lap down into the foam with a popsicle stick. It does bounce back but just apply a little more pressure to bounce back flush with the foam.

Additive F will help your fish eye problem. That's one of the big pluses to using it with your hotcoats. Warming the resin to the 80 degree range will also help it flow. Also, lay down the hotcoat and walk away. Let it self level. Playing around with the hotcoat will only cause trouble. If you see any fish eyes or separations in the hotcoat after a few minutes just lightly rub the area with your finger to re-connect the resin (you're breaking surface tension).
Yes, you can use Super Sap with Resin Research, they will bond nicely. In our experience the SuperSAP hotcoats are a bit flatter than RR but we feel RR is a stronger product for laminations.
70 degrees F is a great temperature to glass at.
With Resin Research 2000CE Ultra give yourself at least 2 hours minimum between glassing steps to let the resin harden. The longer you wait the better as epoxy cures slowly and will reach 90% full cure in 24 hours (100% in 7 days). But after 2 hours you'll be able to flip it and proceed.
Resin Research Quick kick can be flipped in about 1 hour....
Here's a graph of how epoxy cures that might help you a little
Pin holes are caused by dust particles on the board when hotcoating. The dust prevents that area from bonding. Pin holes will allow water to get into your board.
It is best to blow off the board with compressed air and wipe down with denatured alcohol before hotcoating.
You can also drag piece of masking tape, sticky side down, over the board to pick up dust particles.
After hotcoating walk out of the room and don't touch the board. Moving around the board may kick up dust which might settle in the board causing issues.To fix the pin holes sand the board to 150 grit and either re-hotcoat (glosscoat) the entire board or just do small epoxy patches / fills over the pin holes and sand them flat after cured.
Additive F can be used in both the lamination and hotcoat step of glassing with Resin Research Epoxy
In the laminatinon, additive F will help thin the resin for a faster wet out and saturation of the fiberglass.
For laminaions, mix 1cc per ounce of Hardener
So for 24 oz total mixed epoxy resin (18 oz resin : 6 oz hardener) use 6 cc's Additive F
CC's (cubic centimeter) can be easily measured with a 1 oz graduated measuring cup.
Including Additive F in the hotcoat is necessary to eliminate blush and reduce fish eyes and pinholes in the hotcoat surface. It also helps make the resin harder when cured to sand easier.
For hotcoats, use 2cc Additive F per ounce of Hardener
So for a 15 oz epoxy hotcoat mix (10 oz Resin : 5 oz hardener) use 10 cc Additive FI know there are a number a of things that could lead to this but I've sanded the surface, used acetone to clean it and let it dry for a day before trying again. I have not washed the surface with soapy water to clean up any acetone residue which may be the problem.
I did paint the board using Rust-Oleum 2x ultra cover which could also be creating the problem. However after painting I sanded and cleaned with acetone.
Sorry to hear you're having issues with your hotcoat. Orange peeling can occur from 3 things.
1. Contaminants on the board - Acetone is typically not used with epoxy resins as it is an aggressive solvent and can break the epoxy bonds. Denatured alcohol is usually used to wipe a board down. I'm concerned the Rust-Oleum paint and acetone mix might be causing you the problems. We normally use acrylic paints on all our boards with no issue.
2. Hotcoat thickness - The epoxy needs to be at a certain thickness on the board to maintain a proper surface tension to hold together while curing. Not sure what exact mil thickeness but the thicker the better. It will self level and smooth out.
3. Temperature - Hot and humid climates can cause the hotcoat to cure quicker than it can flow and settle flat.
I'm thinking it's the paint + acetone... the resin is perfectly fine and has an infinite shelf life if the cap is on tight.
Not a problem. Just wait 3 days before sanding it so the hardness of the epoxy increases. Then it'll sand nice. Additive F helps sanding by making the resin shell harder and also has wax to lubricate the sandpaper. But if you wait a few days to sand it'll be the same sand job.
Epoxy has an unlimited shelf life if the lid is tightly closed. In colder temps the resin component will gel and solidify but can be re-liquified with heat (microwave, hot water bath, etc) with no affect to the performance of the resin. The hardener will yellow over time but it's not an issue.
Sounds like you're doing it right but acetone should not be used with epoxy, only use Denatured Alcohol (DNA). It is much less aggressive. Acetone residue on the board is breaking the epoxy bonds and causing separation.
Also watch your hotcoat thickness - The epoxy needs to be at a certain thickness on the board to maintain a proper surface tension to hold together while curing. Not sure what exact mil thickness but the thicker the better. It will self level and smooth out.
A final tip is to not play with the hotcoat. Brush it on then walk away. The more you play with it the more issues you get.
It's just the wax solidifying. Simply heat up the bottle of Add F in a hot water bath or heater and you'll be good to go.
The slight blue tint is an optical enhancer and will disappear when spread in a thin layer on your board. It is meant to make white boards look whiter but the resin is clear when it is thin.
As long as the cap is on tight the resin will be good to use. Over the winter it may have thickened from reduced temperatures so you can put it in the sun or a hot water bath to liquify it again.
Epoxy resin will solidify in cold temperatures but can be re-liquified by applying heat. Either a hot bath of water or place the epoxy next to a heater and the resin will be good as new in a short time.
Fish eyes happen but do no affect the board's performance. You can sand the board with 80 grit to scratch it up and hotcoat again it but it's not worth the resin usage if you don't have enough.
Fish eyes can come from contaminants in the air falling into the resin as it cures. Even walking around the board while it's wet will kick up dust that can affect the hotcoat. It's best to lay down the resin and walk away.
Also, when mixing the hotcoat batch of resin try not to whip bubbles into it, mix nice and slow. Do not over do it with the brushing either. That can aerate the resin and cause pin holes and fish eyes. Just brush the resin on so all is covered and let it flow flat.
With epoxy the additive is not 100% necessary, it just makes sanding easier as it has wax in it to lubricate the paper. I recommend giving the resin at least 2 days to cure before sanding for a better sand job.
The densities of the resin and hardener are very close and it can be mixed 2:1 by either weight or volume. We prefer to mix by weight with a digital scale for the most accuracy. As long as you're within 5% of the mix ratio you'll get a full cure.
Yes you can apply another hotcoat (can be considered a gloss coat) over the cured resin within 48 hours for a chemical bond. We do however advise to scratch up the surface with 80 or 120 grit for a better mechanical bond for optimal strength.
For epoxy gloss coats first sand the hotcoat to 150 grit so everything is flat and even as possible. Then lay down a thin epoxy gloss coat (with additive F) and let it cure for at least 2 days (sands much better after 2 days of cure).
Sand your gloss coat with 220 grit and each progressive grit (320, 400, 600, 800...) until your desired look then compound and polish the hotcoat after sanding. The higher sanding grit you go to the shinier the board looks but no need to go above 2000 grit as the compound paste is more gritty than 2000 grit.
The idea for a good gloss look is erasing the scratches from the previous grit so light rays do not refract and make it look dull. A "mirror-like" finish is free of all scratches. Pretty tough to get a perfect mirror finish but you can choose the level of shine with how much work you want to put into it...
Also remember salt water is an abrasive and will dull a super shiney gloss coats so don't worry about getting it perfect.
First make sure you are using epoxy resin and not polyester resin. Poly will melt EPS foam.
You are experiencing exotherm of the resin which is melting your blank.
Read our Epoxy tips (particularly #3 and #4) and as soon as you mix the resin dump most of it out on the blank so it is not concentrated in the bucket and getting hot. A thin layer of epoxy will give you plenty of working time to fully saturate the cloth.
There is no time limit on waiting to hot coat. The hotcoat will technically have a higher bond strength within 48 hours of laminating since the resin is still curing but it's really not measurable. You can wait a year to hotcoat and still have the same strong board. Just make sure to clean the lamination off with Denatured Alcohol before hotcoating to remove any dust and debris the may settle on the board and cause pin holes in the hotcoat.
It takes more heat and time than you think to reliquify frozen epoxy. Fastest way is in the microwave on high for a minute at a time until most is melted. Boiling water bath a few times works - don't melt the plastic bottle.
You just have to find a way to apply heat that you're comfortable with.
1. The resin and hardener were not measured accurately to the 2:1 ratio. As little as 5% off of the ratio and it will not cure properly. We recommend using resin dispensing pumps, digital scale, or graduated mixing buckets to get the ratio correct.
2. The resin and hardener were not thoroughly mixed and there's unmixed resin making it tacky. You have to scrape the bottom and sides of the mixing bucket to get all the molecules touching each other for a full cure. We recommend mixing for 2 minutes.
No worries just hotcoat over it with correctly mixed resin and it will cure hard. The extra layer of resin will help the tacky resin cure up a bit more too and your board will be strong.
Hot water to open the pores and wash the dust out. Hotter the better.
White Vinegar or citrus based cleaner with pummice like Gojo will clean wet epoxy. Once it is cure you have to rip it off like a bandaid.
Sanding is not necessary for bonding leash loops or fin patches. Although technically you'll get more strength with a combo chemical / mechanical bond with some more surface area for the resin to bond to. But epoxy is so strong it's negligible really.
It is best to just sand the hotcoat and if you burn through either brush a little resin on those areas and sand or do a "gloss coat" on the whole board and sand that starting at 320 or 400 grit where there is very little change to burn through again.
Yes you can gloss over the posca pens just don't wipe the line with the DNA. After laying down the resin check for little separations on the pinline and drip more resin on them (if any)
Dust on the board will cause pin holes. Before seal coating brush or blow the board off and wipe with denatured alcohol on a clean rag to pick up any remaining dust particles.
Make sure to use 3 oz of mixed resin per board foot for proper seal coat thickness. If the seal coat is laid on thick enough it will bury any potential pin holes and fish eyes with it's surface tension.For now just give it a light sand, clean the surface, and you can simply squeegee a small batch of resin over the pin holes to fill them.
Yes, resin tints and swirls can be done with epoxy. Just make sure you use resin pigments that are compatible with epoxy (all our pigments are designed for use with both epoxy and poly)
Spray paint is fine for Polyurethane blanks, but
not EPS foam as the solvents in rattle can spray paint will melt EPS. You can
always use a HVLP gun, a brush or roller, and
acrylic paints. For painting PU blanks a
with rattle can we suggest several light coats of spraypaint, allowing each
coat to dry for about 10 minutes before applying the next
coat. Let the paint totally
cure for a day before fiberglassing or it may run and smear with the
resin. |
Sure, you can paint over the stringer but in our
opinion it looks kooky (unless it's a stringerless
blank) Most guys put a
strip of masking
tape over the stringer before painting then peel the tape shortly
after applying the paint
to the blank. |
Yes thin the acrylic with bottled water and strain the paint to get any clumps out. That way you get a nice even layer of paint and no clogs in the gun.
Best practice is to spray real light coats and wait about 10 minutes between coats to dry so the paint doesn't build up and run.
Any spray gun will work, but remember you get what you pay for so guns in the $25-$35 range are good enough for low volume surfboard builders.
![]()
| We
have done a ton of paint jobs on board then glassed them with epoxy. We
suggest painting directly on the foam and glassing over as the results are
better than painting the hotcoat. The issue with painting the hotcoat then laying another epoxy
hotcoat / gloss coat over is the epoxy tends to fisheye and/or separate over
the paint. It can be done successfully though, simply scuff the paint
with 150 grit then hotcoat over it. The scuffing will give the paint some
"teeth" and grip the epoxy keeping it from
separating. But, to be safe it's much easier to just paint with acrylic
directly to the foam then do a clear lamination over
it... |
It is not recommended to use stickers as logos,
they will delaminate quickly. You can print any graphic on our ink
jet logo paper. Using logo paper is the industry standard and allows the
resin to soak through the paper to bond the fiberglass to the foam. |
| It depends on the pigment content of the paint, more pigment content the longer and brighter the color will stay. |
Spray paint is fine for Polyurethane blanks, but
not EPS foam as the solvents in rattle can spray paint will melt EPS. You can
always use a HVLP gun, a brush or roller, and acrylic
paints. For painting
PU blanks a with rattle can we suggest several light coats of spraypaint,
allowing each coat to dry for about 10 minutes before applying the next coat. Let
the paint totally cure for a day before fiberglassing or it may run and smear
with the resin. |
You can paint directly on the foam of the shaped blank before glassing with acrylic paints or use POSCA pens to do artwork on the sanded hotcoat and seal with Krylon Acrylic Clear Coat Spray. Do not use spray paints on EPS foam as the solvents in rattle can spray paint will melt EPS. You can always use a HVLP gun, a brush or roller, and acrylic paints. For painting PU blanks a with rattle can we suggest several light coats of spraypaint, allowing each coat to dry for about 10 minutes before applying the next coat. Let the paint totally cure for a day before fiberglassing or it may run and smear with the resin. |
Airbrushing is for controlled, fine line artwork
whereas the HVLP is high volume low pressure with
a larger gun designed
to paint larger areas quickly. Airbrush kits normally come with a compressor about 1/16
HP... If using a
HVLP gun choose a compressor that has a larger tank, more than 2 gallons... A
large air tank will allow continuous operation of the HVLP gun to lay own
paint without losing air midway through your board painting. |
| Doesn't matter with airbrushing because the paint is applied in a thin layer. You can pull the tape anytime. |
Yes, after shaping the board you can paint the
blank then glass it. Spray paint is fine for Polyurethane blanks, but
not EPS foam as the solvents in rattle can spray paint will melt EPS. You can
always use a HVLP gun, a brush or roller, and
acrylic paints. For painting PU blanks a
with rattle can we suggest several light coats of spraypaint, allowing each
coat to dry for about 10 minutes before applying the next
coat. Let the paint totally
cure for a day before fiberglassing or it may run and smear with the
resin. |
You can paint the fiberglass now then clear lam over it. Let the paint dry for a day before lamming.
Now... painting directly on fiberglass presents a potential problem. The weave will wick paint and cause bleed... you can hide it with a pinline.OR for a clean paint job baste the rails with resin, let cure, sand and paint, lam over it.
We would have painted the entire board first then clear lammed it... easiest way.
Other way to do it like the chinese is to spray automotive paint on the hotcoat then automotive clearcoat over that. We don't deal in that stuff so I have no good info on that method.
It is best to mix your own colors to get exactly what you
want. I recommend for something between Aqua and Turquois
mixing Teal
pigment as your base color and adding dashes
of blue
pigment andwhite
pigment to get the color exactly how you want
it. It is a good idea to test your
color before putting it on the board as the color will look much darker in
the mixing bucket than on the surfboard. Start by mixing your colors into the
resin and spreading it on some scrap foam or white paper to see how the color
will look. When you are satisfied then add the catalyst (polyester resin) or
hardener (epoxy resin) and laminate your board. If you are doing both the
bottom and deck the same color, you should mix a "master batch" of
colored resin and divide it into 2 mixing buckets. Cover one bucket and put
it aside for the deck lamination later. When you're ready to glass the deck
just add the catalyst or hardener and you'll have the same exact color! It's
much easier than trying to color match a new mix. |
| Yes, you can just add a drop of pigment to get a tinted effect. The more pigment you add the more opaque it becomes.. |
Bummer on the artwork. Sorry to hear it didn't turn out the way you wanted. It's not optimal to paint on the hotcoat but it can be done. It'll cause more complication in the board build but you can definitely go for it if the correct color is important to you.We suggest hotcoating and sanding the board, then spray painting with acrylic. When the spray is dry go over the board with a clear coat spray like Krylon Cleat Gloss (or Matte) to keep the paint from chipping off. It will eventually chip off though from daily use of the board. It's best to paint the board with multiple light layers of paint so it doesn't build up. |
You'll want to use acrylic resin, thinned with a little bottled water, just enough to let the paint flow like water. If you want you can strain the paint so no clumps clog the HVLP gun. Spray light coats and let it sit for about 10 minutes before applying another coat. Repeat until yoo get the desired coverage.
No need to prime...
Let the paint cure for a day before glossing. Also, LIGHTY sand the paint with 220 grit or so to help resin adhesion to the paint. Just scratch it up a little.
Yeah, it's too thick and that's why the resin is pitted... when painting a board only use Acrylic (Tempra is no good) and it's best to spray light coats but brushing can work too, just keep it thin.
Another thing in the future is to screen the board down to close all the holes in the foam for a nice surface...
An option for colorwork other than paint is to do a "foam stain" with pigmented resin. Just squeegee it on the foam and let cure. Then you can do a clear glass job over it. Looks like paint but different application.
It's always good practice to test the pigmented resin on a piece of scrap foam or white paper to see how it'll look on the board. In the bucket the resin looks much darker because you're looking though a deep layer of color.
The trick is to keep adding color and testing it on white until you achieve the tone you're looking for. Then mix in the hardener and laminate.
Our rice paper is for printing images or logos on, however we suggest glassing over the logo. If you just paint epoxy over it when you sand the area you will most likely sand through the epoxy and hit the logo which is why were glass over our logos.
Yes, sand the hotcoat to 150 grit and do your Posca artwork on it. Let it dry for a day before you gloss coat it. You should also VERY lightly sand the artwork with 220 grit to help the gloss resin stick better and not delaminate over time.
The Posca pens will show streaks of paint since it comes out of a felt tip... the paint does remain wet for a few seconds and you might be able to blend it with a paper towel. I recommend experimenting with it. You can always sand the paint off and try again.
It's advised to spackle for a painted / tinted board. The spackle fills any bead tear outs and leaves you with a bright white "canvas" to paint on. It is especially important to spackle for a tint. If you don't have a smooth, even surface then the color gets spotty and looks like a bird's egg.
Another trick is to finish shape the board with sanding screen to close up the gaps between the beads then spackle. Turns out looking exactly like a PU blank.
We use Red Devil "One Time" lightweight spackle and mix it with bottled or distilled water to a whipped cream consistency. The minerals in regular tap water will turn the spackle yellowish and screw up your color.
Fabric inlays are pretty simple actually. It is best to use silk or cotton fabric.
Tape off the inlay area as if you were doing a cut lap (because you are doing a cut lap actually)
Lightly spray 3M Super 77 spray adhesive on the blank and ROLL out the fabric, making sure to get rid of any wrinkles along the way. You can iron the fabric first if you want...
Laminate and let the resin soak through the fabric.
When the resin is tacky but not fully cured run a razor blade along the tape line and pull the excess off. Depending on the cloth it might be hard to see the tape so you can make a template first and scribe the line on the fabric before cut lapping.
You can push the edges of the fabric slightly into the foam with a popsicle stick to get it flush so no air bubbles will happen at the seam as you laminate the fiberglass over it.
Not difficult at all.
PRINTING LOGO LAMINATES
If you would like to put some logos under your laminate, you can design them on your computer and print them out using Greenlight’s Logo Printer Paper. Once you have designed your logo, set your ink-jet printer to print on medium resolution. You need to tape the Logo Printer Paper to a regular sheet of paper, and manually feed this paper into your printer. Make sure the logo paper is facing the proper direction to receive the ink jet ink.
Once the logos are printed, remove the logo paper from the backing paper and cut the artwork/logo out leaving a small margin around the design. You should print as many logos as you can on each piece of logo paper, since you can only send it through the printer once.
LOGO PLACEMENT
If you have printed out any logos or artwork that you’d like to place under the fiberglass, this should be done right before you are ready to laminate. To do this, carefully roll up all of your fiberglass layers to a point just beyond where you want to place your artwork. Try not to shift the placement of the fiberglass as you roll it up, as you will eventually be rolling it back down, and you want it in the same place. If the artwork is closer to the tail, roll up the glass from the tail. Vice-versa if the artwork is closer to the nose. You will be basting the logo to the foam with a thin layer of epoxy once your resin is mixed and ready to be spread on the fiberglass.
You can use the Posca pens directly on the foam and laminate over them.
Carbon fiber is black and is laminated to the bottom surface of the foam so it will interfere with artwork on the bottom.
Unfortunately there is a good chance the resin won't bond to the oil paint. If it's a wall hanger cool. But if meant to be surfed it'll delaminate pretty quickly.
Glassing over it shouldn't be a problem though. I'd let it dry for a few days first to make sure it's set and will not smear with resin.
For the red "resin panel", simply laminate the bottom with green pigmented resin and after it cures tape off the square and brush on a pigmented red layer of resin in the tape square. When the resin is tacky pull the tape and let it cure.
We can cut you any length you'd like. Our rice paper is only 15" wide though. If that works for you let us know how long you want and we'll send it out to you.
It is a good idea to test your color before putting it on the board as the color will look much darker in the mixing bucket than on the surfboard. Start by mixing your colors into the resin and spreading it on some scrap foam or white paper to see how the color will look. When you are satisfied then add the catalyst (polyester resin) or hardener (epoxy resin) and laminate your board.
If you are doing both the bottom and deck the same color, you should mix a "master batch" of colored resin and divide it into 2 mixing buckets. Cover one bucket and put it aside for the deck lamination later. When you're ready to glass the deck just add the catalyst or hardener and you'll have the same exact color! It's much easier than trying to color match a new mix.
There is no specific measurement of resin tint or pigment. It depends on the depth of color you want. A good place to start is to mix in about 2% color to resin ratio (by weight) and work from there. The maximum amount of tint or pigment is 5%. Adding too much color will get the the way of the resin curing and make it softer.
It is a good idea to test your color before putting it on the board as the color will look much darker in the mixing bucket than on the surfboard. Start by mixing your colors into the resin and spreading it on some scrap foam or white paper to see how the color will look. Keep adding a little at a time. When you are satisfied then add the catalyst (polyester resin) or hardener (epoxy resin) and laminate your board.
You can hotcoat, sand to 200 grit, then paint the deck - do multiple layers of light coats of paint to keep it even.
Then scratch up the paint with 220 grit rail lightly to help the gloss coat resin bond. Gloss.
Sand the gloss starting at 320 or 400 grit to make sure you don't sand through to the paint.
Another option instead of paint is to do a "resin panel" on the deck. Tape off the area you want to color and mix opaque pigment into the resin, then brush on like a hotcoat. No need to add AdditiveF for this step.
About an hour or so later pull the tape. When the resin is cured lightly sand the resin lip where the tape was to knock it down.
You can pinline the perimeter of the color if you wish.
Proceed to hotcoat the board with clear resin and sand.
Shapie will bleed on rice paper. Better to use Posca paint pens or print on an inkjet printer
No need to heat up the resin for a swirl, you certainly can if you want to though... when laying down the color just know the colors that hit the foam first will stay and the rest will wipe away and tint the surrounding area.
No, it is not a good idea to paint the fiberglass because the paint will pool up in the weave and not allow the resin to bond to the glass. Your hotcoat will crack and fall off with paint stuck to it.
It's always best to paint directly on the foam but also OK to paint the hotcoat and apply a thin glosscoat over it to protect the paint. Make sure to lightly scratch up the paint with 220 grit sandpaper for better glosscoat adhesion.
Resin tints are translucent and you can see the stringer through the color.
Resin pigments are opaque and you can't see through them to the stringer or foam.
No need to seal the board. You can glass right over the paint with no issues. Let the paint dry for at least a day so it doesn't smear when laminating.
Painting over the hotcoat (seal coat) depends on your application.
The only way that works on top of a hotcoat is to paint the board with a rattle can, HVLP gun, brush or roller, and spray multiple layers of Kryon Clear Spray to protect the paint.
If you intend on painting over a hotcoat and doing another hotcoat or glosscoat on top of the paint -DON'T DO IT! The resin will not stick to the paint well and you'll be very disappointed.
It's always best to paint directly on the foam and glass over it.
All the pigments we sell are compatible with both epoxy and polyester resins. Check out or MAFIA pigments and Greenlight colors
Use Acrylic paints for airbrushing on both EPS and PU blanks. No other paints work as well as Acrylic. Thin the paint with water to flow though a HVLP spray gun.
The trick to good color is to spray multiple light coats. Spray one light coat of paint and let dry for about 10 minutes, then do another coat. Normally 2-5 coats of paint depending on how it looks.
Sealing EPS is good if you are painting. It gives an even surface to paint and makes the board a little stronger. No delamination issues with or without sealing.
Always let the paint dry for a day before laminating over it to prevent smearing, especially with polyester resin. No need to seal over the paint. If you have smearing issues you can seal the paint with a clear acrylic spray before laminating but try letting the paint dry for a day first...
After your pigmented lamination is cured you can put another logo on top and patch with a layer of glass. That is the common practice for putting logos on dark pigmented boards.
Cut your fiberglass patch about 2" bigger than your logo and after the resin has cured fair in the the edges of the glass before you hotcoat. This will help you not burn through when sanding.
Same technique as installing fin boxes after a dark pigmented lamination...
Normally we do a tint or pigmented lamination without the logo and after it cures we'll laminate the logo over it and cap the logo (+ about 1" around) with clear 1.5 oz fiberglass, then hotcoat. You can also use clear 4 oz glass to cap the logo but you have to sand the edges down (like a lap) before hotcoating.
Another tip for logos over dark colors is to spraypaint the back of the logo paper white (or any light color) to make the logo look really good and pronounced on the board.
It really doesn't matter how you mix the color, whether the pigment is mixed together before adding to the resin or adding each color to the resin independently... it comes out the same. BUT, I prefer to put base color (red) in the resin first, then add a dash of white, mix and test the color on a piece of scrap foam or white paper as that will show you exactly how it will look on the surfboard. When you get the color you want then add the hardener and laminate.
Usually you'll find you'll need to add more red or white to get the hue you're thinking of. So it's easier to add to the resin and test again, and again. Keep sneaking up on the color...
Another tip I'll give you is to add a tiny bit of black pigment to darken up the pink - you can do that with any color to make a deeper shade. Same thing. Just keep sneaking up on the color you desire.
If you are doing the board all the same color (deck and bottom). Make a "Master Batch" of colored resin and put a bit more than 1/2 of it aside (covered) so you can use it for the deck and be the same exact color... (except for the 2 layers of fiberglass cloth on the deck will make it look darker as it holds more resin - pinline the deck lap and bottom lap to trick the eye into looking all the same color)
You can laminate the logo paper print side up. It doesn't matter really. The key to no bleed is to print it on normal quality (not best quality) so there is no extra ink sitting on top of the paper...
If you are to laminate the logo over the color you should first sand the hotcoat away from the logo area so the 2 oz glass bonds well to the lamination.
Spread some resin on the board and place the logo over it with more resin over top and squeegee out all the air bubbles. Then you can lay the 2 oz cloth over and laminate it. Then hotcoat that area.
Normally a logo patch over color is done before hotcoating but you just have a little extra work sanding and re-hotcoating.
If you are to laminate the logo over the color you should first sand the hotcoat away from the logo area so the 1.5 oz glass bonds well to the lamination.
Spread some resin on the board and place the logo over it with more resin over top and squeegee out all the air bubbles. Then you can lay the 1.5 oz cloth over and laminate it. Then hotcoat that area.
Normally a logo patch over color is done before hotcoating but you just have a little extra work sanding and re-hotcoating.
Tape the leading edge of the logo paper to regular printer paper to send it through.
Set your print quality to "Normal" (not Best) as too much ink on the paper may bleed when laminating with resin.Paint directly on the foam with acrylic paints only with a HVLP spray gun or brush the paint on. The aerosol in rattle can spray paint will melt the foam.
For EPS foam it is best to seal the blank first with Sealing Paste before painting for a clean, even surface.
Foam stains are great on EPS. There a two ways you can do them:
1. Spackle the blank and add pigment to resin and squeegee on the blank, let it cure and laminate the glass on.
2. Skip the spackle and mix Q-cell with the resin and pigment to a thin pasts and squeegee onto the foam. This will seal the blank at the same time as staining the foam. The white Q-cell will make the color a little lighter so add a bit more pigment to the resin and Q-cell mix.
It's a good idea to always test the color on a piece of scrap foam or white paper to see exactly how it will look on the board before mixing in the hardener. Colors are much darker in the mixing bucket than on the board.
Normally posca paint pens are used on the sanded hotcoat and protected by another hotcoat (glosscoat) or with a few layers of Krylon clear spray acrylic. The posca pens can also be used to do artwork directly on the foam. It is not recommended to paint the fiberglass lamination because it will bleed with the texture of the fiberglass.
Here's the trick to getting a great white (or any color) on the rice paper:
Print your graphic on one side of the logo paper and spray acrylic paint (white in this case) on the back side of the paper. Makes logos pop on dark boards.
You'll also want to apply the logo paper on top of your laminations and put a layer of 4 oz cloth over it to protect the logo. The 4 oz "cap" only needs to be about 1" larger than your logo paper cutout. Lightly sand the edges of the cap to get them close to the fiberglass below, then hotcoat the board.
Use acrylic paint thinned with water. Spray 4-5 very light coats about 10 minutes apart and it will be the quickest drying, best looking paint job on both EPS and PU. If painting EPS seal it first with spackle or a q-cell/epoxy mixture to make it a smooth surface.
Yeah but it's difficult. The logos tend to move a little when squeegeeing over. Best to lay the logos down with resin and let it cure, then glass over.
Or you can get a larger logo printed at boardlams.com
An acid splash is just another name for a resin swirl. Resin with two or more resin pigments or tints are randomly "swirled" together during the laminating process to create an abstract look on the board.
There's different ways to do it.
1. On sanded hotcoat to 150 grit and glosscoat over (careful not to sand through the gloss and hit the pinline)
2. If you want to avoid the potential of sanding through you can do your deck laminations in 2 steps and put the pin in between them. First do a 1" wide hotcoat where your pinline will be, let cure, and sand with 220 grit along the direction of the pinline (circular sanding will create micro channels that the pinline can bleed under the tape.
Pinline with a Posca pen and let dry for a little while then laminate your 2nd deck layer over that. Now your pinline is protected from sanding and looks the same as on top of the glass.
Yes you can mix tints and pigments but the pigment will always win in terms or opaqueness. If you just add a few drops of pigment to the resin it will be transparent. We recommend testing the color on a piece of scrap foam or white paper before adding the hardener.
I do Posca and Acrylic pin lines between laminations to protect them from sanding. It's 2 more steps in the process but it's more work when you sand a pinline off too...
On the first deck lamination, brush on a 1" seal coat around the lap line and sand with 220 grit along the direction of the pin to create micro grooves along the pinline. When you tape on top of the sanded seal coat the paint won't run under the tape and make a fuzzy pin line. Pull the tape right after laying down the pinline. When the paint dries do the top lamination and seal coat and no chance of sanding it off. This eliminates the need to gloss over the pinline.
For resin pinlines mix cab-o-sil in the resin to make it a thick paste and use your finger to lay it between the tape lines. You can do this on top of a sanded seal coat and gloss over. There will be a "bump" of pinline resin that will sand flat when sanding the gloss coat.
| A power
sander will increase the speed and ease of your sanding but will
require some practice to get used to it. Selecting the right Flexpad
Sanding Pad for the job will help you sand efficiently and minimize
burning through the hotcoat into the fiberglass (which that area would need
to be re-hotcoated and sanded again). Hard Flexpad for flat areas and grinding down
finboxes Medium
Flexpad - good all around sanding pad and we recommend if you're going to buy
one Flexpad, the Medium density is the best one to get to start. It will sand
the entire board well but not
perfectly. Soft
Flexpad - Great for higher grit sanding (220+ grit) of the hotcoat and also
your surfboard rails. |
| Try
sanding with a more aggressive sand paper like 80 grit on Hard Flexpad
until it is blended. The goal of sanding is to get all the resin flat and
level. |
Sanding your hotcoat with Epoxy we start at 80
grit, we use a Variable
Speed Polisher / Sander with a FlexPad
Sanding Pad but an orbital sander will work; it will just
take longer. |
Yes, you
can use the soft pad with 150 grit. If you keep it flat with a light touch it
will bend into the concave and sand the bottom of the
concave. Don't worry about getting all the shinies. Just
get as many as you can without over sanding (sanding through) and you can
always touch up the leftover shinies by hand. |
It's best to lay a "gloss coat" over the entire board to fill the weave. You'll use less resin that on the hotcoat. I don't know what size your board is so here's a resin usage chart (check out the gloss coat column)
Lay it down and walk away. You can sand it with 320 or 400 grit when cured and good to go!
The shine of your gloss coat will depend on the levels of sanding you choose to do. Each progressive grit will sand out the scratches of the previous grit. A super shiny gloss will progress from 320, 400, 600, 800, 1000, to 1200 grit or more if you wish. Then compound with a wool bonnet and polish with a foam polishing pad.
You can choose to sand up to any grit, compound and polish. It all looks good. Just depends on how much "depth" of shiny-ness you're looking for.
Basically you'll be laying down a gloss coat... Continue sanding your board to 150 and get all the bumps and dips out of it. This will make your gloss coat flat and very easy to sand.
When the gloss coat is cured give it a day before sanding, the resin will be harder and the sandpaper will cut it better.
Start sanding at 320 or 400 depending on how flat the gloss turns out. It'll be hard to burn through again at those grits and you'll have a good looking board. You can continue to wetsand through higher grits , compound and polish to give your board a real nice shine if you'd like.
The centerfin box is installed after the hotcoat, before sanding the board. The lip of the box will be sanded down flush with the bottom of the board during the sanding process. We recommend "grinding" the fin box plastic with 60 or 80 grit and a hard or medium flexpad.
Grinding is a bit different than sanding whereas you tilt the sanding pad up a little bit to use just the edge of pad to focus the force right where you need it (on the box plastic). Sanding is done by keeping the pad flat on the board and removing a broader area of hotcoat.
Grind the finbox plastic down for a few seconds and let it cool for a few seconds as too much friction will actually melt the plastic and the heat can possibly transfer into the foam and weaken the area around the box. So it's best to cycle the grinding a few seconds on, a few seconds off.
Grind the box down as close as you're comfortable with without hitting the hotcoat. Then proceeed to sand the entire board with the flexpad flat and as you pass over the finbox it will sand evenly with the hotcoat.
We recommend "grinding" the fin box plastic with 60 or 80 grit and a hard or medium flexpad.
Grinding is a bit different than sanding whereas you tilt the sanding pad up a little bit to use just the edge of pad to focus the force right where you need it (on the box plastic). Sanding is done by keeping the pad flat on the board and removing a broader area of hotcoat.
entire board with the flexpad flat and as you pass over the finbox it will sand evenly with the hotcoat.
The heat from sanding friction will cause epoxy to soften then re-harden. It's best to sand a plug for 10 seconds or so then move to another plug, making your way around them. By the time you get to the first plug it will be cold again and sand nicely.
We have cloth face Flexpads in stock. Velcro faced pads are special order. We do not stock velcro because the hook and loop is not a flat surface when sanding and creates swirl marks due to the velcro flexing with pressure.
Cloth face sanding pads with PSA sanding discs provide a better sanding finish in our experience.
It sounds like you have pin holes in the hotcoat which is caused by dust settling into the hotcoat as it cures. When you sand the board the sanding dust gets caught up in these little pin holes. In the end you won't see the imperfections that much but it is best to blow out the dust with compressed air and follow up with a needle to scrape out what's left. Not worth the needle effort as far as I'm concerned, like I said you won't see most of them when glossed over.
| We would suggest the soft Flexpad
for a gloss coat sand out. Start sanding with 320 grit, then move to 400
wetsand and up with whatever grits you'd like. The each successive grit
removes the scratches left by the previous
grit. For a super mirror-like gloss
shine you'll want to wetsand with each grit from 320 up to 1500, then use
Greenlight's specially formulated Surfboard
Compound and polish. |
| You might have enough epoxy to lay up a gloss coat depending
on how much you used on the board. Gloss coating with epoxy you can add
xylene and additive F to thin it a little, also you can heat the resin to
reduce the viscosity so it flows like water and cures faster. Only heat the
resin component of epoxy (never the hardener) for 2-3 seconds per ounce in a
microwave oven, or sit the bottle on a heater for a few
minutes. |
| You should not need to go any heavier with the gloss coat in
the pin line area. Actually, the resin will self level and not really be able
to build up around any area. Take care when sanding your gloss coat around the pin lines to
not burn through. You may want to sand the pin line area by hand to be
safe... |
You'll want to get 1 sheet of paper per side of
board in each grit. After hotcoating, sand the board with 80
grit peel n' stick discs, then 120 grit, then 150
grit, then 220 grit. You
want to get that hotcoat flat with the least amount of work to
prevent burnthroughs. Or you can save some
money and make your own sanding discs from cloth
backed sandpaper. We use 3M super 77 spray
adhesive with the cloth backed paper to adhere to the
sanding pad. Cloth backed is very strong and will not
tear when removing it from the pad. Regular paper backed sandpaper
will wreck your pad in a few
sandings... Then gloss... you can purchase Gloss
Resin here or make your own by adding Surfacing
Wax and Styrene
to the Laminating resin. Here's Greenlight's
Resin Addititve Chart of how much Wax and Styrene to add. |
EPS foam must be laminated and hotcoated with
epoxy
resin. It is not endorsed by us but it is possible to to gloss
the sanded epoxy
hotcoat with polyester resin. Make sure the epoxy hotcoat is sanded nice and
flat to 80 grit for a stronger mechanical bond to the polyester resin. Otherwise the
glosscoat will chip off over time. |
You want to sand your first hotcoat dead flat to 150 grit then lay down a thin "gloss coat". Walk away and don't mess with it. It'll self-level. Here's a link to our resin usage chart.
Give the gloss coat a day to cure to get harder and cut better. Sand starting at 320 and work your way up through the grits, then compound and polish.
Most important part is your first hotcoat getting sanded flat.
Yes, tape the rails off. Same procedure as a hotcoat but you do not need to build a "resin dam" in the tail area with tape on the gloss coat.
Here is info from our Surfboard Buidling Guide:
COMPOUNDING
Once you have wet-sanded to 1,200, it’s time to break out your wool compounding bonnet and compounding liquid. You need to use your variable speed sander/polisher for these final steps. The goal with the compound is to spread it on the board and spread it around while it’s still in liquid form. Typically you work in sections with the compound, spreading it around and buffing the board until the compound dries in a haze. Once that section is dry, move on to the next section. Finally, when all of the sections are dry, you basically buff off the compound with your polisher/sander. Don’t forget the rails. You should be covering the entire board with the compound. You can do the whole thing with the power polisher. No need to hand-compound at this stage. Once the compound is buffed off, hand-wipe the entire board with a microfiber cloth to remove any compound residue before you start the polishing stage.
POLISHING
The final step in the process, polishing requires use of a surfboard polish (finer grit) and polishing bonnet(typically foam). Besides these two components, the polishing step is essentially the same as the compounding step. Work section by section, and don’t forget the rails. Once the polish has dried to a haze, you buff it off with your polisher and you won’t believe your eyes. The board should be back to it’s original post-gloss shine. At this stage, take one final pass with your microfiber cloth, and you are DONE.
We suggest our customers save money on resin by making their own hotcoat and gloss resins instead of buying more resin than you need and having it go bad.
You can add Surfacing Wax and Styrene to the Laminating Resin to make Gloss resin.
As far as the gloss, a shiney look is basically getting the surface flat so the light reflects off it. This starts with sanding your hotcoat flat up to 150 grit., then brushing a gloss coat on it. Adding Styrene to the hoatcoat resin (laminating resin + surfacing wax) will allow the resin to flow flat.
The shine of your gloss coat will depend on the levels of sanding you choose to do. Each progressive grit will sand out the scratches of the previous grit. A super shiny gloss will progress from 320, 400, 600, 800, 1000, to 1200 grit or more if you wish. Then compound with a wool bonnet and polish with a foam polishing pad.
You can choose to sand up to any grit, compound and polish. It all looks good. Just depends on how much "depth" of shiny-ness you're looking for.
Yes, we do offer a universal SUP template. It can be used full length to 12'6" or you can take any length from the middle of the template to get your desired length. You can make the board wider or narrower by sliding the template further or closer to the stringer. The SUP template can be ordered here Greenlight has developed a technique to allow anyone with a printer to make full scale templates for any surfboard outline imaginable. We segment the outline into 8.5" x 11" regions and add registration marks so the segments can be cut out and taped back together accurately. Templates are emailed within 24 hours after purchase in Adobe Acrobat PDF format and are printed on normal 8.5" x 11" paper. (No Scale) |
Our 9'6" Sup blanks sound perfect for your project and
come with a pre-cut outline. As far as
fins are concerned a lot of fin selection comes down to the weight of the
rider. Any FCS twin tab fin will work depending on your weight and what
dynamics you want from the board. Bigger fins will give more hold and drive
while smaller fins will be loose and slide a little. Can't go wrong with the
FCS M5 or G-AM sets. On the days we
want more hold we typically make our surf sups quad +1 so we just pop in the
center fin and two side fins. We sell the Futures
SUP handle install kit for the futures
SUP handle (we recommend installing 2 vented
leash plugs if using this handle). or you can freehand the route if
using the FCS
SUP handle with Goretex Vent (we recommend adding an additional
vented leash plug for a SUP to prevent delaminations) |
YES we have SUP blanks and complete kits! We have stock 9'6, 10'6, 11'6 and 12'0 SUP Blanks. They have the outline cut for you already to save a lot of shaping work. We also custom cut EPS SUP blanks per your design on our CNC hotwire machine up to 14' long. |
Our Vented Leash Plugs have been in surfboards and SUPs for
over 7 years now worldwide with no reports of degrading over time. We
recently developed a new improved membrane we call "G-vent" to
replace Goretex which is the standard venting
material. If
you are concerned with longevity of the membrane then you can rinse with
fresh water as the only thing that can do wrong with the membrane itself is
getting clogged with salt particles from ocean water. But that is very
unlikely since the microscopic membrane is smaller than water
moleucules. You can be confident in the lifetime if our vented leash
plugs. |
| Here is a link to the Vented Leash Plug Install Video We can guide you through the installation of the VXV. It's simple. Use a 1 1/8" (28mm) holesaw and drill about 5/8" (16mm) Deep. Remove the foam and stringer material Knead the putty in your fingers for a few seconds and roll into a rod about 1/8" (3mm) diameter Wrap the putty tube around the base flange of the plug - this acts as a resin damn so resin does not flow under the plug and clog the vent. Push the plug with putty flange into hole and use the small stick to tamp the putty down making sure it spreads to the edges of the hole you drilled. A little water on the stick helps it not get stuck in the putty. Mix a small batch of resin (add cab-o-sil if you want to thicken it) and pour around the perimeter of the hole, filling it up. When cured sand the plug flush with the board and you're all set. |
Our Engineered EPS SUP Blanks require only 2 layers of glass on the deck due to the increased foam strength but you can certainly add as many layers as you'd like for additional strength. Laminating 2 layers at a time is the easiest way. The resin will saturate through 2 layers easily but tends to create air pockets when soaking 3 layers at once, making the glass job weaker. So yeah, do 2 layers and you can immediately roll out the 3rd layer of glass, cut, and saturate it. It will use a bit less resin that way too. |
| We recommend putting 2 at least vents in SUPs, one in the tail
and one mid-to nose area. If you are planning to install a bungee hold down system in
the nose of the board you can use a vented leash plug and three normal leash
plugs as the anchors. |
The handles are designed to be installed before
glassing (put tape over hole so resin doesn't get it when laminating. When
you sand the board as the final step the fiberglass over the handle will be
sanded away and open up. The finbox should be installed after hotcoating
and sanded flush to the board. |
Vents are an "insurance policy" for EPS
surfboards and SUPs. If the board gets dinged and water infiltrates the foam,
heat from being left in the sun or a hot car will expand the water steam and
push against the glass causing a delamination or
bubble. The vented leash plugs are a pressure equalizer
preventing delaminations. Very few surfers take care of their boards and are
mindful to keep them out of the sun so it is common that unvented boards
bubble. We see a lot of that in older SUPs that come in for
repair. We suggest using 2 VXVs in SUPs to handle the
volume of expanding air. |
How should I store finished sup boards. Laying flat but no room , can't stand up because ceiling is 8 ft. So on their side on my old weight bench converted into an sup rack. Will this angled warp the shape of the board
The blank comes with the rocker, foil and outline cut. You need to shape the rails and bottom contours to your liking... We can also custom cut the rocker and outline to your preferences, any length you want.
The amount of fiberglass depends on length and density of the SUP foam you're shaping, as well as your desired strength vs. weight of the board.
Our Engineered EPS SUP Blanks are stronger than other blanks on the market and require less fiberglass
1 layer bottom / 2 layers deck
Board up to 10' long = 11 yards 6 oz x 42" wide fiberglass
Board up to 12' long = 13 yards 6 oz x 42" wide fiberglass
The carbon fiber strip is laminated to the bottom of the surfboard or SUP to increase the stiffness so it doesn't bend when standing on it.
Carbon fiber provides great strength when put in tension (the force on the bottom of the board from bending) and is a substitute for the traditional wood stringer.
Incorporating a carbon stringer on the bottom of a stringerless blank eliminates the wood shaping tools needed and fussing with keeping the stringer flush with the foam when shaping, reducing some of the work.
Simply laminate the carbon strip right to the foam and roll the bottom layer of fiberglass right over it and continue laminating the bottom. All in one step...
We recommend putting at least two vents in SUPs, one in the tail and one mid-to nose area due to the volume of foam. (Also applicable to hollow wood SUPS)
If you are planning to install a bungee hold down system in the nose of the board you can use a vented leash plug and three normal leash plugs as the anchors.
The futures SUP handle is fully enclosed and can be used in hollow wood boards but requires 2 routes (one through, one shallow flange route). A simpler alternative handle is the Factory SUP handle. Regardless of the handle you choose you should insert it into a solid wood block spanning the deck to bottom skins to hold the weight of the board when carried.
We recommend an 11'6" SUP blank for 225 - 250 pound paddlers but can cut any custom size or thickness you want.
Building a SUP is the same process as a surfboard described in our Surfboard Building Guide. We cut the SUP's outline for you already so shaping the rails and glassing the board is really all you need to do.
A 10.5" centerfin box and a 9" or 10" Centerfin is what you want for a SUP.
For glassing your board we have 6 oz x 42" wide fiberglass cloth, sold by the yard. It is common to laminate 2 layers on the bottom and 2 or 3 layers on the deck depending how strong you want the board to be.
You'll also need 3 gallons Resin Research 2000CE ULTRA epoxy resin and a 4 oz. bottle of Additive F for your final sanding coat.
Also, you may want to get a SUP handle, vented leash plug, or deck vent plug for your board.
We recommend an 11'6 SUP Blank for 200 - 250 pound paddlers.
the 12'0 SUP Blank is also an option if you want additional float to make paddling easier.
Building a SUP is the same process as a surfboard described in our Surfboard Building Guide. We cut the SUP's outline for you already so shaping the rails and glassing the board is really all you need to do.
Laminating 2 layers at a time is the easiest way. The resin will saturate through 2 layers easily but tends to create air pockets when soaking 3 layers at once, making the glass job weaker.
So yeah, do 2 layers and you can immediately roll out the 3rd layer of glass, cut, and saturate it. It will use a bit less resin that way too.
1. How much fiberglass clothe should I purchase. Looks like you guys recommend the 6 oz 3 layers top and 2 layers bottom. So how much should I purchase to factor in waste as well. 65 linear foot for each board sound about right? Yes, 3 layers deck, 2 bottom. You'll need 20 yards for each board - 40 yards total. Please note we are currently out of stock on the 6 oz x 42" SUP cloth but will be in by the end of this week.
2. How much Epoxy and Add. F should I buy? Does 3 Gallons Epoxy and 2 OZ Add F for each board sound right? or should I get more since there may be a lot of waste for my first try at this? You'll need 3 gallons epoxy per board (6 gallons total) and (1) 4 oz bottle Add F.
3. If I purchase the FCS SUP handle with Vent. will that be enough ventaliation for the boards or do I need another vent or vented leash plug as well? We recommend putting 2 at least vents in SUPs, one in the tail and one mid-to nose area.
4. The 10.5 " Center fin Box. does that come with the fin as well? or just the box? Just the box
5. I have seen some people install the fin box and handles first before glassing and some install after the glassing. What to you recommend for a first timer? The handles are designed to be installed before glassing (put tape over hole so resin doesn't get it when laminating. When you sand the board as the final step the fiberglass over the handle will be sanded away and open up.
The finbox should be installed after hotcoating and sanded flush to the board.
The FACTORY and FCS SUP handles are installed after hotcoating, just like the centerfin box. There are no large forces on the handle so no need for a fiberglass patch over it. Just route a tight pocket and install with resin and cab-O-sil to thicken the resin and decrease drainage into the foam.
The futures SUP handle with the flange is installed before laminating, just like a futures fin box.
Using VectorNET will definitely improve strength and a good idea. But the 4 oz S-2 glass is only 30" wide and will not lap all the way around the rail to the other side of the SUP. For optimal strength you can use 1 layer 6 oz x 42" E-cloth on the bottom and a combination of 1 layer 6 oz x 42" E-cloth & 1 layer 4 oz S-2 on the deck.
Put the S-2 cloth on the foam and let it cover as much of the rail as it can, then lay the 6 oz x 42" over it.
If using VectorNET on the deck put that on first, then the S-2, then 6 oz....
2 vents are recommended for SUPs since there is a large amount of volume in the board. We typically put 1 deck vent about 1/3rd from the nose and a vented leash plug on the tail. Both on the stringer. Make sure to drill the hole in the front deck vent larger than the stringer width so the vent will be exposed to foam on both sides of the stringer.
Yes you can pre-glass both vents with tape. Make sure they sit about 1/16" high so you can grind them flat after hotcoating. Also watch for air bubbles around the vent circumference when pre-glassing. Make sure there is plenty of resin in that area so you don't have to fill in after grinding.
Carbon reinforcement on the bottom is a must but not needed on the deck. It will certainly make the board stronger and look cool but the gains are minimal. Using VectorNET is a better option on the deck of a SUP as it will strengthen the deck where you stand to prevent foot wells showing up over time.
Multiply the railband dimensions from the chart by a factor of 2X for SUP rails.
Thanks for the email and sorry to hear you are having venting issues in your board. Two Vented leash should be enough to vent a SUP.
Few things to check:
1. Does the board have a stringer and are the plugs installed on the stringer with the bottom venting area exposed to each side of foam? It is important that internal air can get to the bottom of the plug to vent and a stringer will block the airflow unless the plus is exposed to both sides of foam.
2. Possibly resin got under the plug during installation and clogged the vent. The epoxy putty "resin dam" included with the plug must be smashed down to spread out against the walls of the plug and foam to seal from resin getting under.
3. You can check the vent by pouring a little water in the plug and as the board heats up and released pressure, you'll see the water bubbling from the vent.
FCS and FACTORY SUP handle installation instructions:
You don't really need a jig, just trace the handle on the foam and hand route inside the line. Proper depth is important so extra resin isn't sitting under the handle.
Press the handle into the routed pocket to make sure you have a good fit, then pull out.
Mix 1 1/2 oz. of epoxy and pour a little in the pocket and "paint" the bottom and sides of the pocket with the resin using the mixing stick. Just spread the resin all over the cavity. Spread resin all over the outside of the handle, especially the foam ring around it and press the handle into the pocket. Done with no exotherm...
The center fin box, SUP handle, leash plugs and vents are installed after the seal coat and before sanding. You'll sand down any plastic sticking out of the board while sanding the seal coat so everything's flush.
We sell a poly ding repair kit that includes everything you need to take care of any dings you get over time.
1. Pull out any broken fiberglass in the ding
2. Scratch up the area about 1" around the ding with sandpaper
3. Mix resin and Q-cell to a peanut butter consistency and fill the hole. For a shallow ding like that you don't need to catalyze the q-cell mix. The UV rays will get in there..
4. Sand the Q-cell / resin flush with the board
5. Put a small patch of fiberglass over the area about 1" bigger than the ding on all sides and laminate with resin and a squeegee
6. When cured lightly sand the edges of the fiberglass down so there is no hard edges.
7. Brush or squeegee more resin over the ding repair to seal it. You can leave it shiny or sand it if you want.
It's buckled. Won't surf the same again. But if
you want to fix it get 48 oz Resin
Research Epoxy and a yard of 4
oz
fiberglass. Mix the resin with Q-cell
to a peanut butter consistency to fill the void the buckle created. Strip
about a foot of glass from the area and re-glass. |
The best product for your SUP repairs is Resin
Research 2000 ULTRA Epoxy. It has UV inhibitors mixed in to prevent
yellowing from the sun. We
recommend the 2000 with Fast hardener but we also sell slow hardener if you
prefer. As long as you don't leave a lot of resin sitting in the mixing
bucket it will not heat up (called exotherm). Best to mix the resin and put it on the board, plenty of
working time to get the job done with a nice, strong, clear repair. Resin
Research is all we use for building and fixing surfboards here at the
shop. You want to add Q-cell to
the epoxy mix as a filler. It's strong and sands smooth. Q-cell is the
Industry standard repair filler. You can order the resin research and q-cell online and we'll
ship it to you immediately. |
Sorry, we do not do ding repairs.
Sorry we do not sell divinycel. Best we can do is 2# density EPS which is twice as dense and string as the .75-1.0 lbf density in your paddeboard (we used to repair Dolphin, Bennet, and Krackin prones every summer).
Yes. You can use epoxy on anything. Scratch up the surface well with 60 or 80 grit for a good bond to the existing fiberglass.
Note: You cannot use Polyester resin on an EPS (epoxy) board.
Yes you can just use Suncure on a small ding. Q-cell is for filling deep holes and then fiberglass over it...
Q-cell mixed in resin requires catalyst since the sun's UV rays will not penetrate and cure the resin. But you can just use the sun cure on surface cracks and small dings.
Note: Use Suncure and polyester resins with polyester boards only! Do not use on EPS (epoxy) boards
Yes you can absolutely refurbish an old surfboard. Lots of guys do it. The process is exactly how you describe.
You'll need 4 oz fiberglass, polyester resin, MEKP catalyst, Surfacing Wax, and Q-cell to repair the dings.
There are plenty of videos on YouTube showing the ding repair process
If you need more than 6 oz of resin for ding repairs you can either get an epoxy ding repair kit and a 6 oz kit of Resin Research Quik Kick for 12 oz total.
Another option is 48 oz Resin Research Quik Kick, a yard of 4 oz fiberglass, and a 32 oz tub of Q-cell powder.
You can certainly route the box out. The plastic is soft and will not kill the router bit. Make sure to remove the screws first!
But we prefer to dremmel the glass around the box flange and just pull it out... less stress than routing.
Install a fin in the box, rock it back and forth, and pull it out.
You can install a new finbox in the same hole without re-routing.
I have searched your website and love it! I recently buckled a slingshot kiteboard (2014 Trex). I have attached some pics showing the buckle. I am looking to get into board shaping and repair and I figure this would be a fun project to get my feet wet. What would you suggest for fixing this board? I am not super concerned about weight because I will most likely use the board with straps only as opposed to the punting strapless board that it once was (hence how it was buckled). I am thinking about using some Q cell to fill the break and then glass it with some carbon fiber. What do you think? Thanks for the info and help!
You can definitely fix that board and keep it alive.
Yep, sand the area with 80 grit first for a good resin bond and then fill with Q-cell and epoxy mix.
You can use carbon but regular 4 oz fiberglass will work fine too. I'd make the glass patch about 12" wide to strengthen the buckle area and wrap around the rails to the deck.
It is not necessary to install new stringers for a buckle but you certainly can if you want. It depends on the damage to the stringer. Here at the shop, when boards are snapped in half we install new support stringers but not with buckles. A nice wide piece of glass will do the trick.
Yes you can just use Suncure on a small ding. Q-cell is for filling deep holes and then fiberglass over it...
Q-cell mixed in resin requires catalyst since the sun's UV rays will not penetrate and cure the resin. But you can just use the sun cure on surface cracks and small dings.
Yes. You can use epoxy on anything. Scratch up the surface well with 60 or 80 grit for a good bond to the existing fiberglass.
Note: You cannot use Polyester resin on an EPS (epoxy) board.
Mix the UV resin and Q-cell to a "whipped cream" consistency and pour it in the hole. Let cure in the sun.
Sand the Q-cell down flush with the board.
Lay a piece of fiberglass over the ding about 1" larger than the ding for bonding to the fiberglass.
Pour UV resin on the fiberglass and squeegee around.
Lightly sand the edges of the fiberglass to fair into the board so there is no "lip" of glass
Brush more UV resin over the fiberglass patch and cure. Lightly sand the resin to smooth it out.
![]()
Yes, cut out the fiberglass in the hole and scratch up the surrounding fiberglass area with 60 or 80 grit sandpaper.
Sorry my friend. We do not offer a class like that.
The UV cure resin is a laminating resin but can be sanded. It is recommended to add Surfacing Wax for a shiney and easily sandable finish.
Also if filling a deep ding with Q-cell powder, mix MEKP catalyst in with the resin for full cure as the sun's UV rays may not penetrate all the way through.
For UV resin to cure it must be exposed to the sun's UV rays. UV rays bounce off the ground (concrete is best) but will cure faster if exposed to full sun.
Well the fin system you use in a wakesurf board really depends on the thickness of the last 10" - 12" of your shape and fin manufacturer preference.
Most surf-style wake surfboards (as would be built in our wakesurf board kit) have plenty of foam in the tail to use any fin system we carry, FCS or futures. Our kits include 5 fins boxes of your choice to ride as a twin, ti-fin, quad, or 5 fin. An example of the fin layout for a surf-style wakesurf board looks like this:
If you are building a "skim-style" wake surfboard they tend to be thinner (5/8" - 3/4" thick) and normally have one centerfin. In this case you would use a futures 1/2" box in the tail.
Another note on fin systems:
You can install fin boxes before or after glassing the board.
FCS X-2 plugs and Factory Plugs are installed after glassing and require a normal power drill, X-2 Holesaw bit. and quick set jigs.
Three other fin box options that are installed before fiberglassing your board are:
We also have FCS Fusion fin plugs which require a Fusion Install kit and trim router.
or
Futures Fin system which requires a Futures intstall kit with router
We recommend reading our Surfboard Building Guide and looking through the questions and answers in our HELP CENTER to learn what you need to know before ordering your materials.
Yes, surf-style wakesurf boards are pretty much smaller scale surfboards with different design characteristics for riding a boat's wake instead of a natural wave.
The materials used for wakesurf boards are exactly the same as surfboards. EPS foam and Epoxy resin is the most popular materials to build wakesurf boards because they are stronger than Polyurethane and Polyster resin boards.
Wakesurf boards are built the same was as surfboards as is fully described in our Surfboard Building Guide, Design Guide, and HELP CENTER answers
We'd go with a "Full Soft" Rail to keep more volume. You can slide it up and down the face of the wake easier too. If you want to do tricks like 180s and 360s you'll need the board to release more water so a "Pinched" Rail would do you nicely.
Multiply the vertical rail band dimensions on the rail band dimension sheets by 0.8 for a 2" thick board.
The knifey railband dimension will work but will track and stick in the wake more than a Boxy railband which will allow you to "slide" up and down a bit.
It is your choice which type of rail to shape for your wakesurf board (that's the beauty of building your own boards) but we recommend the Boxy Rails for wakesurfs...
We recommend Boxy railbands for your wakesurf board.
As far as speed, flat is fastest so a low rocker board is what you want to shape. Our wakesurf blanks are designed with a low rocker that does not need adjustment. Too much curve in the rocker will cause drag and slow you down.
Also, does your board have enough volume to float you? If you're sinking the board it will definitely slow it down. Don't be afraid to thicken the next shape for more float and you'll be able to spin much easier.
Volume is not a standard consideration for wakesurf boards since you're being pulled by the boat, not paddling. Surface area (length x width) is more important to maintaining trim in the wake...
Thickness is a personal preference (skim style is super thin, surf style is thicker, and everything in between). The shape of the rail on thicker boards will determine how reactive the boards is as a thinner rail will dig deeper into the wake and a thicker, more volume rail will "slide" up and down the wake face.
How to Build a River Surfboard
With our Engineered EPS Surfboard Foam, we recommend at least 2 layers of 6 oz fiberglass on the bottom for a River Surfboard, or to save weight 1 layer of 6 oz + 1 layer 4 oz S-2 glass on the bottom. The deck can be 6+6 or 6+4 depending on your board weight preference.