Surfboard Tail Design
TAIL SHAPE INTRO
Like most aspects of design, the shape of a surfboard’s tail is an extension of other design elements. Most importantly, tail shape is a direct continuation of a board’s rail line, but it is also closely tied to bottom contours, fin placement, foil, rocker, and rail profile. It is important to recognize that there is a synergistic effect among design elements – different design elements work together in a well-designed board, lending a concrete example to the phrase, “The whole is greater than the sum of its parts.” But the opposite can also be true. A poorly designed board does not take into account the fact that design elements can, at times, work against each other, and it does not take many waves to recognize when this has occurred! Tail shape is no exception. The shape of a board’s tail should be designed to work in concert with planshape, foil, rocker, bottom contours, and the like, so that a harmony is created between them, and the board’s design as a whole meets the conditions and expectations of the intended wave type and rider.
TAIL SHAPE BASICS

There is a sort of simplistic “conventional wisdom” and general consensus among shapers, about board tail shapes and how they effect performance - square tails facilitate square turns, and rounded tails facilitate round turns. The reason for this general statement has to do with the fact that the straighter outlines in the tail and the added surface area at the corners of a square or squash tail’s pod or block – the very end of the board, measured corner-to-corner perpendicular to the stringer - create more lift, thereby deflecting more water when the board is turned. The more water deflected, the faster and harder the turn, but the more force required to initiate the turn. Rounded tails, by contrast, have curvier outlines in the tail and no corners, allowing water to release from under the tail sooner and in a more diffused fashion, and therefore deflect much less water. Because water is shed from under the board earlier and more evenly along the rail of the rounded tail, turns become less snappy and more fluid, and require less force. While this “rule of thumb” is helpful, a more detailed look at what’s going on along the board’s last foot or so can give a better understanding of why tails work the way they do, and help the designer/shaper build a more finely tuned board, raising the performance bar a notch or two. A good place to start is with a quick overview of some basic tail shapes, and a simple explanation of what they are and how they differ.

The first three tail shapes can be discussed together, as they are generally straighter in rail template along the last foot of board. In terms of lift, the square tail, with its maximized surface area and hard corners, creates the most lift, followed by the rounded square, then the squash. With each progressive loss in lift, there is an increase in release. Square tails, of course, are simply…square. Used mostly on long boards and high performance short boards, the large square corners give the rider a lot of leverage and lift to pivot off of. The rounded square tail is basically a softened square tail with the corners rounded off. The feeling is very similar to the square tail. The squash is similar to the rounded square tail, except for the fact that the rounded square tail retains its flat, straight pod, while most squash tails have pods that are very slightly arched. By far the most popular tail, the squash provides what many feel is the ideal balance between lift and release - the shape produces sharp but fluid turns. The difference between these three tails, particularly the last two, can be subtle, and often only a matter of degree.

Full round tails, sometimes referred to as “thumb” tails, provide the most lift out of the curved tail designs. Release is smooth and diffuse along the rail, but the rail template is straighter in the full round tail than the next tail down the line – the rounded pin tail. Full round tails have curves that accelerate greatly near the pod, as the fuller outline and soft curves leading into the tail are rapidly pulled together into the arc of the completely rounded, “would-be” pod. The feeling can be very similar to the squash tail, but tends to produce smoother, more open turns. The rounded pin, however, pulls the tail template in much sooner, feeding into a pulled but curved tail shape with less curve acceleration where the rails converge. Due to the reduced planing surface of rounded pins, the back foot is placed further forward than would be placed on a squash or rounded square tail, making these tail shapes better suited for large, steep, hollow surf. The more parabolic curves of the rounded pin produce a soft rounded point, rather than a sharp point, found in true pin tails. True pin tails are reserved for big wave guns, as surface area and lift are severely minimized in an effort to focus on control and easy rail-to-rail transfer at top speeds.

There are also various cut-away tail shapes, all of which have portions of the pod removed in order to proved better release and less surface area, while maintaining straighter, more squash or square-like rail templates in the last foot or so. Swallow tails or mini-swallows have notches or wedges of foam removed in the center, creating two distinct points where the rail line ends. Diamond tails have the corners of what would be a square tail cut off, producing a diamond shaped tail block, that produces a shorter rail line than the board is long at the stringer. Bat tails or star tails have two semi-circular shaped sections removed from either side of the stringer, creating a tooth like point at the stringer, while crescent or moon tails have one semi-circle of material removed from the center, creating a bite-mark shaped swallow effect with two points at the rails’ end.
FISH TAILS

Deep swallow tails found on many retro fish designs, in both the twin fin and quad varieties, have what some refer to simply as fish tails. Good examples of these traditional fish-tailed templates are Al Merrick’s CI Retro Fish, Rich “Toby” Pavel’s Rainbow Fish, and Gordon and Smith’s Traditional Fish. The exaggerated swallow of these fish tails combine form with both function and aesthetics (as many tail shapes do), by allowing the shaper to maximize tail width and straighten rail templates behind the wide point, while reducing planing area, increasing responsiveness, and improving hold in steep portions of the wave. While there is a tremendous variety of dimensions among fish tails, and no hard and fast rules regarding the specs, a few simple formulas can be used to get consistent results that yield a true “fish feeling” among designs with varying tail widths. Simply put, the area of foam removed between the tips of the swallow equates to about 14% of the surface area of the last foot of board. This is a proven, functional ratio, whether intentional or unintentional, found on a number of “retro fish” designs. Combined with proper fin placement and tip shape, this design yields consistent, reliable results, true to the ride of the fundamental twin-keeled fish surfboards.
Given the desired tail width, shapers can use the following formulas to determine the tip-to-tip distance and depth of butt crack - the layman’s term used to describe the deepest point of the swallow measured from the stringer to the tips, as if you were extending the stringer all the way to the pod. So… if your basic board dimensions call for a 16 ½ inch tail, you can use the following formula to design a basic, functional fish tail:
1) Multiply your tail width by 3.23, then add 2.82 to that number.
ex. 16.5 x 3.23 = 53.295 + 2.82 = 56.115
2) Take the square root of that number, then add 1.68.
ex. The square root of 56.115 = 7.49 + 1.68 = 9.171
3) Divide that number by .749, and that is your tip-to-tip distance.
ex. 9.171 divided by .749 is 12.24. Or, 12 ¼ inches is your tip-to-tip distance.
To get your depth of crack, just multiply the tip-to-tip distance by .49.
ex. 12.25 x .47 = 5.75. Or, your crack should be 5 3/4 inches deep.
If you make your tip-to-tip distance 12 1/4 inches, and your crack is 5 3/4 inches deep, you’ll get a fish tail that works like a fish tail is expected to work, given proper fin placement and tip shape. You can tweak those numbers to fine-tune the design for rider preference, but these numbers are certainly within the “normal” range.
A second rule of thumb that has been used with great success over the years uses a board’s wide point, rather tail width, to determine tip-to-tip distance: make your tip-to-tip distance half of your wide point distance. So a 21-inch wide fish would have a tip-to-tip distance of 10 ½ inches. This method tends to pull the tips together, yielding less tail area overall than the first method, and can be used to facilitates more curve in the rail line through the tail than the first method, given the same tail width.

One observation that has been made comparing the two methods indicates that the first, which tends to produce a wider, deeper swallow tail and a straighter rail line through the tail, gives a board more traditional fish characteristics than the second method. The added curves and smaller, shallower swallows produced by the second method, while still certainly “fish,” move the design toward the true “twin fin” designs - the fish’s close cousin, refined further by Bob McTavish and Mark Richards in the late 70’s and early 80’s. True “twinnies” evolved from the smaller-swallowed fish, and employed wings, smaller fins, narrower noses, and later channels, in an effort to increase performance without losing the fish’s blazing speed and superior bite and hold. A few good examples of modern day fish/twin fins are the G&S Mini Fish, the Rawson Twin Fish, the MR Flying Fish, and the McTavish Twin Fish. These boards break away from the true retro fishes in that they add more curve in the tail, smaller (but still fish-like) swallows, and tend to be ridden an inch or two longer than their hard core fish counterparts. They also may or may not include a trailer or “stabilizer” fin, in combination with more modern bottom contours, rocker, and rail profiles.
ABOUT TIP SHAPE

Many designers rely on the “shaper’s eye” when templating the inside curves of a fish tail, and simply sketch out a curve that looks right. Others use existing curves that are easily accessible – if you look around your house or shop, you’ll find lots of objects with curves that might fit the objective… paint cans, pot lids, even garbage can lids have been known to be used for this purpose. Other shapers argue that the outside curve of the nose should be balanced with the inside curves of the swallow tail, and use the nose template to mark out the fish tail curves. All of these methods are certainly effective, but may yield some inconsistency, particularly if you’re trying to stick to a specific percentage of material removed. The following is one of perhaps an infinite number of simple methods that can be used on any width tail to produce a proven, functional design:
1) At the pod end of the board, make a mark ½ the distance between the tip and the stringer. Connect that mark with the depth-of-crack mark with a pencil line, and cut along that line.
2) Repeat this process for the other side. You should have a perfect triangle of material removed from the pod, with the height of the triangle the desired crack depth.
3) Make a mark that divides the remaining pod (the soon to be swallow) in half, and measure the distance between that mark and the corner of the triangle of material you’ve just removed.
4) Make a mark up the inside of the swallow the same distance, and connect the two marks. Essentially, you are cutting a second triangle of material off the inside corner of the swallow. Do the same to the other side.
5) Round off the remaining corners, leaving the tips sharp, but creating a smoothly accelerating curve from the stringer to the corner of the tip.
The resulting swallow shape will not only remove the desired 14% of material from the shape, but will also create a functional design – the straighter lines of the deepest part of the crack provide greater and more even release than a continuous curve carried from the stringer to the tip. The more release, the more responsive the shape, as water is allowed to quickly exit from under the board down the middle, shifting the center of the turn’s axis toward the rail. This allows the tip to penetrate slightly deeper, improving bite and hold. Meanwhile, the fuller tip area toward the pod provides fin-like projection through the turn, as water more is deflected by the relatively larger surface area.
Tail Shape in Relation to Rail Line and Surface Area

It has been said that there are only two basic types of tails – square tails and pintails – and all other tail shapes are just variations of these two. If the designer considers how a tail shape relates to rail line and surface area, there is a great deal of truth to this concept. Square tails maximize surface area at the end of the board, while pintails minimize it. All other tail types – squash, round, swallow, etc. make critical adjustments in surface area, while allowing the shaper to maintain the desired rail line. For example, if the design is intended to have a straighter, more parallel rail line through the middle of the board that maintains volume and surface area all the way back to the tail, a more squared tail would be ideal, as this tail shape accommodates straighter lines in the aft section more naturally. However, if more curve is put into the rail line through the middle, particularly from a widepoint that is behind center, the rail curve is extended and elongated all the way through the tail, and a more flowing, curvy rounded tail shape would be the call. Finally, if the shape is intended to minimize surface area in the tail, as seen in many designs that call for the widepoint to be pushed forward, a more pin-like tail would make the most sense, as this tail shape minimizes not only curve in the tail, but surface area and volume as well.
In all three examples above, the tail shape that most naturally complements the rail line was chosen. The purpose of matching tails and template has to do with how water along the rail moves. The curves of a board’s planshape through the middle are designed to provide adequate width for the intended conditions, but also to allow the template outline to flow smoothly as to minimize transitions along the curve. In other words, the chosen tail shape should be an extension of that smooth, flowing curve, so that the appropriate tail width can be accommodated without creating unintended release points along the rail.
For the sake of illustration, let’s consider a 6’2 modern fish shortboard that has a wide point of 20 inches at the midpoint, and more parallel rails that running through the middle third of the board. It would be difficult to bring that parallel planshape back to, say, a 14 inch rounded pintail without adding an exaggerated curve in the back third, or without some kind of hip or bump. The combination of a parallel rail line through the mid section, and an overly curved rail line toward the tail, would work in opposition to one another, as the parallel rail maintains a greater surface area and enhances trim and projection, while the accentuated curve in the tail reduces surface area and enhances release.
A more natural, complementary tail shape, and one you find often on modern fish designs, would be a mini swallow tail – basically a square tail with a notch cut out for bite and release behind the trailing fin. This tail shape accommodates the straighter rail lines through the middle of the planshape more naturally. An alternative to the swallow would be a full round tail. Again, the straighter, more parallel rail curves would lead naturally into the full, subtle curves of the round tail as they do a square tail. The difference would be that the corners of the square tail would be rounded off considerably, pulling the majority of the tail’s release back to the very end of the board behind the trailing fin.
EFFECTIVE RAIL
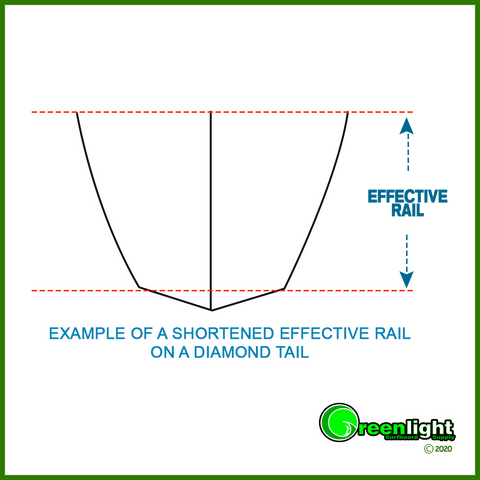
Another aspect of rail line has to do with the length of effective rail – the length of rail that has the primary function of providing hold and directional stability, rather than release. Simply put, shorter effective rail lengths result in shorter turning radii, all other design elements being the same. It is clear to see how diamond tail, for example, provides a shorter effective rail length than a square tail, as the point of the diamond extends beyond the corner of the rail. The same is true, but to a lesser degree, with squash tails and rounded tails when compared to swallows, crescent, or bat tails. The latter three extend and straighten the rail line compared to the rounded off corners of the squash, thumb and round tails. It his helpful to understand that any rail behind the back foot becomes a lever, with the foot acting as the fulcrum. The longer the lever, the more water it will push when turning on a rail. Shortening the rail allows water to release from under the board sooner, reducing resistance, and allowing the board to flow around a tighter arc. While this may sound complicated, chances are you’ve known this all along… which way do you move your back foot right before you do a snap, forward or back?
TAIL SHAPE AND FOIL
The relationship between tail shape and foil is primarily a matter of volume management. Measured at 12 inches up from the end of the board, designs that incorporate a thickly foiled tail (typically greater than 1 ½ inches) maximize volume under and behind the rider’s back foot. Such designs, used extensively in boards built for small or weak surf, bring added buoyancy to the aft section of the board, increasing drive and wave catching ability. The added buoyant volume behind the back foot serves as leverage to push against, aiding in the ability of the rider to pump for additional speed in the mush. But the trade-off is a lack of control at speed, as the increased volume causes the board to plane higher, all other factors being equal, forcing the rider to apply deliberate pressure with the back foot in an effort to initiate a turn. This type of turn tends to scrub off speed as the turn is initiated with more of a stomping, or stalling motion. But in small or weak surf, the idea is to conserve or generate speed, rather than reduce it, so the added volume under and behind the back foot makes sense.
One solution to the problem of thicker tails on boards designed for better waves is to add a release feature to the tail that allows water to escape from under the board sooner when planing at speed. From a purely functional perspective, it is be better for water to be released from along a high volume tail’s rail line, rather than its middle, so a bumped or hipped squash tail might be chosen over a swallow or other “cutout” type tail. The choice to provide release along the rail rather than from the stringer has to do with what many refer to as the “biting” effect a swallow tail provides, and the fact that a swallow tail lengthens the board’s effective rail line all the way to the board’s end. By contrast, the rounded corners of the squash, at least to some degree, shorten the effective rail line, helping to create a tighter turning radius. In addition, the biting corners of a swallow tend to penetrate deeper into the water than the rounded corner of a squash, as the leverage of the lengthened rail forces the tip of the tail further into the water than the corner of a squash would be pushed with the same amount of force.
Thinly foiled tails (typically 1 ½ inches or less) are commonly found on boards designed for larger or hollower waves, or on longboards, particularly high performance longboards or noseriders. The reduced volume of the tail, along with a more thinly foiled rail around the perimeter of the tail, increases control by allowing the tail to penetrate deeper into the water than a tail with more volume. In shortboards designed for bigger surf, the reduced tail volume and deeper penetration has a similar effect as reduced planing area (more pulled tail templates, or tails with cutout features) - the tail helps control speed through deeper penetration into the wave face, adding stability and minimizing the “skipping stone” effect. On performance longboards and noseriders, the reduced tail volume gives the rider the ability to sink the tail deeply on more radical turns, pushing the limits of the design to the fullest, even with minimal energy from the wave. Under these conditions, the overall volume of the board and added rail length helps keep the board from bogging even in small or weaker surf, while maintaining the ability to pivot the board hard off the tail. Similarly, noseriders utilize thinned tails, in combination with large fins, rolled bottoms and soft rails (more on these matters later), in an effort to keep the tail deeply engaged in the wave, while allowing the nose to continue to plane along the water’s surface even while weighted.
What would be considered a “thick” tail compared to a “thin” tail is subjective and really a matter of personal preference. In addition, the shape and volume of the rail in the tail has a great deal to do with how a given tail foil performs. Still, it may be helpful to have some point of reference when designing a board for a given rider or set of conditions. The following are what many would consider typical tail thicknesses for given designs:

TAIL SHAPE AND ROCKER
As discussed earlier, any upward curve in rocker behind the midpoint creates drag through “suction.” This is particularly true in the last foot or so of rocker, where the kick in the tail is an acceleration of the rocker curve. Due to the Coanda Effect, water hugging the upturned curve of the tail creates an area of slightly lower pressure under and behind the curve, resulting in drag and turbulence. The amount of drag created is directly proportional to two factors – kick and surface area. Tails with a large amount of kick create a large amount of drag because the greater the curve, the lower the pressure. Similarly, the larger the surface area, the greater the volume of water in contact with the curve, the greater the total amount of suction created.
It stands to reason, then, that more pulled in tail shapes, such as pins, rounded pins, and deep swallows, create less drag than fuller tail shapes, such as full round tails, square tails, or even squash tails with wide pods. The job of the shaper is to determine what amount of drag is desirable in a given shape, and select a tail shape that, when combined with the appropriate tail kick, will achieve the desired characteristics. It is not uncommon, for example, for a noserider longboard to have both an exaggerated tail kick and a square tail in order to maximize suction, while a twin keeled, deep swallow retro fish would have very little tail kick and minimal surface area at the end of the board in order to minimize suction and maximize down-the-line speed. But the equation becomes more complicated when you begin to factor in what you need in terms of rocker for turning. At this point, the shaper begins to manipulate bottom contours and fin arrangements to achieve desired results – something that will be discussed in coming chapters.
Continue to Learn More About:
SURFBOARD ROCKER & FOIL DESIGN
SURFBOARD TAIL DESIGN
SURFBOARD RAIL DESIGN
SURFBOARD BOTTOM CONTOUR DESIGN
SURFBOARD FIN DESIGN