Greenlight's Surfboard Building Philosophies #10 Trouble Free Epoxy Glassing Tips
It looks like glassing your boards with epoxy resin has become the more popular choice over polyester resin based on our records this year. Years ago we had plenty of experienced poly guys come into the shop stating they’ll never use epoxy for one reason or another. Today most of them have added epoxy to their skill set and some of them now say “I’ll never use polyester resin again! It stinks, it’s weak, it’s hazardous… epoxy’s so much nicer to work with.”
Notice I used the words skill set to describe the act of using epoxy. Skill comes from knowledge and experience. So here’s a little more epoxy knowledge to help elevate your epoxy game.
The Golden Rule of Epoxy #1 - MEASURE Epoxy Resin ACCURATELY
For years I’ve been telling people this little anecdote about epoxy to help them understand the importance of measuring epoxy thoroughly:
“Pretend the resin and hardener molecules are dancing at a party in the mixing bucket. You want everyone to hold hands, that is where the strength is (this is called cross-linking). Anyone who is not paired up is floating in there, useless, in the way, and causes a soft spot in the cure. So an accurate mix ratio is critical to ensure everyone is holding hands and there are no extra stragglers screwing up a fun party.”
The epoxy systems we sell, Resin Research and Greenlight Marine Grade Epoxy are both measured and mixed at a 2 parts Resin to 1 part Hardener mix ratio by volume (in a graduated mixing bucket).
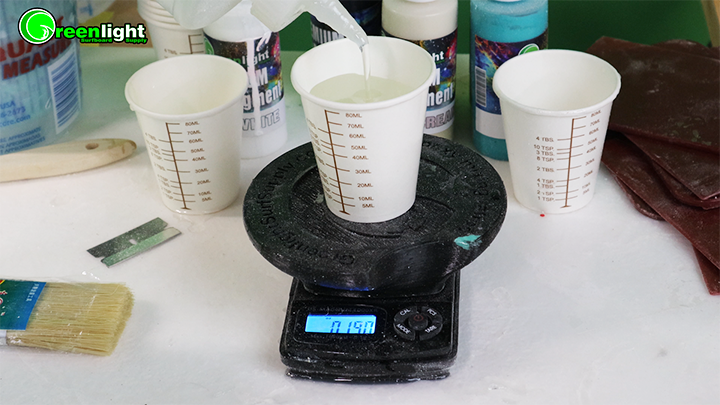
But to be the most accurate and have a full, durable cure to the epoxy it is best to measure by weight with a digital scale.
Greenlight Marine Grade Epoxy Resin System is mixed at a 2.2 parts Resin to 1 part Hardener by weight (100 parts resin : 45 parts Hardener to be more specific)
Greenlight has used and evaluated many different types of digital scales over the since 2010 and now offers the most accurate, reliable, and affordable digital epoxy scale on the market.
The Golden Rule of Epoxy #2 : MIX Epoxy Resin THOROUGHLY
Now that you have all the epoxy molecules measured out precisely, it is important to mix the resin thoroughly so all the party-goers get to mingle and find a partner to join hands with.
We recommend slowly mixing the resin for at least 1 minute and be sure to scrape the sides, corners, and bottom of the mixing bucket to pull the viscous resin off the walls.
We’ve received far too many emails with first time epoxy users saying they have a soft spot on the board or “it didn’t cure”. This is always from bad measuring and mixing habits as the resin sticks to the sides and bottom of the bucket and has not cross-linked with the hardener molecules!
Perfect Epoxy Seal Coats:
Best tip we can give for a flat and smooth epoxy seal coat is to lay it down and walk away! Don’t screw with it! Let it flow out and lay flat over time.
Few things I can tell you about seal coating technique.
-
Mix the resin slowly and do not dip the mixing stick in and out of the resin, this will introduce air into the resin and make it a little cloudy. Same thing happens when you “whip” the epoxy up. We want to keep the air out for the least amount of bubbles.
-
Another way air gets trapped in seal coats is by plowing the resin too much with the brush. Notice how when the epoxy rolls over itself how it tends to froth up? Avoid that. Just lay a fat bead of resin down the center of the board and plow it out with one stroke them move to one side and continue to plow it out towards the rails, while adding more fat resin beads as needed. Try not to let the brush go over the same spot more than twice.
-
Cross stroke gently, it’s just helping to even out the resin distribution on the board, keep as much resin on there as possible.
-
Walk out or “tip out” even lighter than the cross strokes. Just let the weight of the brush level out the cross stroke marks and wipe the resin off the brush into the mixing bucket after every stroke.
-
THEN WALK AWAY! You’re done for now! (See Golden Rule #3)
-
About 10-15 minutes later come back and check it for anything funky going on like pin holes, fish eyes, or separations on the seal coat.
I recently glassed a board for myself outside in the worst conditions, didn’t blow the lamination off or clean with Denatured alcohol, just a quick brush off as an experiment to see how bad the fisheye and pinhole situation would be (and also an opportunity to figure out the best fix for seal coat problems). I followed the instructions I wrote above and guess what? Only 2 small issues after 10 minutes of the resin flowing out and settling (other than a couple bugs landing on the board but that gives it back yard board character).
I had 2 fish eyes (separations) so I simply dipped a gloved finger into the mixing bucket (resin is still flowable and not hardened) and gently swirled it on the separated area. It connected with the existing seal coat and filled the void and still had time to flatten and bond nicely.
Separations in the seal coat is a epoxy surface tension issue. I just put a little resin where it needed to be to fix the issue.
So I guess the GOLDEN RULE of Epoxy #3 is:
Walk away, then come back and fix any little issues
Also, not a golden rule but a great tip:
Pull your seal coat rail drip masking tape after the resin has tacked up (30 mins - 1 hour depending on temperature)
This will eliminate the masking tape from getting trapped under the resin and having to spend extra time picking pieces of tape off the rail.
It’s OK to leave the tape on the board after the seal coat has cured if time doesn’t permit pulling that tape earlier. Just use a razor blade to scrape the tape off the board, it’s much easier than picking it off.
Epoxy in the wintertime...
Now that we're getting into the winter months and the temperatures are dropping you'll find the resin component thicken up and possibly freeze into a solid if not stored at room temperature. We recommend heating the resin up in a bath of hot water or ever microwaving it for 2-3 seconds per ounce before adding the hardener. This will make the resin flow nicely and cure faster. Be sure not to let it exotherm in the mixing bucket though! Get it out on the board.
Also, it's super helpful to have your shaped blank warmed to room temp too. Having a warm blank will prevent the thermal shock of pouring warm resin on a cold blank as well as help pull the resin into the foam when both cool and contract at the same rate.
A small radiator heater works great to elevate your workspace and foam blank temperature in the winter time.